Learn to create an automated system that transforms product images into user-style marketing videos using OpenAI Vision for analysis, Google Gemini 2.5 Flash for image generation, and Vertex AI Veo 3.1 for video creation and, Motia's backend framework for orchestration.
What we'll be building
In this tutorial, we will build an automated UGC video system that transforms product images into user-generated content videos, perfect for social media campaigns and advertising.
The complete system will include:
- Image Upload API - REST endpoint that accepts product photos and triggers the generation pipeline
- AI Vision Analysis - Extracts brand name, colors, typography, and product style using OpenAI Vision (Python step)
- Variant Generation - Creates multiple versions with different camera angles, lighting setups, and compositions
- Image Creation - Generates realistic product shots in various styles using Google
Gemini 2.5 Flash - Video Production - Creates authentic user-style marketing videos with
Vertex AI Veo 3 - Cloud Storage - Automatically uploads all generated images and videos to Box for team access
By building this system, you'll learn how to:
- Build event-driven workflows where each step automatically triggers the next through Motia
- Create multi-language pipelines that combines
TypeScriptandPythonbased on what each task needs - Integrate multiple AI models (OpenAI Vision, Gemini, Veo 3) in a single automated system
- Handle async AI operations with polling patterns for long-running video generation
- Chain AI outputs from one model as inputs to another for complex workflows
- Store and manage generated media assets in cloud storage automatically
This project showcases Motia's ability to combine TypeScript and Python in the same workflow. Step 2 (Vision Analysis) is written in Python to leverage OpenAI's Python SDK, while the other steps use TypeScript. They communicate seamlessly through events emission, each step doesn't know what language the others use.
Prerequisites
To follow along with this tutorial you will need:
1. OpenAI API Key
For vision analysis and intelligent prompt generation.
- Get your API key here
- Free tier includes $5 in credits
2. Google Cloud Account
You'll need two services enabled:
Gemini API - For AI image generation
- Get your Gemini API key
- Free tier: 60 requests per minute
Vertex AI with Veo 3.1 - For video generation
- Enable Vertex AI
- Requires billing enabled (pay-per-use)
- Set up authentication
- Google Cloud account with:
- Gemini API key for image generation - Get started
- Vertex AI enabled for Veo 3 video generation - Enable Vertex AI
3. ImageKit Account
For hosting and transforming generated images.
- Sign up for free
- Free tier: 20GB bandwidth/month
4. Box Account
For cloud storage of generated videos and images.
- Create free account
- Free tier: 10GB storage
Getting Started
Creating New Motia Project
Initialize a new Motia project using the command below:
npx motia@latest create
This command launches the Motia Project Creator, an interactive CLI that walks you through setting up your project. Select Typescript as the base template an enter a project name. This creates a new Motia project with the following structure:
ugc-workflow/
├── .cursor/
├── node_modules/
├── src/
├── steps/              # Your workflow steps go here
├── .gitignore
├── motia-workbench.json
├── package-lock.json
├── package.json        # Dependencies
├── tsconfig.json
├── tutorial.tsx
└── types.d.ts
Refer here to learn more about QuickStart to get up and running with a new Motia project.
Install Dependencies
Install the required packages for this project:
npm install axios @google/generative-ai form-data google-auth-library
What each package does:
axios- HTTP client for API calls@google/generative-ai- Google Gemini SDK for image generationform-data- For uploading files to ImageKit and Boxgoogle-auth-library- Auto-refresh tokens for Vertex AI
Configure Your Environment
Create a .env file in the project root:
# OpenAI (for Vision Analysis)
OPENAI_API_KEY=your_openai_key_here

# Google Gemini (for Image Generation)
GOOGLE_GEMINI_API_KEY=your_gemini_key_here

# Google Vertex AI (for Video Generation)
VERTEX_PROJECT_ID=your_gcp_project_id
VERTEX_ACCESS_TOKEN=your_vertex_access_token

# ImageKit (for Image Storage)
IMAGEKIT_PRIVATE_KEY=your_imagekit_private_key
IMAGEKIT_PASSWORD=your_imagekit_password

# Box (for Final Storage)
BOX_ACCESS_TOKEN=your_box_access_token
BOX_ROOT_FOLDER_ID=0
Start the Development Server
Run your Motia project:
npm run dev
This will start your development server at port 3000.

Navigate to http://localhost:3000 in your browser. You'll see the Motia Workbench interface where you can:
- View your workflow steps as they're created
- Monitor event flow between steps
- Test your API endpoints
- Debug issues with detailed logs

Right now, you'll see a sample pet store workflow with example steps. We'll replace these with our UGC video generation steps. Let's start building!
Step 1: Create the Image Upload API
What We're Building
In this step, we will create an API endpoint that receives a product image URL and triggers the entire UGC video generation workflow. This is the entry point that starts the automated pipeline.
Why This Step Matters
Every workflow needs an entry point. In Motia, API steps serve as the gateway between external requests and your event-driven system. By using Motia's api step type, you get automatic HTTP routing, request validation, and event emission, all without writing boilerplate server code.
Think of this step as the "start button" for your video generation factory. When someone hits this endpoint with a product image, it validates the input, generates a unique tracking ID, and emits an event that triggers the next step in the pipeline.
View the complete Step 1 code on GitHub →
Create the Step File
In your project, create a new file at steps/01-image-upload.step.ts:
import { z } from "zod";
import { ApiRouteConfig, Handlers } from "motia";
import axios from "axios";

const ImageUploadInputSchema = z.object({
  numVariations: z.number().default(1),
  imageUrl: z.string().url(),
});

export const config: ApiRouteConfig = {
  type: "api",
  name: "ImageUploadAPI",
  description: "Upload image URL and trigger UGC video generation workflow",
  path: "/ugc/upload",
  method: "POST",
  bodySchema: ImageUploadInputSchema,
  emits: ["image.uploaded"],
  flows: ["ugc-generation"],
};

export const handler: Handlers["ImageUploadAPI"] = async (
  req,
  { logger, emit }
) => {
  const requestId = `ugc_${Date.now()}_${Math.random()
    .toString(36)
    .slice(2, 11)}`;

  logger.info(`ImageUploadAPI Step – Starting image upload process`, {
    requestId,
    body: req.body,
  });

  try {
    const { imageUrl } = req.body;
    const numVariations = req.body.numVariations ?? 1;

    logger.info(`Validating image URL`, { requestId, imageUrl });

    // Validate URL is accessible
    await axios.head(imageUrl, { timeout: 5000 });

    logger.info(`Starting UGC workflow`, { requestId, numVariations });

    await emit({
      topic: "image.uploaded",
      data: {
        requestId,
        imageUrl,
        numVariations,
        timestamp: new Date().toISOString(),
      },
    });

    return {
      status: 200,
      body: {
        message: "UGC workflow started",
        requestId,
        status: "processing",
      },
    };
  } catch (error: any) {
    logger.error(`Failed to process image URL`, {
      requestId,
      error: error.message,
    });

    return {
      status: 400,
      body: {
        error: error.message || "Failed to validate image URL",
        requestId,
      },
    };
  }
};
Let's break down the key parts:
Input Validation
const ImageUploadInputSchema = z.object({
  numVariations: z.number().default(1),
  imageUrl: z.string().url(),
});
Zod automatically validates that imageUrl is a valid URL and sets numVariations to 1 if not provided. Invalid requests fail before entering your workflow.
export const config: ApiRouteConfig = {
  type: "api",
  path: "/ugc/upload",
  method: "POST",
  emits: ["image.uploaded"],
};
type: "api" makes this an HTTP endpointemits: ["image.uploaded"] declares this step triggers the next step via events- Motia handles all the routing automatically
Request ID Generation
const requestId = `ugc_${Date.now()}_${Math.random().toString(36).slice(2, 11)}`;
This creates a unique ID to track this request through all 6 steps. Essential for debugging and monitoring.
URL Validation
await axios.head(imageUrl, { timeout: 5000 });
This fails the request very fast if the URL is broken. Prevents wasting compute on invalid URLs before triggering expensive AI operations.
Event Emission
await emit({
  topic: "image.uploaded",
  data: { requestId, imageUrl, numVariations, timestamp: new Date().toISOString() }
});
This is how steps connect in Motia. Publishing this event triggers Step 2 (Vision Analysis), which subscribes to image.uploaded.
Testing the Endpoint
Save the file. Motia will automatically detect and register your new endpoint.
In your terminal, you should see:

The warning is expected, we haven't created Step 2 yet, which will subscribe to the image.uploaded event.Open the workbench at http://localhost:3000. You'll see the endpoint node registered in the workflow graph:
Click on the Endpoint tab, select the /ugc/upload endpoint, enter an image URL and number of variations, then click play icon to test the endpoint.
You'll see the request logs in the Logs tab at the bottom. The Preview panel shows the successful response with 200 OK status and your requestId. This confirms Step 1 is working correctly.
You'll see the workflow stops here because Step 2 doesn't exist yet. Let's create it next.
Event Connection to Next Step
Here's how this step connects to Step 2:
┌─────────────────────────┐
│   Step 1: Upload API    │
│   (01-image-upload)     │
└───────────┬─────────────┘
            │
            │ emits: "image.uploaded"
            │ data: { requestId, imageUrl, numVariations }
            ▼
┌─────────────────────────┐
│ Step 2: Vision Analysis │
│ (02-vision-analysis)    │
│ subscribes: ["image.uploaded"]
└─────────────────────────┘
Steps communicate through events, not direct function calls. Step 1 doesn't know Step 2 exists, it just publishes an event. Step 2 subscribes to that event and processes it independently.
Step 2: Analyze Product Image with OpenAI Vision
In this step, we are creating an event handler that listens for the image.uploaded event and uses OpenAI's GPT-4 Vision API to analyze the product image. It extracts brand name, colors, typography, product details, and visual style, all the metadata needed to generate realistic UGC content.
Why This Step Matters
To create authentic UGC videos, we need to understand the product's brand identity. OpenAI Vision can analyze an image and extract details like brand colors, font styles, and product characteristics that would take hours to manually catalog. This data flows to the next steps to ensure brand-consistent content generation.
This step is written in Python while the others use TypeScript. Motia supports multi-language workflows. OpenAI's Python SDK offers better type support for Vision API, so we use Python here. The steps communicate seamlessly through events regardless of language.
Create the Step File
Create a new file at steps/02-vision-analysis_step.py:
Full source code available for reference: View the complete Step 2 code on GitHub
Let's break down the key parts:
Event Configuration
config = {
    "type": "event",
    "subscribes": ["image.uploaded"],
    "emits": ["vision.analyzed"],
}
This step listens for the image.uploaded event from Step 1 and emits vision.analyzed when done. Event-driven architecture means Step 2 automatically runs when Step 1 completes.
Vision Prompt Engineering
vision_prompt = """Analyze the given image and return ONLY a compact JSON object..."""
The prompt is structured to extract specific brand elements in a consistent JSON format. We explicitly request no markdown or extra text to avoid parsing errors. The schema defines exactly what data we need for generating UGC content.
OpenAI Vision API Call
payload = {
    "model": "gpt-4o",
    "messages": [
        {
            "role": "user",
            "content": [
                {"type": "text", "text": vision_prompt},
                {"type": "image_url", "image_url": {"url": image_url}},
            ],
        }
    ],
}
GPT-4o's vision capabilities analyze the image and return structured data. We pass both the prompt and image URL in the same message, letting the model "see" the product and extract brand details.
Response Cleaning
# Remove markdown code fences if present
if cleaned_analysis.startswith("```"):
    cleaned_analysis = cleaned_analysis.split("\n", 1)[1]
Sometimes GPT-4o wraps JSON in markdown code blocks. This cleanup ensures we can always parse valid JSON, making the step more robust.
Data Normalization
normalized_data = {
    "brand_name": vision_analysis.get("brand_name", "Unknown Brand"),
    "product": vision_analysis.get("product", "Unknown Product"),
    # ... defaults for all fields
}
Provides fallback values if Vision API misses any fields. Ensures downstream steps always receive complete data, preventing crashes from missing properties.
Color Extraction
normalized_data["primary_color"] = palette[0]["hex"] if len(palette) > 0 else "#d89c94"
Extract the top 3 colors from the palette for easy access. These colors are used in Step 3 to generate brand-consistent image variants.
Testing the Step
Save the file. Motia will automatically register the Python step.

If you see the warning - Could not determine Python version directory, create a requirements.txt file at the root directory and add these dependencies
google-generativeai==0.8.3
aiohttp==3.10.0
Pillow==10.4.0
Then run pnpm motia install. This will create and activate python virtual environment. It also installs the dependencies. Initialize the server again with pnpm run dev.

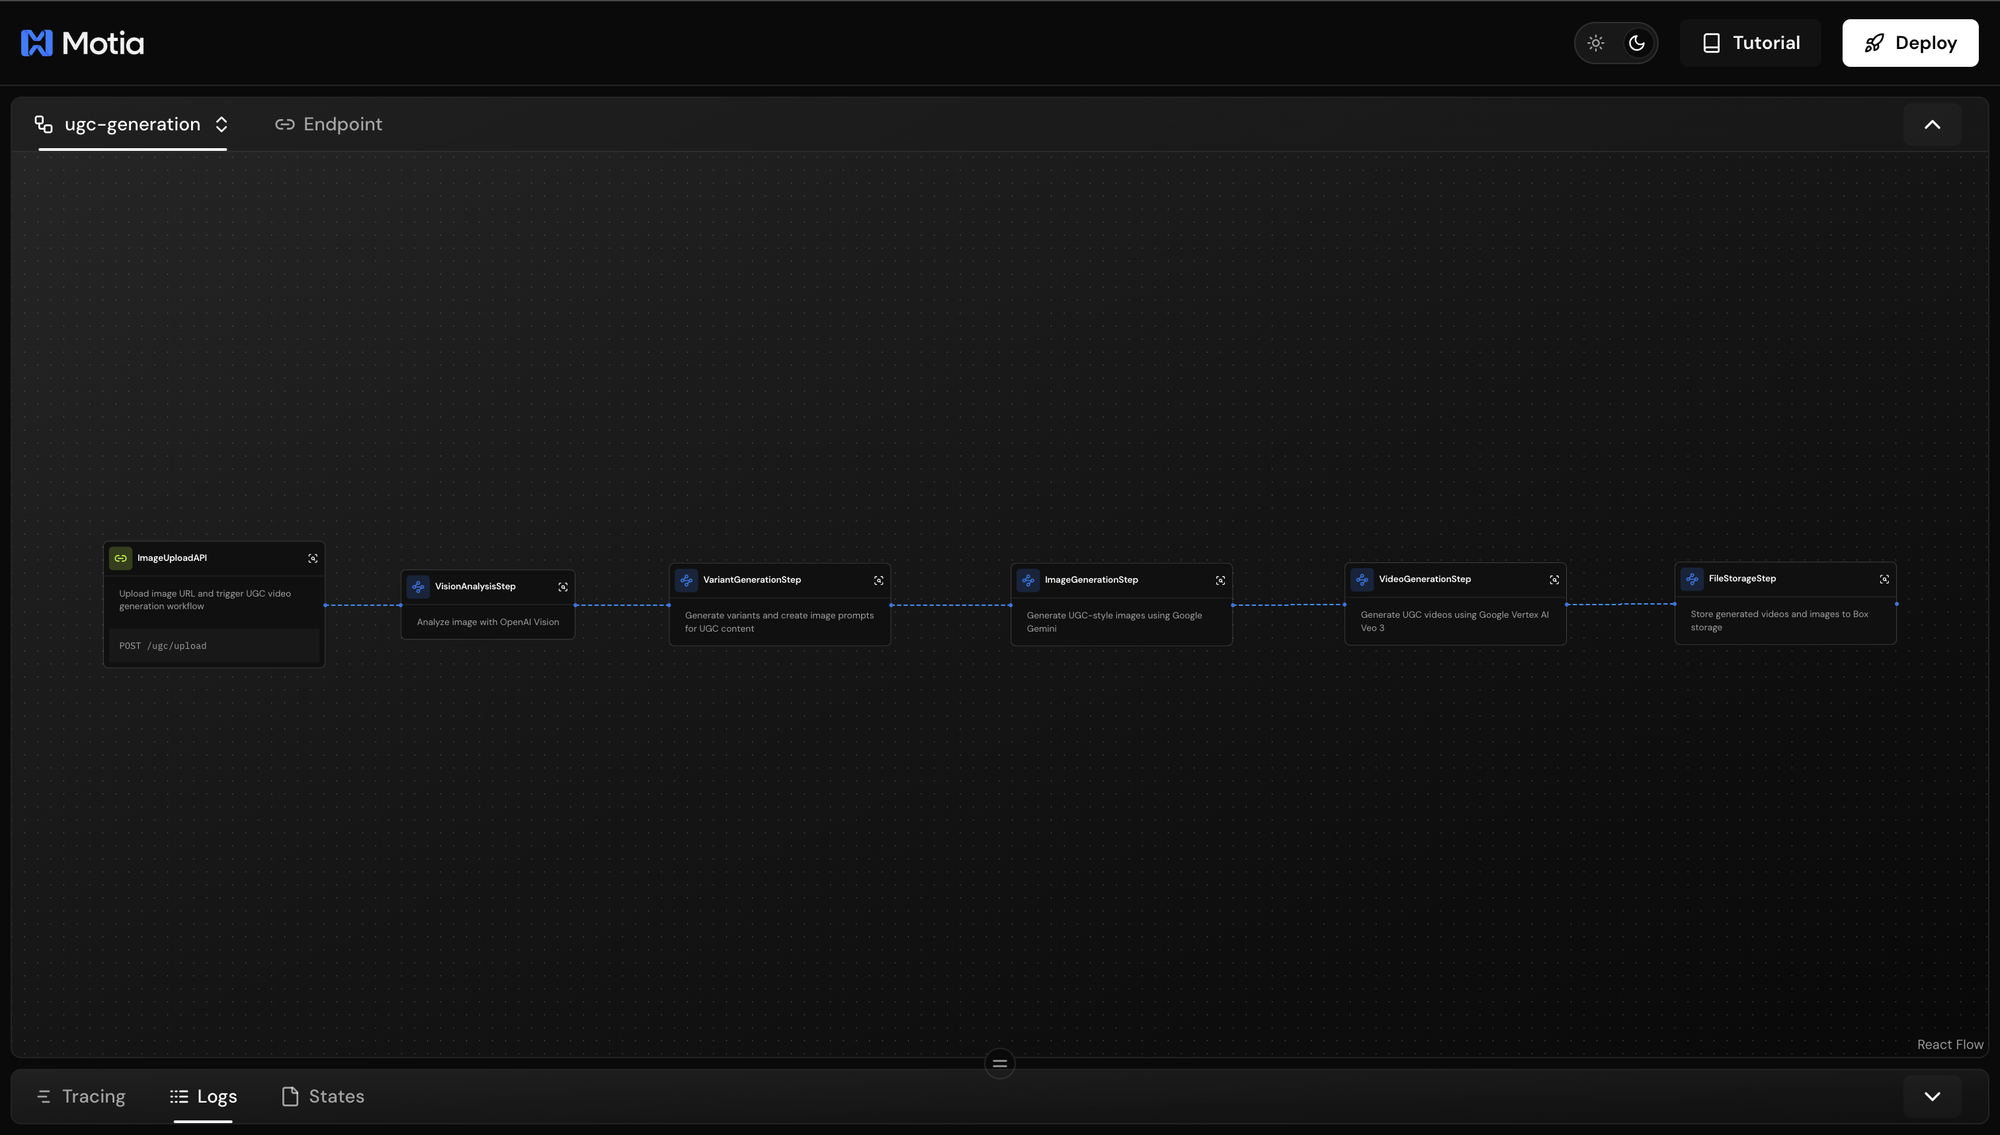
In the Motia Workbench, you'll see both ImageUploadAPI and VisionAnalysisStep nodes connected by the image.uploaded event.
Send another request to Step 1. In the workbench logs, you'll ImageUploadAPI and VisionAnalysisStep steps being completed.
The workflow will stop after Step 2 because Step 3 doesn't exist yet. You'll see a warning about vision.analyzed having no subscriber. This is expected.
Event Connection to Next Step
Here's how this step connects to Step 3:
Step 1: Upload API
    │
    │ emits "image.uploaded"
    ▼
Step 2: Vision Analysis
    │
    │ emits "vision.analyzed"
    │ data: { requestId, imageUrl, visionAnalysis, numVariations }
    ▼
Step 3: Variant Generation
    subscribes to "vision.analyzed"
Step 2 receives the image URL, analyzes it, and passes the brand data forward. Step 3 will use this data to create multiple image variants with different styles.
Step 3: Generate Image Variants
In this step, we are creating an event handler that takes the vision analysis from Step 2 and generates multiple image variants with different camera angles, lighting setups, and compositions. Each variant becomes a unique image prompt ready for AI generation.
Why This Step Matters
One product photo shouldn't produce identical videos. This step creates diversity by generating variants with different perspectives (top-down, eye-level, three-quarter angle) and lighting styles (natural daylight, studio light). Each variant gets its own detailed prompt, enabling Step 4 to create visually distinct UGC content from a single source image.
Create the Step File
Create a new file at steps/03-variant-generation.step.ts:
Full source code available for reference: View Step 3 source code
Let's break down the key parts:
Input Schema Validation
const VariantGenerationInputSchema = z.object({
  requestId: z.string(),
  imageUrl: z.string(),
  visionAnalysis: z.object({
    brand_name: z.string(),
    primary_color: z.string(),
    // ... full vision analysis structure
  }),
});
This schema validates the complete vision analysis data from Step 2. Ensures all required brand metadata is present before generating variants.
Camera Angles and Lighting Arrays
const cameraAngles = [
  "top-down flat lay",
  "three-quarter product angle (30°)",
  "angled overhead (15° tilt)",
  "eye-level hero shot",
];

const lightingStyles = [
  "soft natural daylight",
  "bright, even daylight",
  "diffused window light",
  "soft studio light with diffuser",
];
Here, we pre-define the arrays ensure variety across variants. Using modulo (i % array.length) cycles through options, so requesting 10 variants will use each angle/lighting combination multiple times.
Image Prompt Construction
const imagePrompt = `emotion: confident and natural
action: product naturally displayed in casual setting
character: ${visionAnalysis.character}
product: ${visionAnalysis.brand_name} ${visionAnalysis.product}
camera: ${angle}, amateur phone snapshot style
lighting: ${lighting}, soft shadows, no harsh reflections
color_palette: primary ${visionAnalysis.primary_color}
text_accuracy: preserve all visible product text exactly`;
This structured prompts gives AI models clear instructions. Each line specifies a different aspect (emotion, camera, lighting, colors) that Gemini will use to generate the image. Brand colors from Step 2 ensure consistency.
Variant Object Structure
const variant = {
  variant_id: i + 1,
  image_prompt: imagePrompt,
  camera_angle: angle,
  lighting: lighting,
  brand_colors: {
    primary: visionAnalysis.primary_color,
    secondary: visionAnalysis.secondary_color,
  },
  product_info: {
    brand_name: visionAnalysis.brand_name,
    product: visionAnalysis.product,
  },
};
Each variant is a complete package of metadata. Step 4 receives everything needed to generate an image without referencing the original vision analysis.
Parallel Event Emission
for (const variant of variants) {
  await emit({
    topic: "variants.generated",
    data: { requestId, variant, visionAnalysis }
  });
}
Parallel Event Emission emits each variant separately enables parallel processing. If you request 3 variants, Step 4 runs 3 times simultaneously, generating all images in parallel rather than sequentially. This significantly speeds up the workflow.
Testing the Step
Save the file. Motia will register the new step:

In the Motia Workbench, you'll see the workflow graph now includes three steps connected by events.

Send a request with multiple variants. You will see the generated variants with the number of variations you specified.

All generated variants are emitted for processing.
Event Connection to Next Step
Here's how this step connects to Step 4:
Step 2: Vision Analysis
    │
    │ emits "vision.analyzed"
    ▼
Step 3: Variant Generation
    │
    │ emits "variants.generated" (×N times)
    │ data: { requestId, variant, visionAnalysis }
    ▼
Step 4: Image Generation (runs N times in parallel)
    subscribes to "variants.generated"
Step 3 receives one vision.analyzed event but emits multiple variants.generated events. Step 4 will process each variant independently and in parallel.
In Step 4, we'll create the Image Generation step that listens for variants.generated events and uses Google Gemini 2.5 Flash to transform each variant prompt into a realistic UGC-style product image.
Step 4: Generate UGC Images with Gemini
In this step, we will create an event handler that takes each variant from Step 3 and uses Google Gemini 2.5 Flash to generate realistic UGC-style product images. For each variant, Gemini transforms the original product photo into a lifestyle image with the specified camera angle, lighting, and brand colors.
Why This Step Matters
The original product photo is typically a clean studio shot, perfect for e-commerce but not authentic enough for social media. This step transforms it into natural, user-generated style content that looks like real customers took the photo. Gemini 2.5 Flash excels at image-to-image generation while maintaining brand consistency through the detailed prompts from Step 3.
Create the Step File
Create a new file at steps/04-image-generation.step.ts:
Full source code available for reference: View Step 4 source code.
Let's break down the key parts:
Event Subscription
export const config: EventConfig = {
  type: "event",
  subscribes: ["variants.generated"],
  emits: ["image.generated"],
};
This step runs once for each variant emitted by Step 3. If Step 3 emits 3 variants, this step executes 3 times in parallel, speeding up the entire workflow.
Gemini Model Initialization
const genAI = new GoogleGenerativeAI(process.env.GOOGLE_GEMINI_API_KEY!);
const model = genAI.getGenerativeModel({
  model: "gemini-2.5-flash-image-preview",
});
Gemini 2.5 Flash Image Preview is optimized for fast, high-quality image generation. It accepts both an input image and a text prompt, transforming the original product photo based on the variant's instructions.
Image to Base64 Conversion
const imgResponse = await axios.get(originalImageUrl, {
  responseType: "arraybuffer",
});
const base64Image = Buffer.from(imgResponse.data).toString("base64");
Gemini requires images in base64 format. We download the original image URL and convert it to base64 before sending to the API.
Gemini Generation Call
const result = await model.generateContent([
  {
    inlineData: {
      data: base64Image,
      mimeType: "image/jpeg",
    },
  },
  variant.image_prompt,
]);
Gemini receives both the original image and the detailed prompt from Step 3. It analyzes the product and regenerates it in the new style (different angle, lighting, setting) while preserving brand elements.
Extract Generated Image
const candidates = result.response.candidates || [];
let imageData: string | null = null;
for (const candidate of candidates) {
  for (const part of candidate.content?.parts || []) {
    if (part.inlineData) {
      imageData = part.inlineData.data;
      break;
    }
  }
}
Gemini returns generated images in the response's inlineData field. We extract the base64 image data from the nested response structure.
Upload to ImageKit
const form = new FormData();
form.append("file", imageBuffer, filename);
form.append("fileName", filename);

const uploadResponse = await axios.post(
  "https://upload.imagekit.io/api/v1/files/upload",
  form,
  {
    headers: {
      Authorization: `Basic ${Buffer.from(
        process.env.IMAGEKIT_PRIVATE_KEY + ":" + process.env.IMAGEKIT_PASSWORD
      ).toString("base64")}`,
      ...form.getHeaders(),
    },
  }
);
ImageKit provides permanent, publicly accessible URLs for the generated images. Step 5 needs stable URLs to create videos, temporary base64 data won't work. ImageKit also offers CDN hosting for fast global access.
Testing the Step
Save the file. Motia will register the step:

In the Motia Workbench, you'll see the ImageGenerationStep node connected to VariantGenerationStep through the variants.generated event.

Notice both variants process in parallel, both log entries appear nearly simultaneously.
Event Connection to Next Step
Here's how this step connects to Step 5:
Step 3: Variant Generation
    │
    │ emits "variants.generated" (×N)
    ▼
Step 4: Image Generation (runs N times in parallel)
    │
    │ emits "image.generated" (×N)
    │ data: { requestId, variantId, generatedImageUrl, variant }
    ▼
Step 5: Video Generation (runs N times in parallel)
    subscribes to "image.generated"
Each generated image triggers Step 5 independently. If you create 3 variants, Step 5 will run 3 times in parallel to generate 3 videos simultaneously.
In Step 5, we'll create the Video Generation step that listens for image.generated events and uses Google Vertex AI Veo 3 to transform each lifestyle image into an authentic UGC-style marketing video with motion and presentation.
Step 5: Generate UGC Videos with Veo 3
In this step, we will create an event handler that takes each generated image from Step 4 and uses Google Vertex AI Veo 3 to create authentic UGC-style marketing videos. Veo 3 animates the static lifestyle image into a video where someone presents the product naturally, like real social media content.
Why This Step Matters
Static images are good, but videos drive 10x more engagement on social media. Veo 3 is Google's state-of-the-art video generation model that can create realistic human motion, natural product presentation, and authentic UGC aesthetics. This step transforms your lifestyle images into short-form video content ready for TikTok, Instagram Reels, or YouTube Shorts.
Video generation takes 2-5 minutes per video, so we use polling to check status rather than blocking the workflow.
Create the Step File
Create a new file at steps/05-video-generation.step.ts:
Full source code available for reference: View Step 5 source code
Let's break down the key parts.
Event Configuration
export const config: EventConfig = {
  type: "event",
  subscribes: ["image.generated"],
  emits: ["video.generated"],
};
This step runs once for each image generated in Step 4. Multiple videos generate in parallel, each independently processing without blocking others.
Access Token Management
async function getAccessToken(): Promise<string> {
  if (process.env.VERTEX_ACCESS_TOKEN) {
    return process.env.VERTEX_ACCESS_TOKEN;
  }
  throw new Error("VERTEX_ACCESS_TOKEN environment variable not set");
}
Vertex AI requires a GCP access token. Get yours with gcloud auth print-access-token. In production, you'd use service account credentials, but for development, manual tokens work fine.
Image to Base64 Conversion
async function imageUrlToBase64(imageUrl: string): Promise<string> {
  const response = await axios.get(imageUrl, {
    responseType: "arraybuffer",
  });
  return Buffer.from(response.data).toString("base64");
}
Veo 3 requires the input image in base64 format. We download the ImageKit URL from Step 4 and convert it.
Video Prompt Construction
const videoPrompt = `A confident person in a casual kitchen setting presenting the ${variant.product_info.brand_name} ${variant.product_info.product} package prominently toward the camera. They smile naturally while presenting the product with enthusiasm, making direct eye contact with the camera. The person gestures with the product, showing it clearly with the branding visible. Natural kitchen lighting, authentic UGC style presentation, like a friend recommending a product on social media.`;
This block of code is a detailed prompts guide Veo 3 to create specific video content. We describe the setting (casual kitchen), action (presenting product), emotion (confident, enthusiastic), and style (authentic UGC). This ensures brand-appropriate content.
Veo 3 API Request
const payload: VideoGenerationPayload = {
  instances: [
    {
      prompt: videoPrompt,
      image: {
        bytesBase64Encoded: base64Image,
        mimeType: "image/jpeg",
      },
    },
  ],
  parameters: {
    sampleCount: 1,
    aspectRatio: "9:16",
    resolution: "1080p",
  },
};

const videoRequest = await axios.post<GenerateVideoResponse>(url, payload, {
  headers: {
    Authorization: `Bearer ${accessToken}`,
    "Content-Type": "application/json",
  },
});
Veo 3's predictLongRunning endpoint starts async video generation. We specify 9:16 aspect ratio (vertical video for mobile/social), 1080p resolution, and pass both the image and prompt. The API returns immediately with an operation name, we poll this operation to check status.
Polling Pattern
async function pollVeo3Status(
  requestId: string,
  variantId: number,
  operationName: string,
  // ...
) {
  const maxAttempts = 20;
  let attempts = 0;

  while (attempts < maxAttempts) {
    await new Promise((resolve) => setTimeout(resolve, 15000)); // Wait 15s
    attempts++;

    const statusResponse = await axios.post<OperationResponse>(pollUrl, {
      operationName: operationName,
    });

    if (statusResponse.data.done && statusResponse.data.response?.videos) {
      // Video ready! Process it
      break;
    }
  }
}
Video generation isn't instant, it takes 2-5 minutes or more sometimes. Instead of blocking, we poll every 15 seconds (max 20 attempts = 5 minutes). When done: true, we extract the video. This keeps the workflow responsive and allows other variants to process simultaneously.
Video File Saving
const videoBase64 = response.videos[0].bytesBase64Encoded;
const videoBuffer = Buffer.from(videoBase64, "base64");
const videoFilename = `${variant.product_info.brand_name}_${variant.product_info.product}_v${variantId}_${Date.now()}.mp4`;
const videoPath = path.join(process.cwd(), videoFilename);

fs.writeFileSync(videoPath, videoBuffer);
Veo 3 returns videos as base64. We convert to a Buffer and save as .mp4 file locally. Step 6 will upload this to Box storage. The filename includes brand, product, variant ID, and timestamp for uniqueness.
State Management
await state.set(
  `video_request_${requestId}_${variantId}`,
  "video_requests",
  {
    requestId,
    variantId,
    operationName,
    status: "queued",
    submittedAt: new Date().toISOString(),
  }
);
Stores workflow progress in Motia's state system. You can query this to check video generation status or debug failed requests. State persists across server restarts.
Testing the Step
Save the file. Motia will register the step:
The polling takes 2-5 minutes. You'll see multiple "still processing" messages before completion.
In the Motia Workbench, you'll see VideoGenerationStep connected to ImageGenerationStep through the image.generated event. The workflow will pause during polling, this is normal for async operations.
Event Connection to Next Step
Here's how this step connects to Step 6:
Step 4: Image Generation
    │
    │ emits "image.generated" (×N)
    ▼
Step 5: Video Generation (runs N times in parallel)
    │
    │ emits "video.generated" (×N)
    │ data: { requestId, variantId, videoPath, generatedImageUrl, variant }
    ▼
Step 6: File Storage (runs N times in parallel)
    subscribes to "video.generated"
Each completed video triggers Step 6 independently. Videos are processed in parallel, so if one finishes before another, its storage upload starts immediately, no waiting for slower videos.
In Step 6, we'll create the File Storage step that listens for video.generated events and uploads both the generated video and image to Box storage, creating shareable links for team access. This completes the automated UGC video generation pipeline.
Step 6: Store Files in Box
In this step, we will create the final event handler that uploads generated videos and images to Box storage. This step takes the local video file from Step 5 and the image URL from Step 4, uploads both to Box, and emits a completion event with shareable links for team access.
Why This Step Matters
Generated content needs to be accessible to your marketing team. Box provides enterprise-grade storage with sharing, collaboration, and access controls. This step automatically organizes all generated assets in one place, making it easy for teams to find and use UGC videos in campaigns without manual file management.
This is also the final step in the workflow, it marks the completion of the entire pipeline from product image to shareable UGC video.
Create the Step File
Create a new file at steps/06-file-storage.step.ts:
Full source code available for reference: View Step 6 source code
Let's break down the parts:
Event Configuration
export const config: EventConfig = {
  type: "event",
  subscribes: ["video.generated"],
  emits: ["workflow.completed"],
};
This step runs after each video is generated. It's the last step in the pipeline, emitting workflow.completed to signal the entire workflow is done for this variant.
Box Authentication
const accessToken = process.env.BOX_ACCESS_TOKEN;
const folderId = process.env.BOX_ROOT_FOLDER_ID || "0";
Box requires an access token for API calls. folderId specifies where files are stored. 0 is your root folder, or you can specify a specific folder ID to organize generated content.
Video Upload with FormData
const videoBuffer = require("fs").readFileSync(videoPath);

const videoForm = new FormData();
const videoAttributes = JSON.stringify({
  name: videoFilename,
  parent: { id: folderId },
});

videoForm.append("attributes", videoAttributes);
videoForm.append("file", videoBuffer, {
  filename: videoFilename,
  contentType: "video/mp4",
});

const videoUploadResponse = await axios.post(
  "https://upload.box.com/api/2.0/files/content",
  videoForm,
  {
    headers: {
      Authorization: `Bearer ${accessToken}`,
      ...videoForm.getHeaders(),
    },
  }
);
Box's upload API uses multipart/form-data. We read the video file from disk (saved in Step 5), create a FormData object with file metadata and binary content, then POST to Box. The response includes the file ID and shareable URL.
Image Download and Upload
// Download image from ImageKit URL
const imageResponse = await axios.get(generatedImageUrl, {
  responseType: "arraybuffer",
});
const imageBuffer = Buffer.from(imageResponse.data);

// Upload to Box
const imageForm = new FormData();
imageForm.append("attributes", imageAttributes);
imageForm.append("file", imageBuffer, {
  filename: imageFilename,
  contentType: "image/jpeg",
});

const imageUploadResponse = await axios.post(
  "https://upload.box.com/api/2.0/files/content",
  imageForm
);
Images are hosted on ImageKit (from Step 4). We download them and re-upload to Box so all generated assets live in one place. Teams can access both videos and source images without juggling multiple storage services.
File Metadata Tracking
uploadedFiles.push({
  type: "video",
  boxFileId: videoFileInfo.id,
  filename: videoFilename,
  boxUrl: `https://app.box.com/file/${videoFileInfo.id}`,
  source: "file",
  originalPath: videoPath,
});

uploadedFiles.push({
  type: "image",
  boxFileId: imageFileInfo.id,
  filename: imageFilename,
  boxUrl: `https://app.box.com/file/${imageFileInfo.id}`,
  originalUrl: generatedImageUrl,
});
Tracks all uploaded files with Box file IDs, URLs, and source info. This metadata helps debug upload issues and provides direct links to access files in Box.
Workflow State Management
await state.set(
  `workflow_${requestId}_${variantId}`,
  "completed_workflows",
  {
    requestId,
    variantId,
    status: "completed",
    uploadedFiles,
    completedAt: new Date().toISOString(),
  }
);
Stores completion data in Motia's state system. You can query completed workflows to generate reports, track success rates, or retrieve Box URLs for specific requests.
Completion Event Emission
await emit({
  topic: "workflow.completed",
  data: {
    requestId,
    variantId,
    status: "completed",
    uploadedFiles,
    summary: {
      brand: variant.product_info.brand_name,
      product: variant.product_info.product,
      filesStored: uploadedFiles.length,
    },
  },
});
Signals the workflow is complete for this variant. You could add a Step 7 that listens to workflow.completed to send notifications, update dashboards, or trigger post-processing.
Testing the Complete Workflow
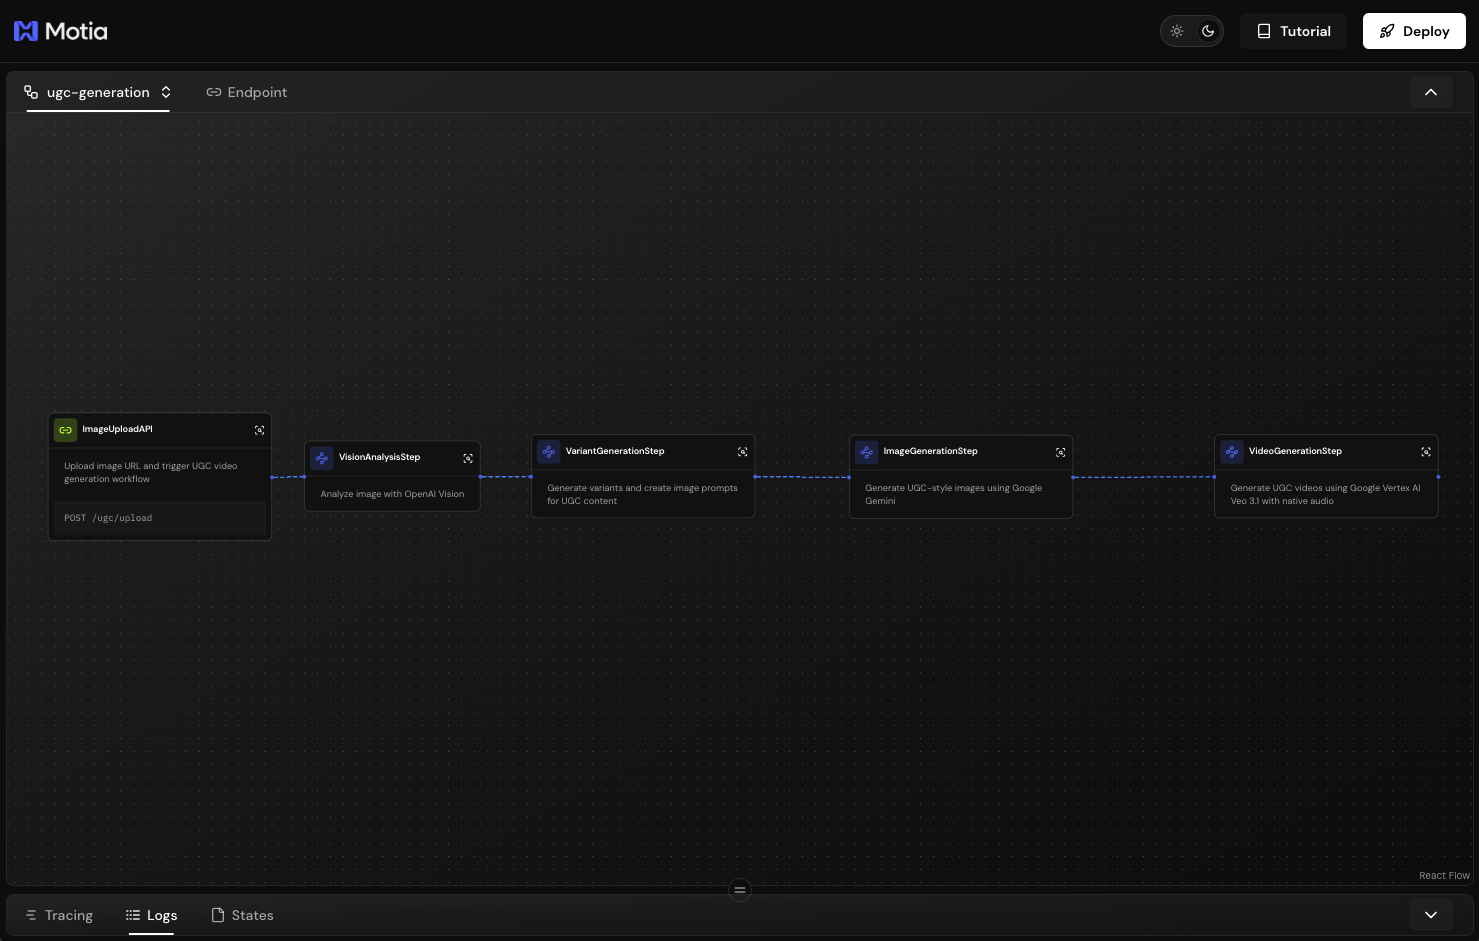
Save the file. Motia will register the final step. In the Motia Workbench, you'll see all 6 steps connected in the workflow graph
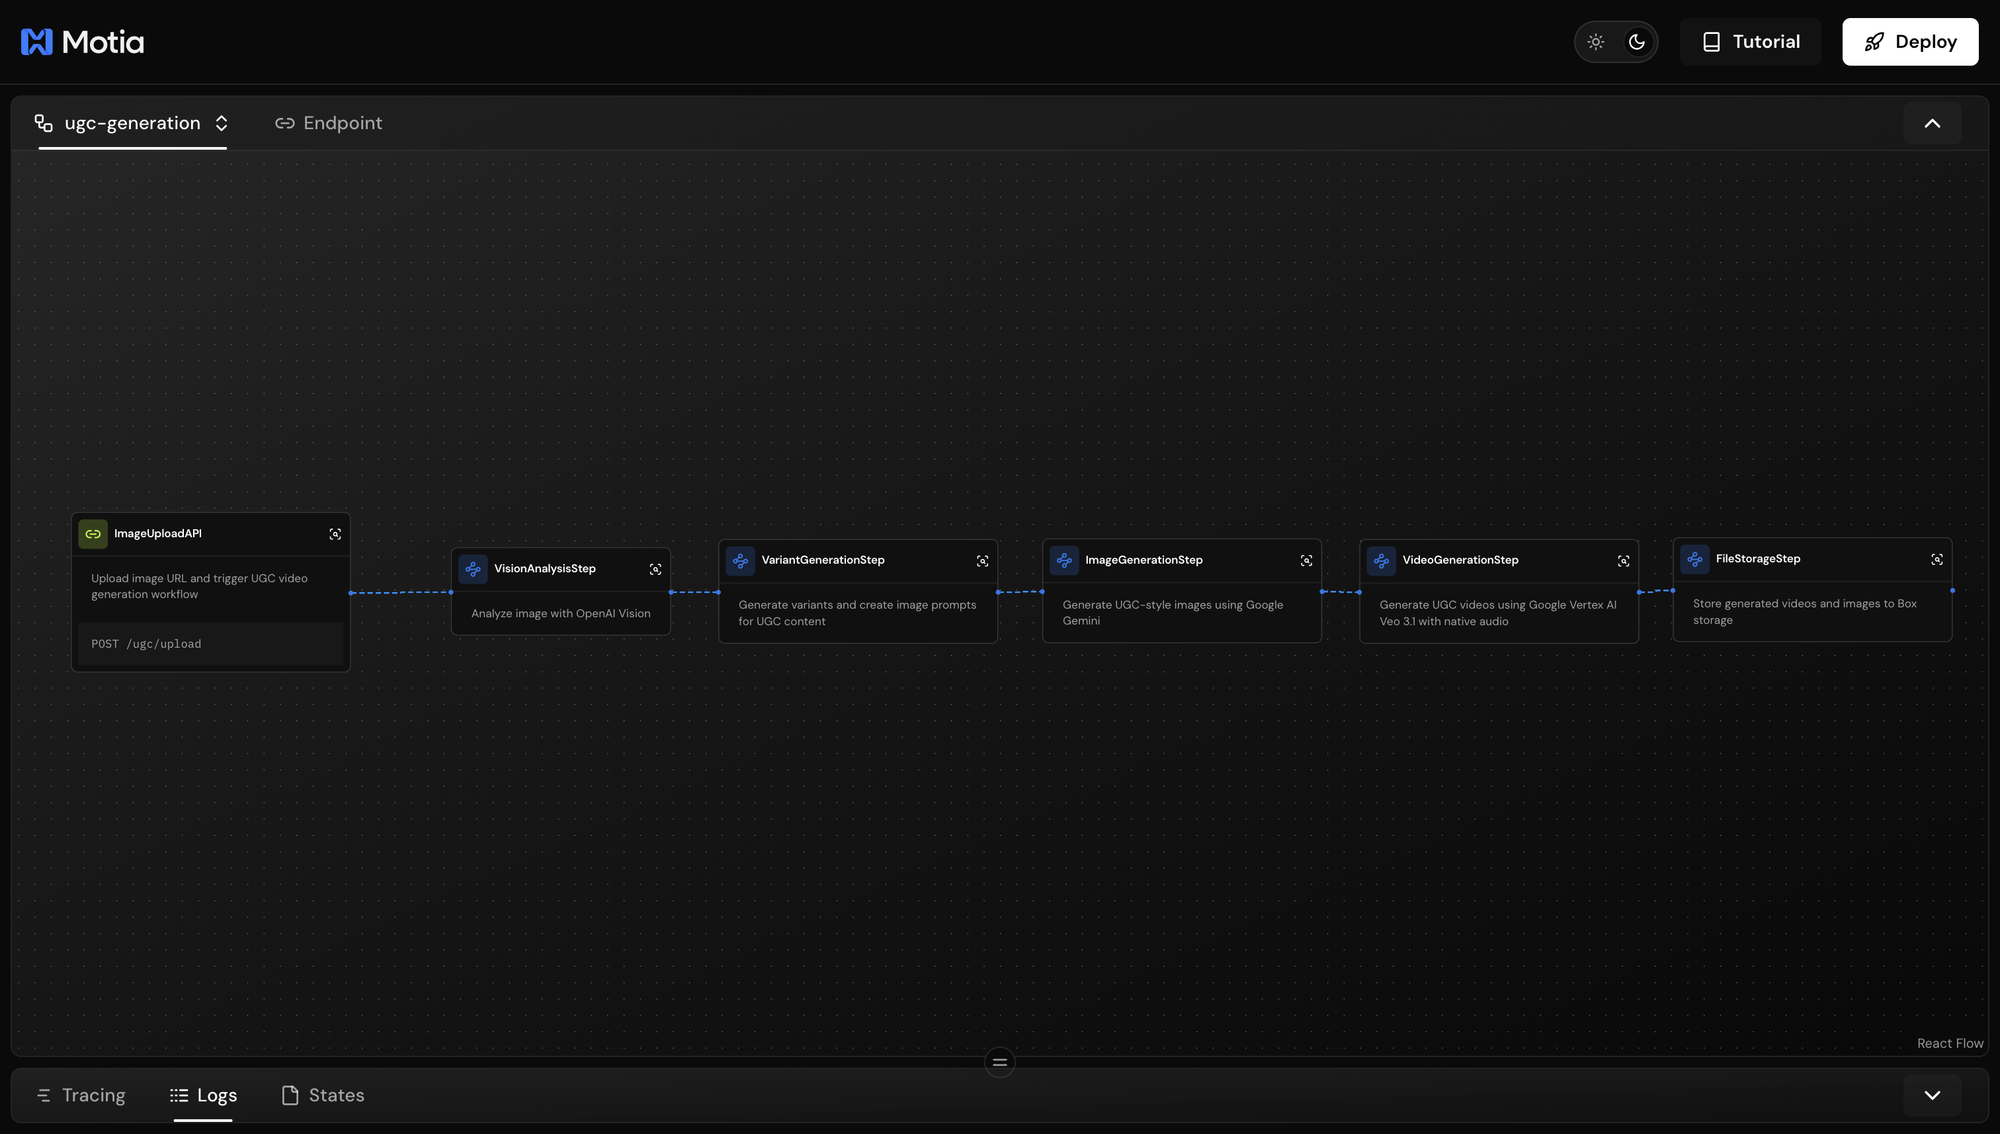
Check your Box account,you should see the generated MP4 video files and JPEG image files for each completed workflow run.
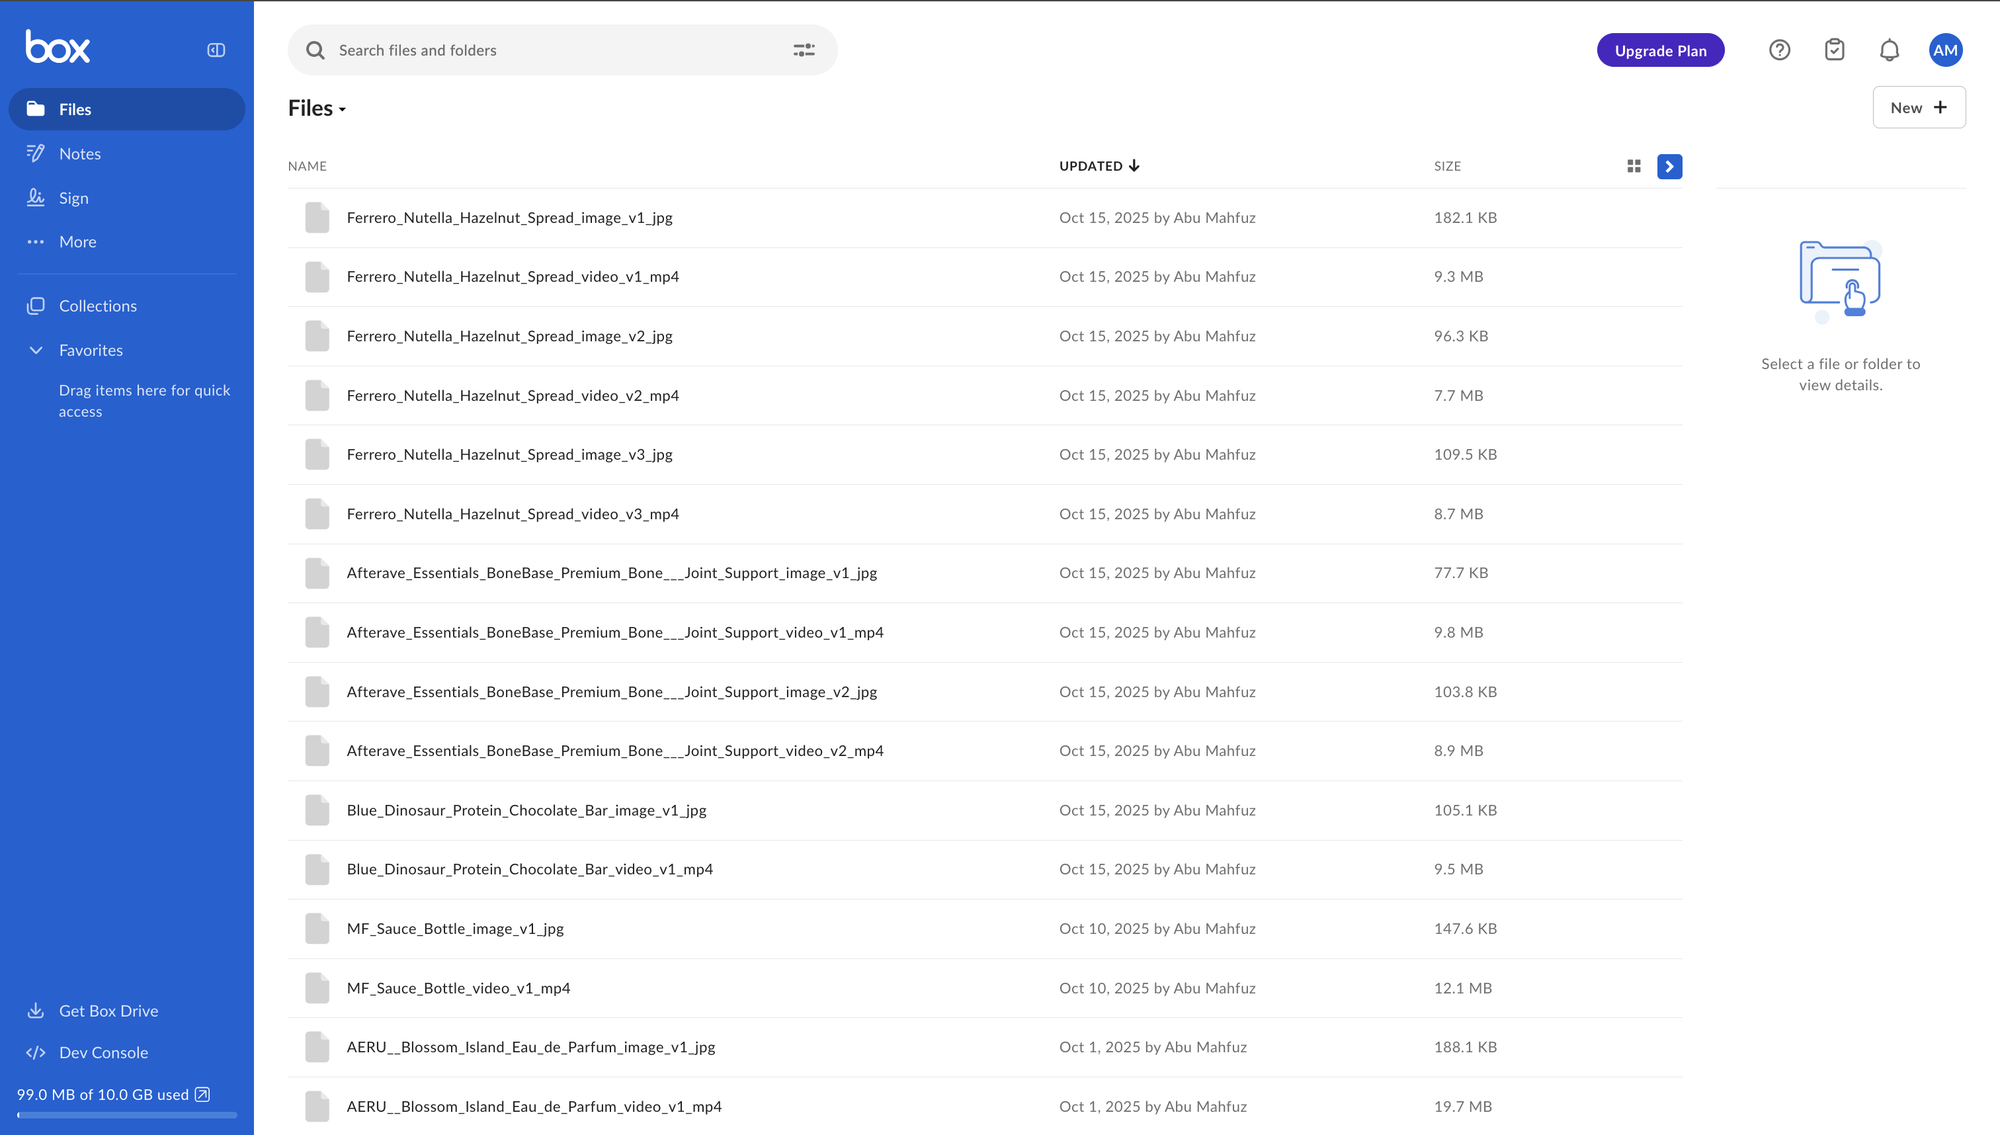
All with branded filenames and ready to share with your team.
Event Flow Visualization
Here's the complete event flow through all 6 steps:
Step 1: Upload API
    │
    │ emits "image.uploaded"
    ▼
Step 2: Vision Analysis
    │
    │ emits "vision.analyzed"
    ▼
Step 3: Variant Generation
    │
    │ emits "variants.generated" (×N)
    ▼
Step 4: Image Generation (×N in parallel)
    │
    │ emits "image.generated" (×N)
    ▼
Step 5: Video Generation (×N in parallel)
    │
    │ emits "video.generated" (×N)
    ▼
Step 6: File Storage (×N in parallel)
    │
    │ emits "workflow.completed" (×N)
    ▼
    ✓ Complete!
What You Built
You now have a complete automated UGC video generation system with:
✅ API endpoint for triggering workflows
✅ AI vision analysis for brand extraction
✅ Multi-variant generation with different styles
✅ Image generation with Gemini 2.5 Flash
✅ Video generation with Vertex AI Veo 3
✅ Cloud storage with shareable Box links
The Complete System
From one product image URL, your system:
- Analyzes brand colors, fonts, and product details
- Generates multiple image variants with different angles/lighting
- Creates realistic UGC-style lifestyle images
- Produces authentic marketing videos with human presentation
- Uploads everything to Box with organized naming
- Provides shareable links for team access
All automatically, with parallel processing, in under 10 minutes.
What's Next
Extend Your Workflow
You can now add additional steps that listen to workflow.completed:
- Notifications - Send email/Slack when videos are ready
- Analytics - Track generation success rates and processing times
- Post-processing - Add captions, logos, or audio overlays
- Distribution - Auto-post to social media platforms
Congratulations!
You've built a production-ready automated UGC video generation system using Motia's event-driven architecture. You learned how to:
- Build multi-step workflows with event connections
- Integrate multiple AI models (OpenAI, Gemini, Veo 3)
- Handle async operations with polling patterns
- Process tasks in parallel for speed
- Manage state and storage in production workflows
Your system is ready to transform product photos into engaging UGC videos at scale.