Learn how to create automated email campaigns with API endpoints, event-driven workflows, AI personalization, and scheduled delivery in this hands-on tutorial using Motia's backend framework and Appwrite.
Build an email marketing system that automatically segments subscribers, generates personalized content, and sends campaigns on schedule using event-driven workflows.
What You'll Build
By the end of this tutorial, you'll have a complete email marketing system with:
- Campaign Management API - Create and schedule email campaigns via REST endpoints
- Smart User Segmentation - Target audiences based on behavior and preferences
- AI-Powered Personalization - Generate unique content for each subscriber using OpenAI
- Automated Delivery - Send emails in batches with rate limiting and retry logic
- Scheduled Campaigns - Queue campaigns for future delivery with cron-based processing
- Real-Time Analytics - Track opens, clicks, and engagement metrics
- User Preferences - One-click unsubscribe and user preference management
Dive into code. If you want to get started quickly:
Prerequisites
Before starting, you'll need:
- Appwrite account (free tier works) - Sign up here
- OpenAI API key for content personalization - Get key
Getting Started
Clone the complete working example at:
git clone https://github.com/MotiaDev/motia-examples.git
cd examples/email-marketing-automation
Once you've cloned the project and navigated to the email-marketing-automation folder, install the dependencies:
npm install
This installs all the packages needed for the email automation system.
Configure Your Environment
Create a .env file in the project root and add the following environment variables:
APPWRITE_ENDPOINT=https://cloud.appwrite.io/v1
APPWRITE_PROJECT_ID=your_project_id
APPWRITE_API_KEY=your_api_key
OPENAI_API_KEY=your_openai_key
Where to find these:
Appwrite Project ID & API Key:
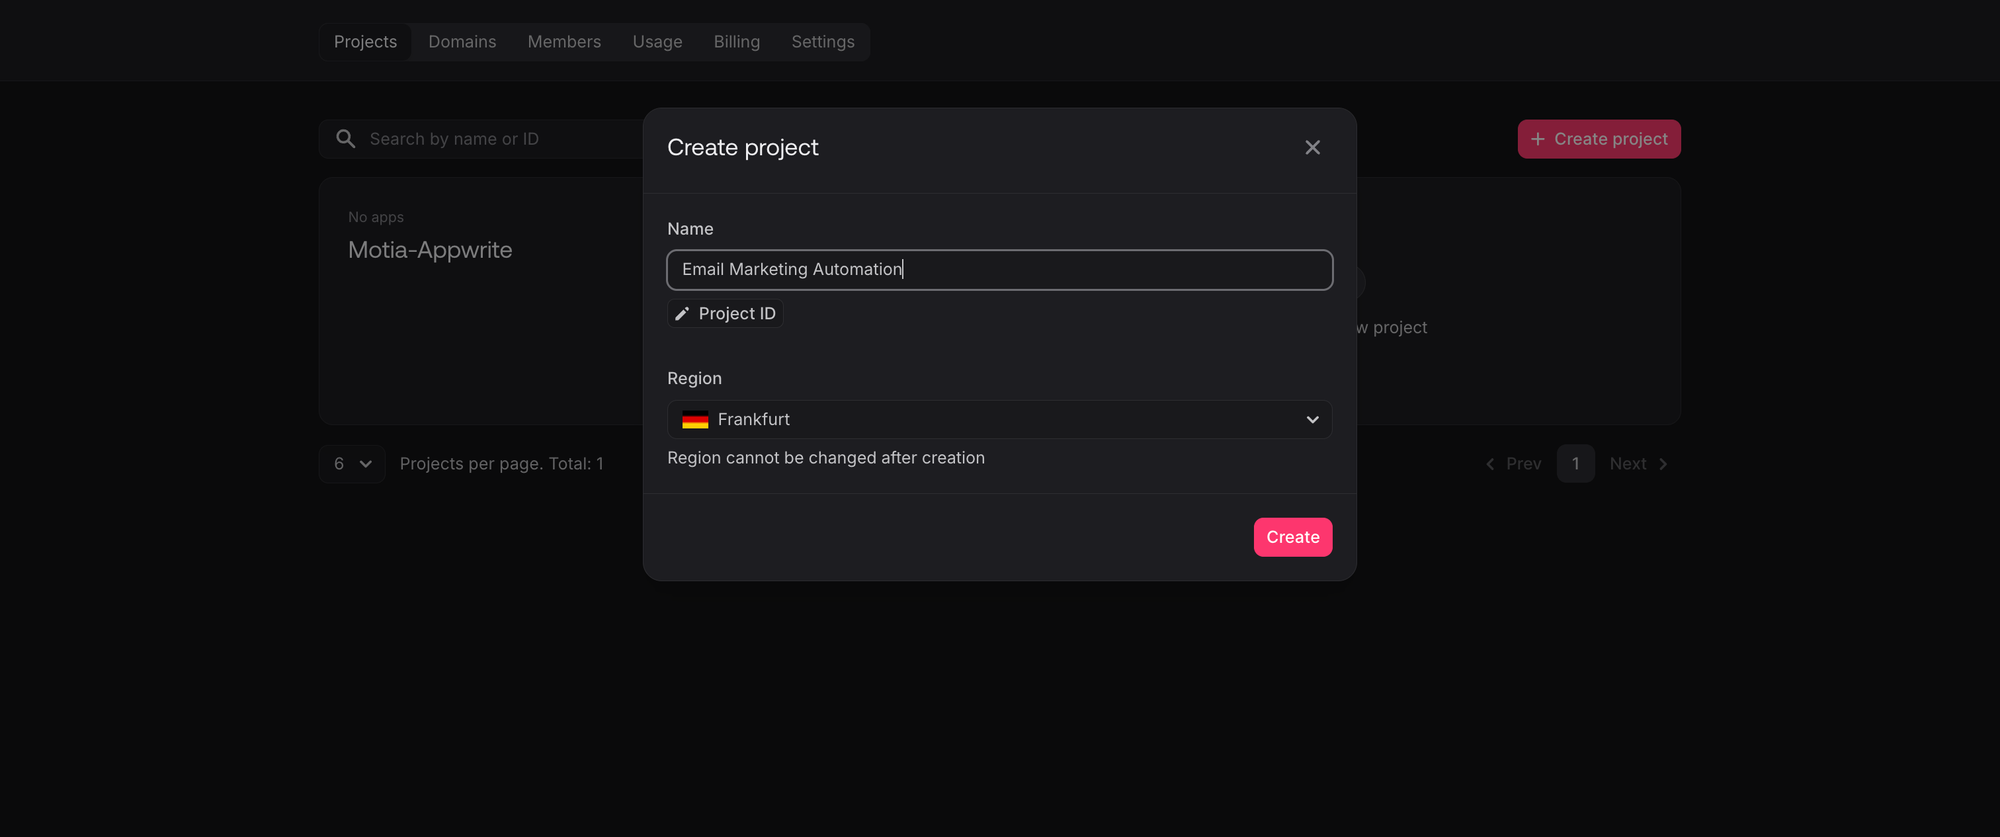
Create a new project in your Appwrite Console.
In the project overview, you will see a section called Integrations
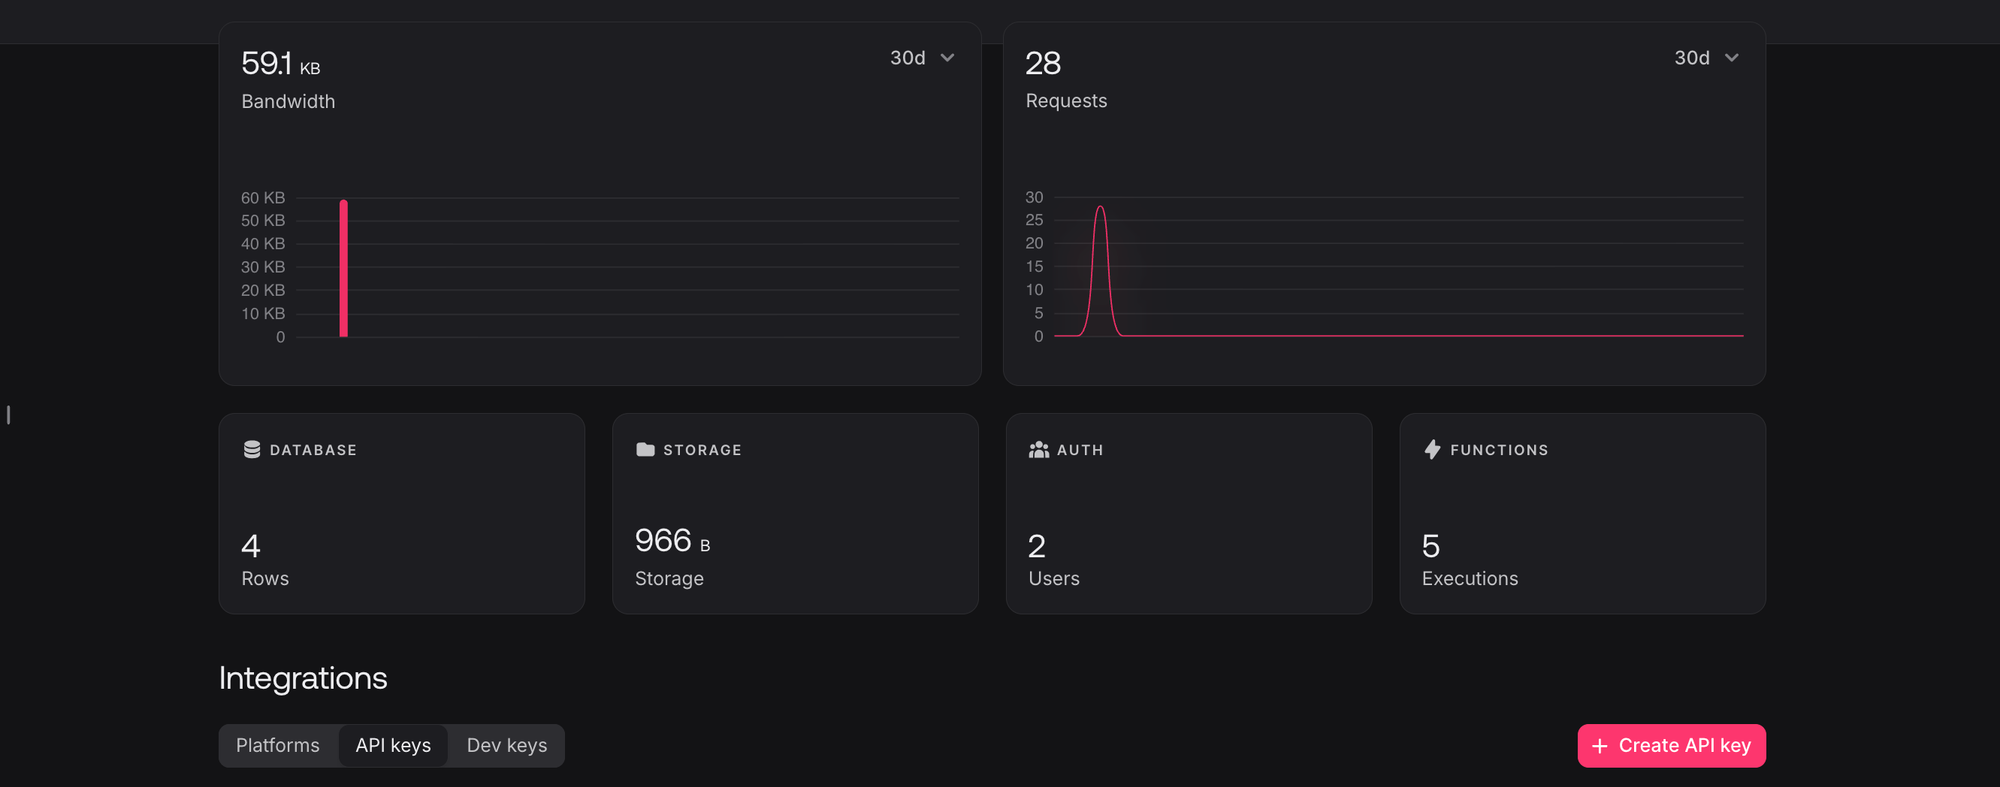
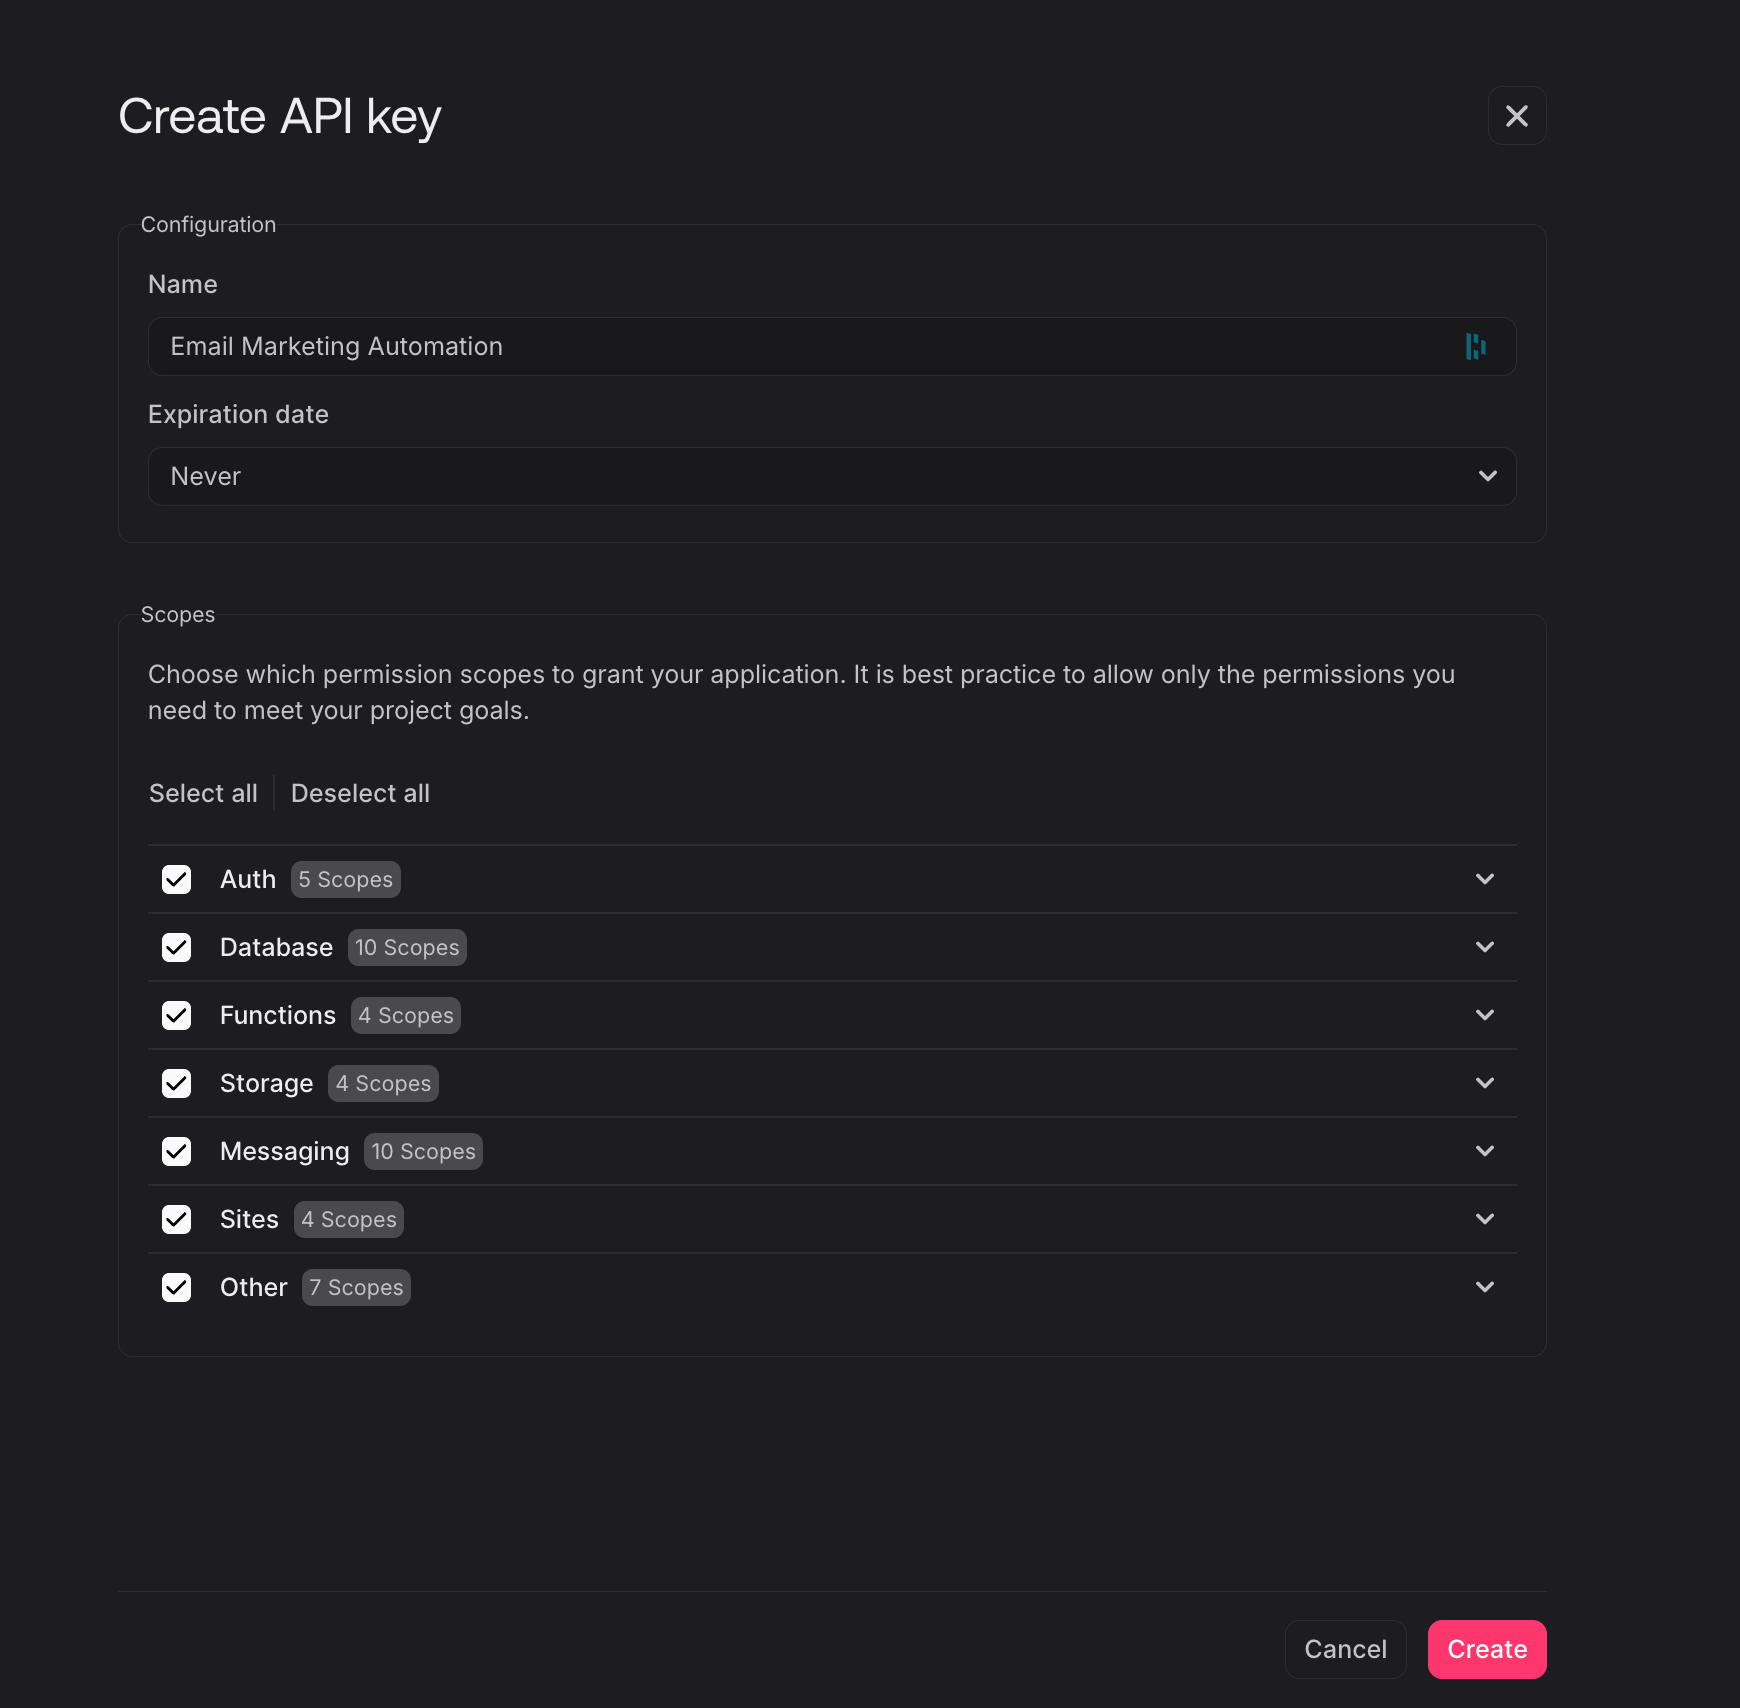
Click on the API Keys tab, to see if you have an API Key already, if not, click Create API Key button to create one and grant it all the scopes as shown on the UI:
OpenAI API Key: Get it from your OpenAI dashboard
Set Up Your Database
You have two options to set up your Appwrite database:
Option 1: Automatic Setup
Run the setup script (in scripts/setup-appwrite) to automatically create your database and tables:
npm run setup-appwrite
Full source code of the script can be found here.
What this script does:
- Creates a database called email-marketing-db
- Creates a users table with columns for email, name, preferences, and metadata
- Creates a campaigns table for managing email campaigns and tracking metrics
- Sets proper permissions for reading and writing data
You'll see success messages confirming each step:
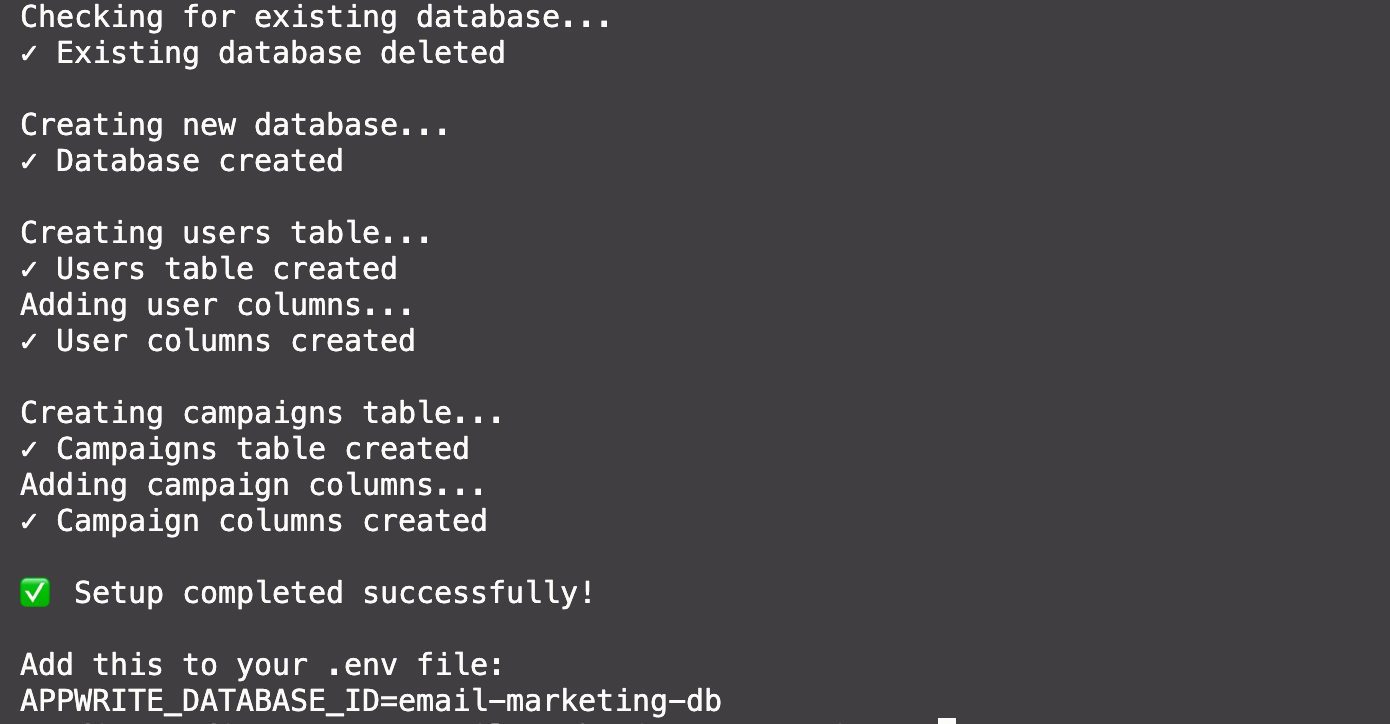
The script will output your database ID at the end. Add it to your .env file:
APPWRITE_DATABASE_ID=email-marketing-db
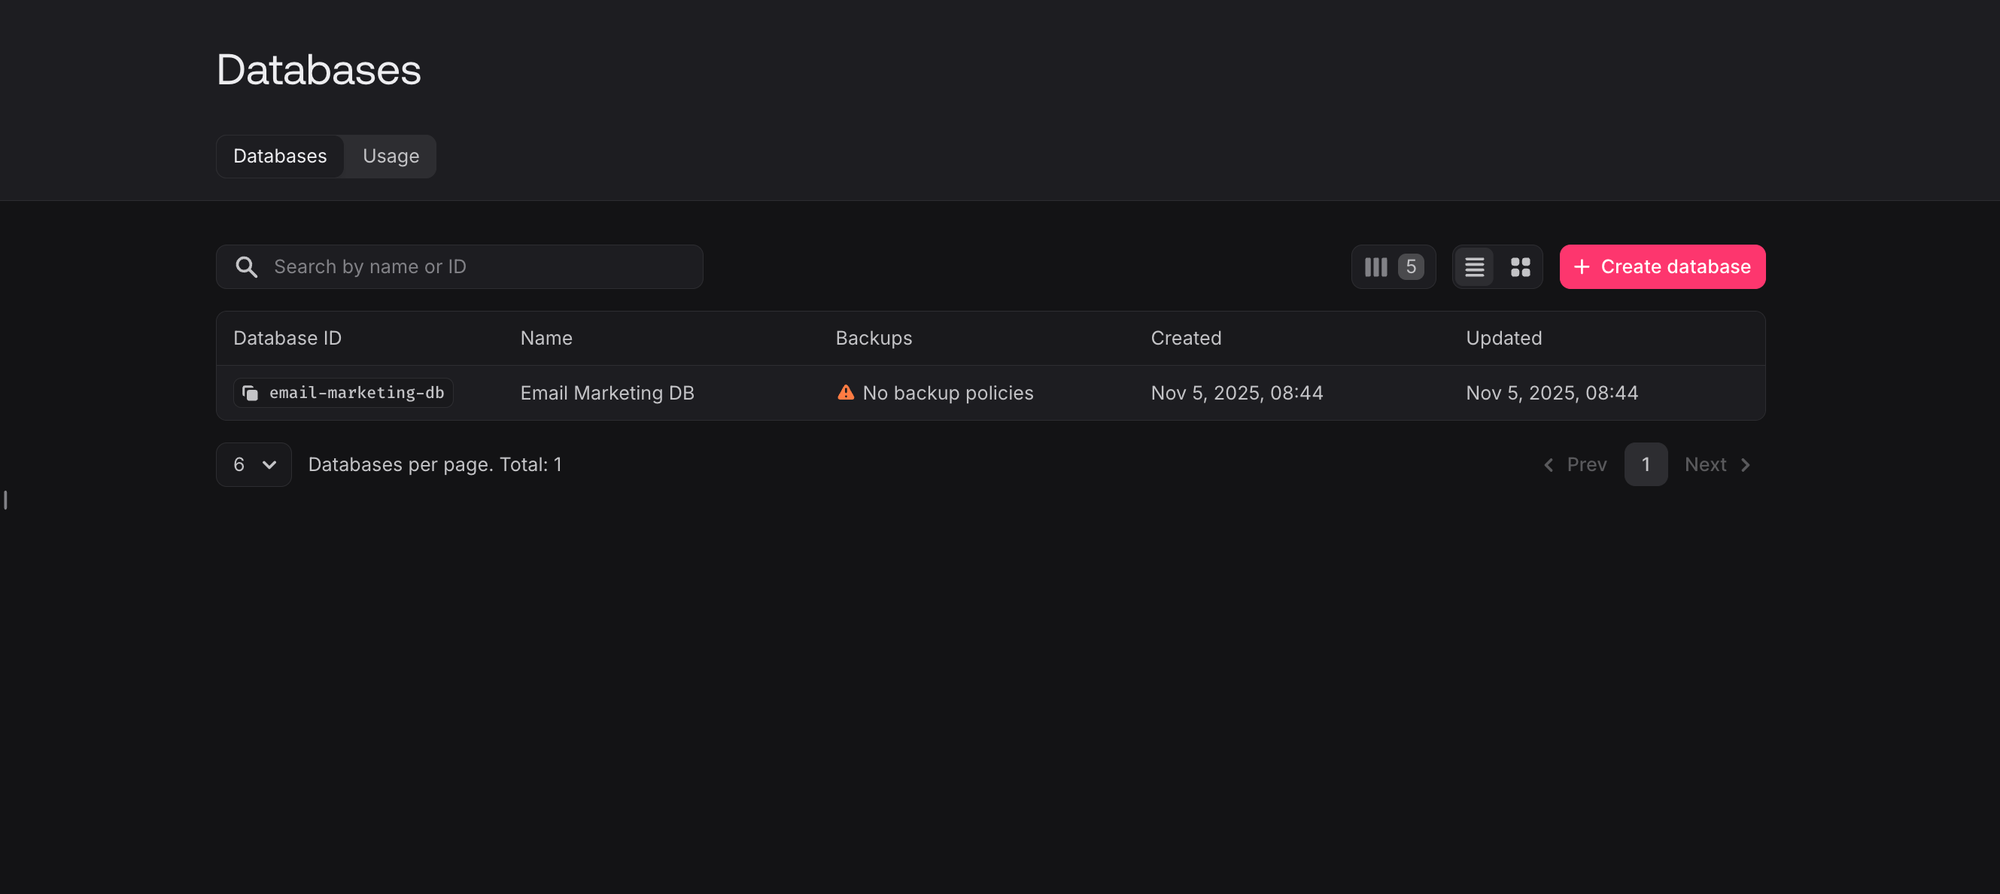
Once the script completes successfully, you can verify your database setup in the Appwrite console. Navigate to the Databases section where you'll see your newly created email-marketing-db:
The script has created two essential tables for our email marketing system. FIrst is the Campaigns table, which will store all your email campaign data:
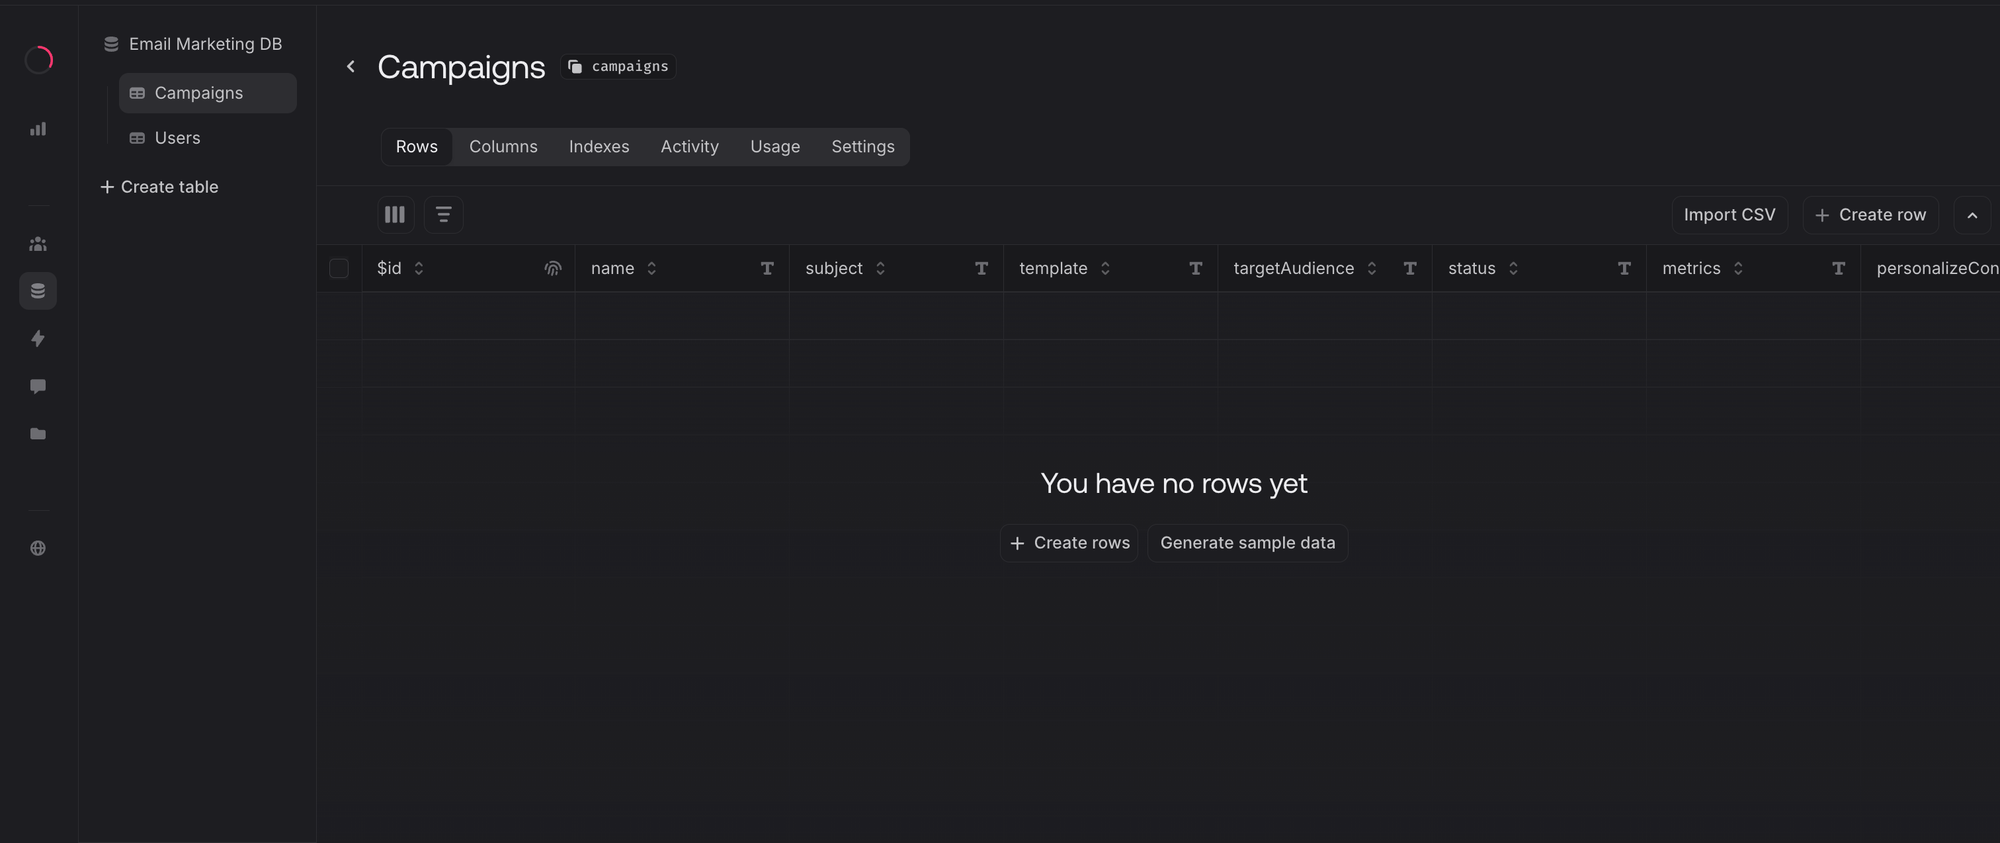
Next, check the Users table that will store your subscriber information:
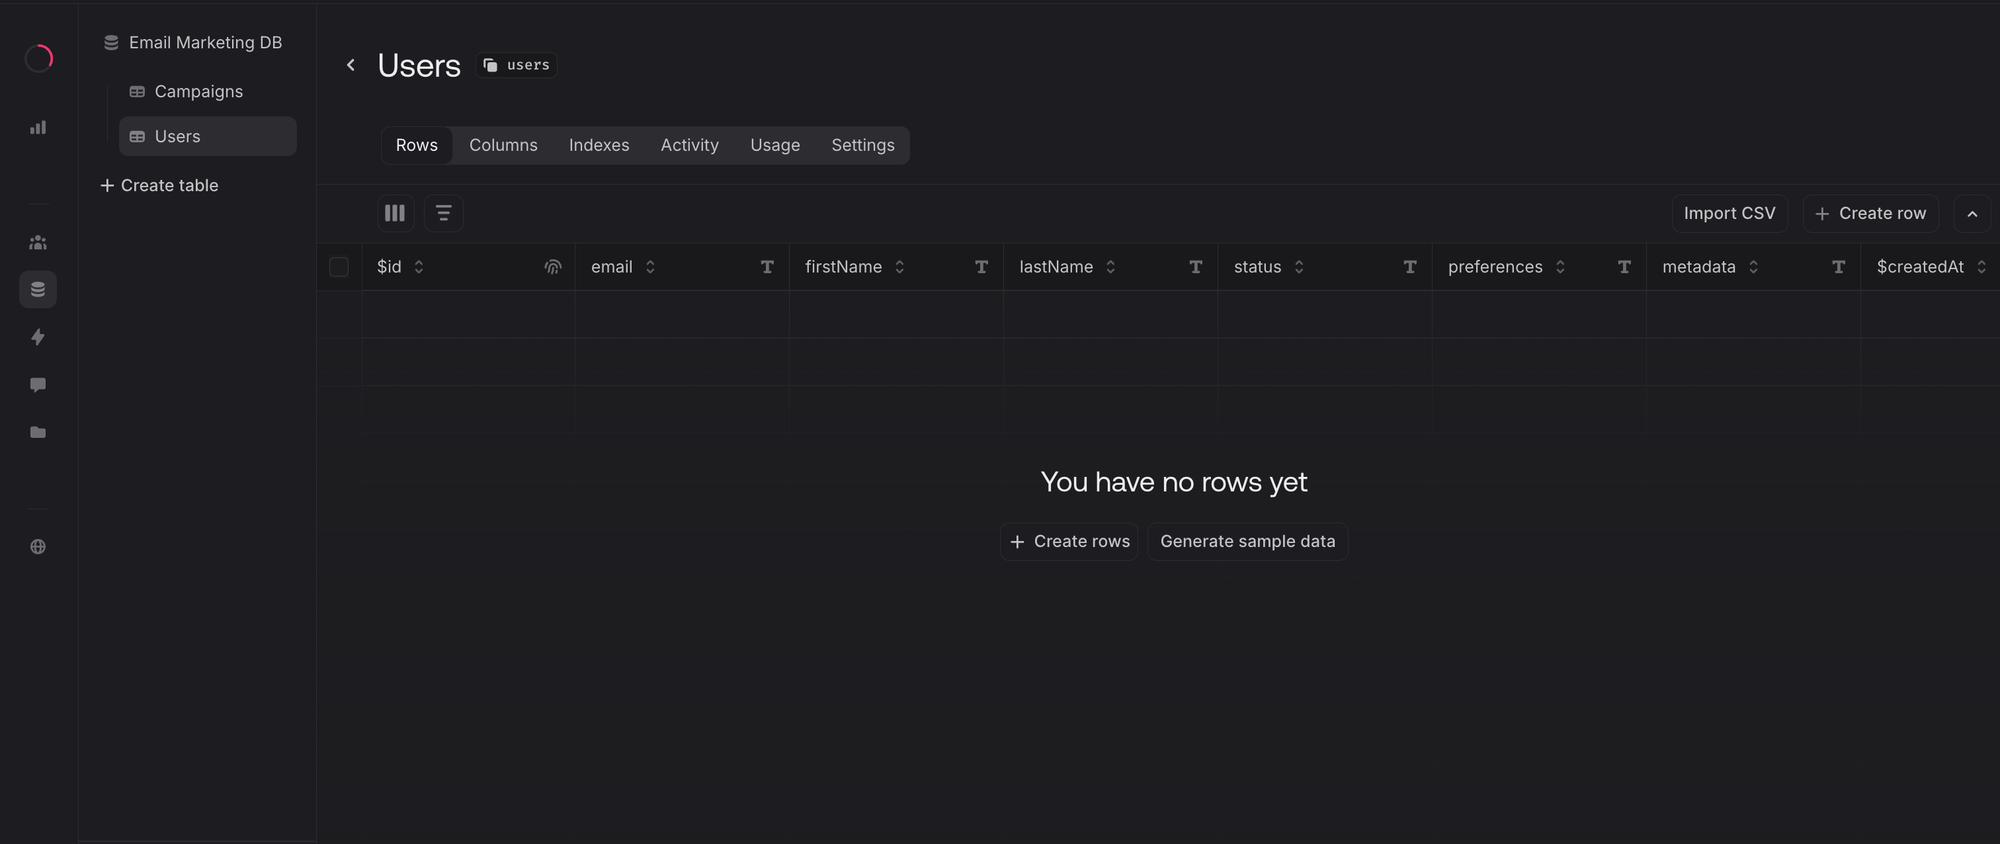
The users table contains fields for email addresses, names, user preferences, and metadata. This enables you to segment your audience and personalize your email campaigns based on subscriber data.
Option 2: Manual Setup via Appwrite Console
If you prefer to set up manually in the Appwrite dashboard, follow our detailed manual setup guide.
The manual process involves creating the database, users table, campaigns table, and setting proper permissions through the Appwrite console interface.
Set Up Email Templates
Before testing your email marketing system, you need to create email templates in Appwrite Storage. The content personalization step fetches these templates to generate personalized emails.
Quick Setup
- In your Appwrite Console, navigate to Storage
- Create a bucket named
templates - Upload HTML template files with specific file IDs
For detailed template creation instructions and sample HTML files, follow the Email Template Setup Guide.
Required Templates
Your system expects these template file IDs:
vip-template- For VIP campaignsbasic-template- For general campaignsnewsletter-template- For newsletterswelcome-template- For welcome emailswinback-template- For re-engagement
Important: Use the exact file IDs shown above, as the content personalization step maps template names to these specific file IDs.
When testing with the VIP payload ("template": "vip"), ensure the vip-template file exists in your templates bucket.
Set Up Email Provider (Optional)
Before your system can send emails, you need to configure an email messaging provider in Appwrite. The email delivery step uses Appwrite's messaging service to send personalized emails to your users.
Quick Setup
- In your Appwrite Console, navigate to Messaging → Providers
- Create an email provider (Mailgun, SendGrid, SMTP, or Resend)
- Navigate to Messaging → Topics
- Create a topic for email subscribers
For detailed provider configuration instructions and messaging setup, follow our Email Provider Setup Guide.
Required Configuration
Your system expects:
- Email Provider: Configured and enabled for sending emails
- Topic: Named
email-subscribersfor managing email recipients - Environment Variables: Provider credentials in your
.envfile
Important: The email delivery step uses Appwrite's messaging service. Without a configured provider, email sending will fail.
Test your provider configuration before running campaigns to ensure emails are delivered successfully.
Start the Development Server
npm run dev
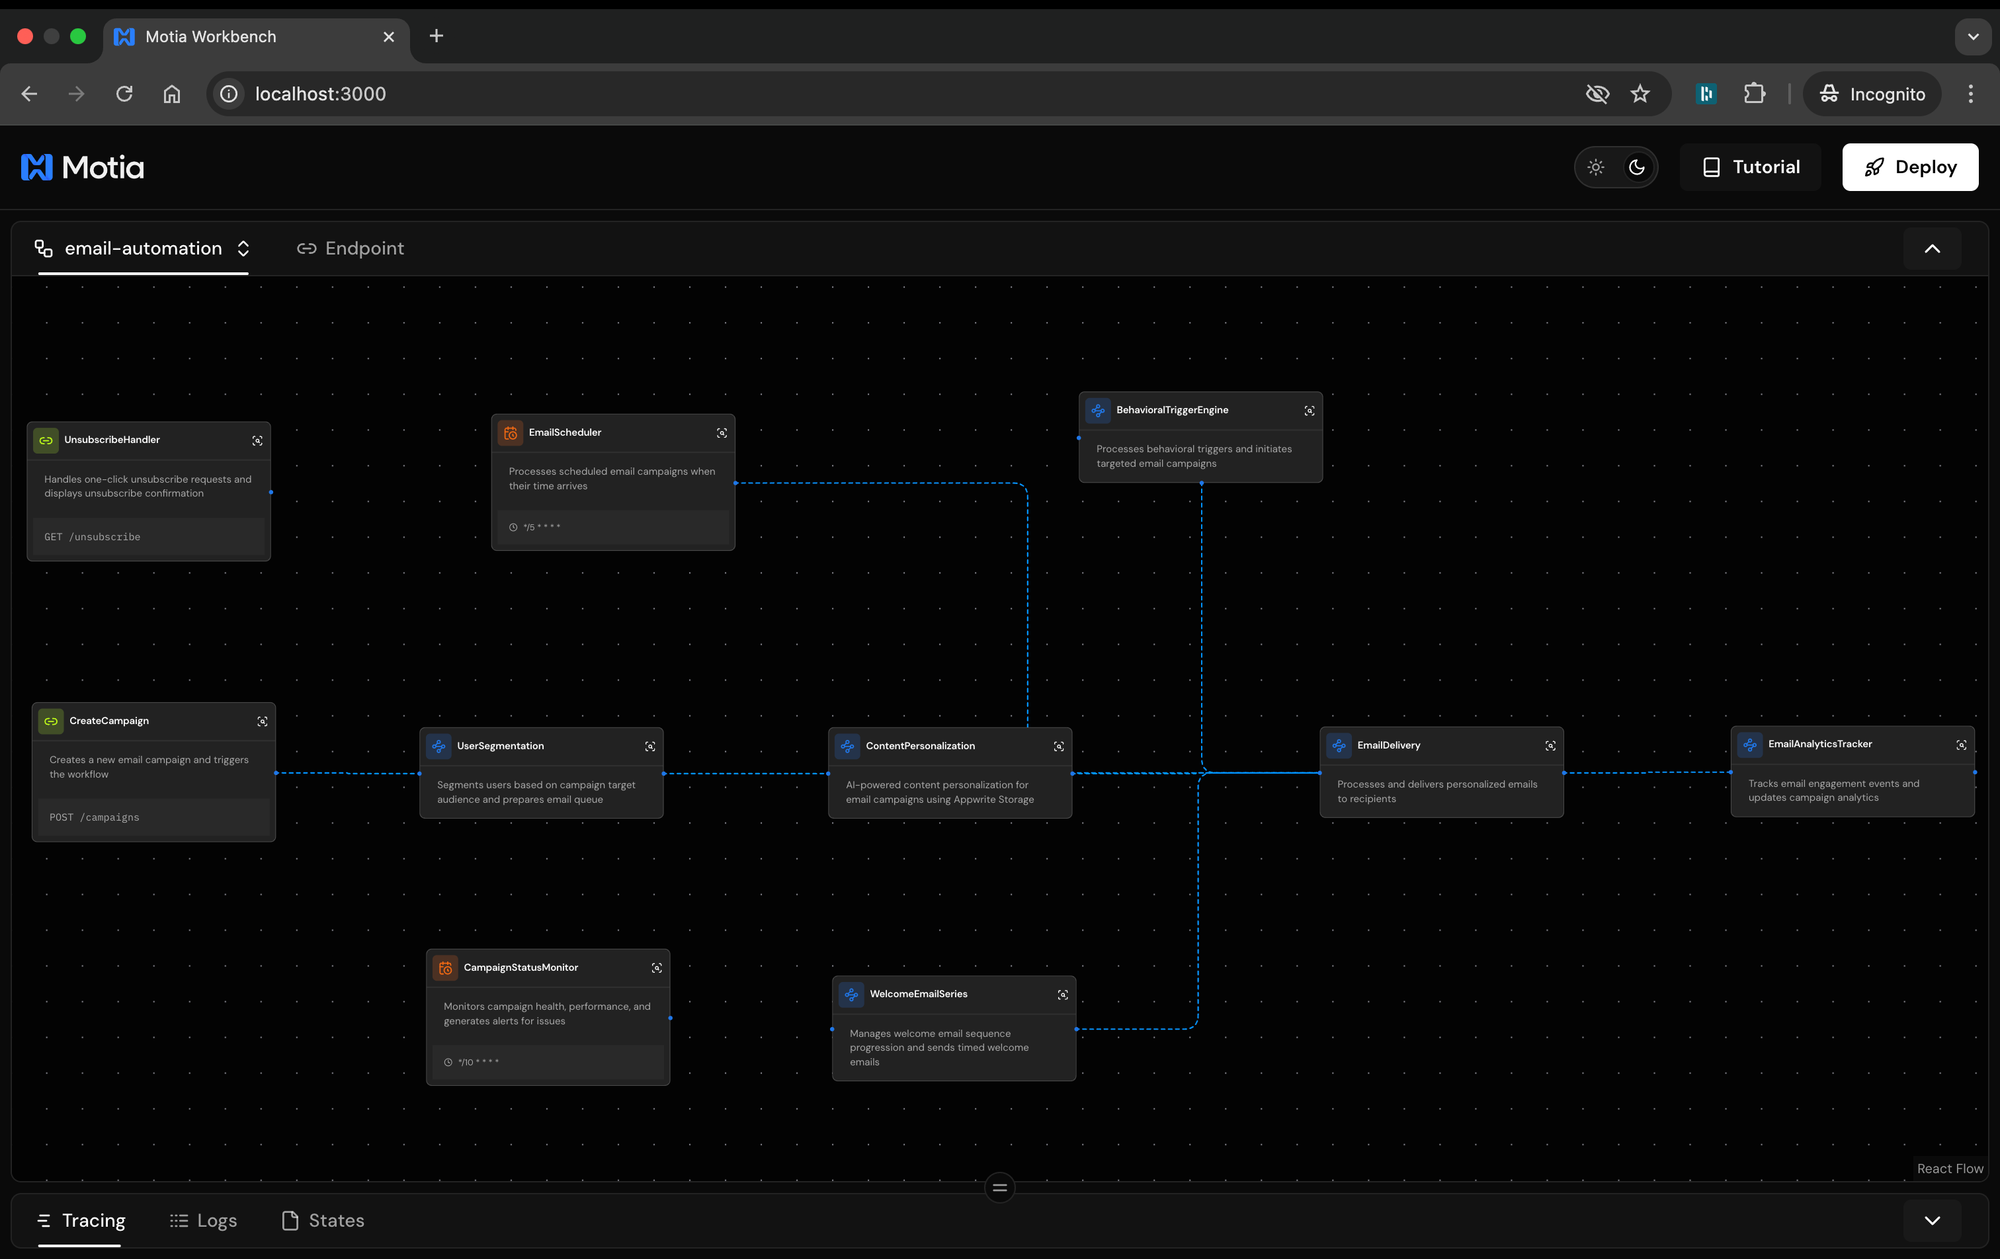
This command starts the server at http://localhost:3000, you can open this in your browser to see all 10 workflow steps and how they are connected.
workbench-workflow
Using the Interactive Tutorial
Before we go into exploring the project, notice the Tutorial button in the top-right of the Workbench. Click it to launch an interactive walkthrough.
The tutorial includes:
- Step-by-step explanations of each workflow component
- Code annotations showing what each section does
- Visual guides through the Workbench interface
interactive-tutorial
You can follow along with the interactive tutorial while reading this guide, or reference it anytime you want deeper context on a specific step.
Exploring the Project
The starter project (that was cloned) includes a complete email marketing system built with Motia's event-driven architecture. We will explore how each component works and connects together.
What's inside:
The /steps folder contains your workflow:
- API endpoints that trigger campaigns
- Event handlers that process data when events fire
- Cron jobs that run on schedules (like checking for scheduled campaigns)
- A Python step for AI-powered personalization
The /services folder handles Appwrite integration:
- Database operations for users and campaigns
- Email delivery through Appwrite Messaging
Environment Configuration
.env- Your API keys and credentialsscript/setup-appwrite.ts- Database setup automation
Each step is a self-contained file with two parts: configuration and handler logic. Motia automatically discovers these files and connects them based on the events they emit and subscribe to.
Let's start by understanding how campaigns are created.
Step 1: Campaign Creation API
The entry point to our system is a REST API endpoint. When you POST campaign data, it stores the campaign in Appwrite and emits an event to trigger the workflow.
Open steps/01-create-campaign.step.ts in your editor.
Configuration

The config defines:
type: 'api'- This is an HTTP endpointmethod: "POST"- HTTP method for the endpointpath: '/campaigns'- Accessible at POST /campaignsflows: ["email-automation"]- Associates this step with the email-automation workflowbodySchema- Zod validation schema that ensures incoming requests have required fields (name, subject, template, targetAudience, etc.)responseSchema- Defines the structure of responses for different HTTP status codes (200 for success, 400 for errors)emits: ['campaign-created']- Triggers other steps that subscribe to this event
Handler Logic
The handler does three key things:
// 1. Extract campaign data
const { name, subject, template, targetAudience } = req.body;
// 2. Store in Appwrite
const createdCampaign = await appwriteService.createCampaign({...});
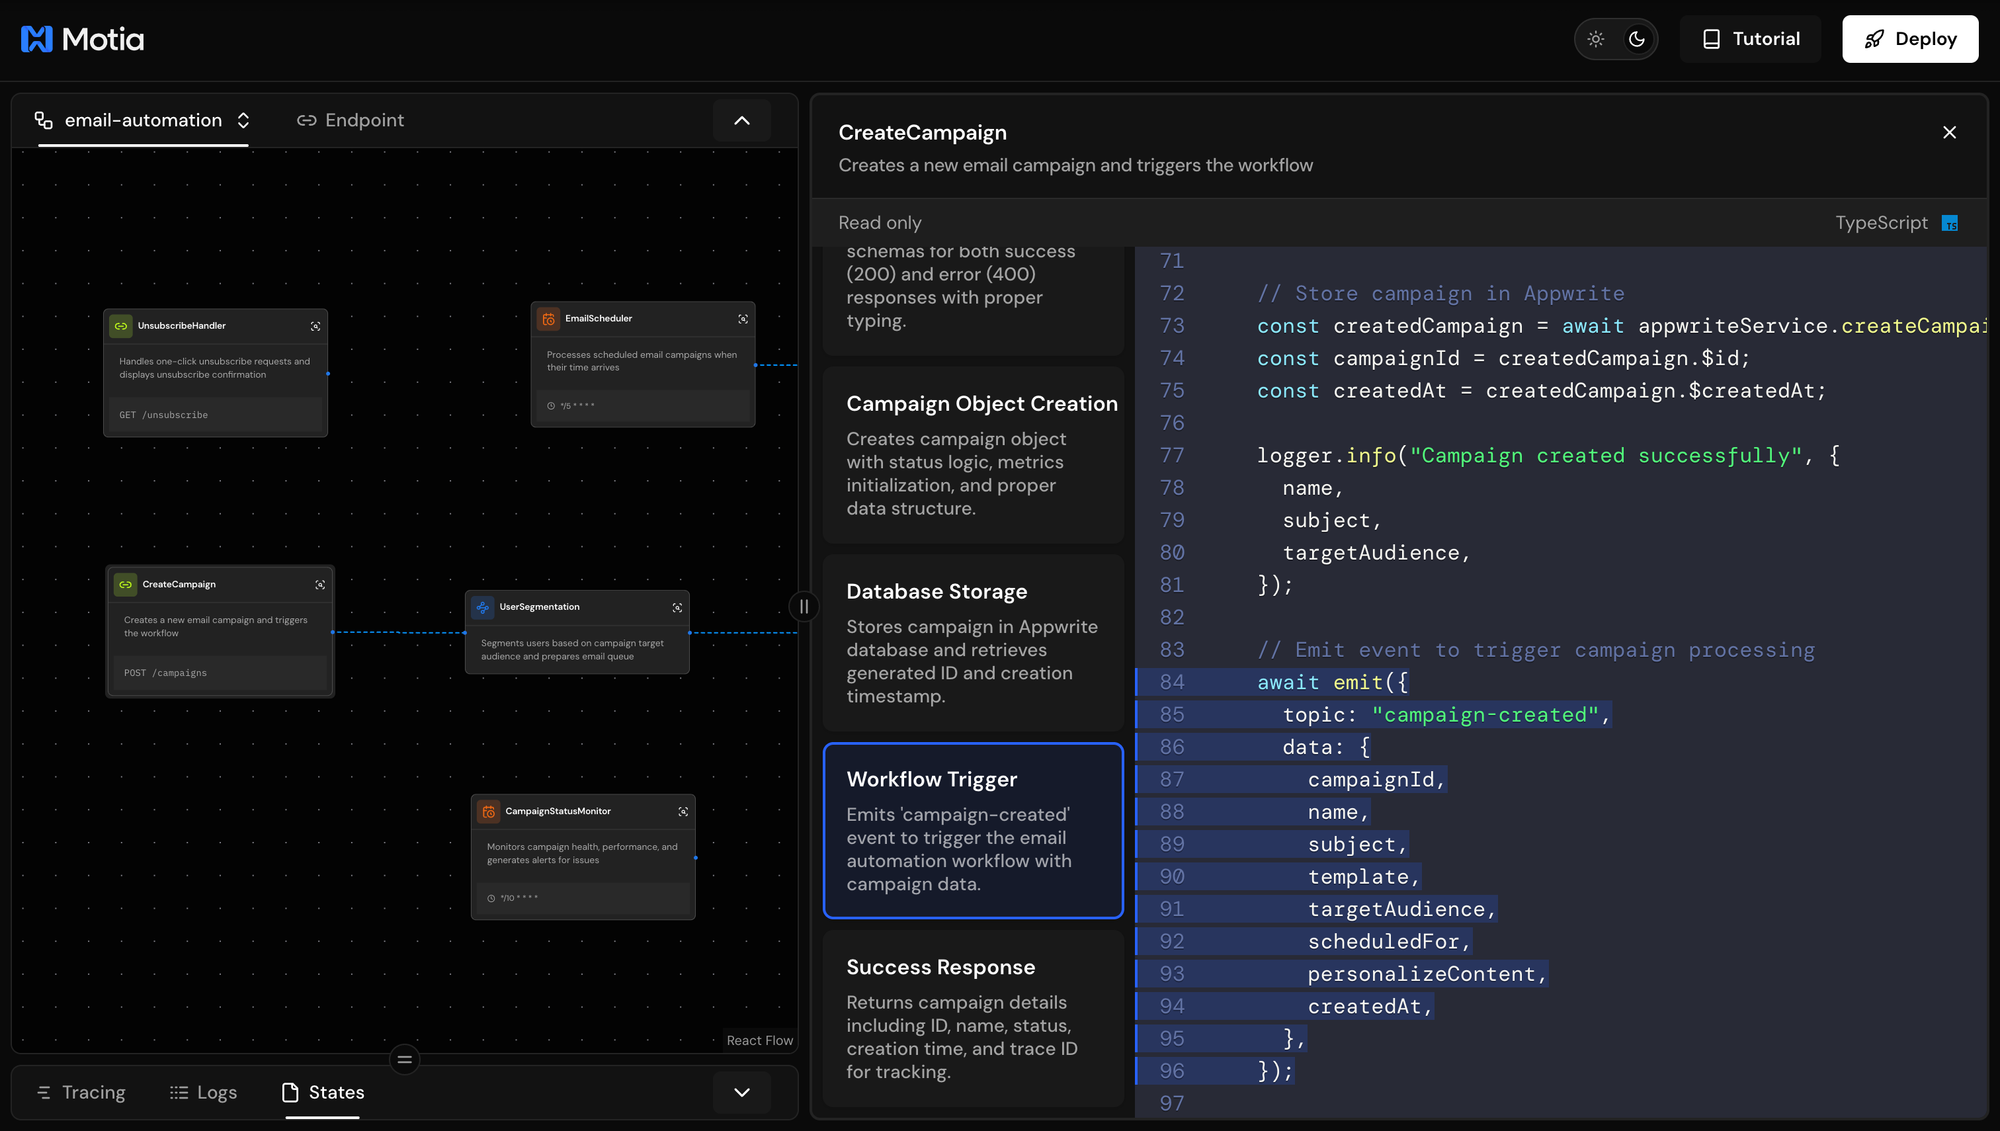
// 3. Emit event to trigger next step
await emit({
topic: 'campaign-created',
data: { campaignId: createdCampaign.$id, ... }
});
What the emit() does: Any step that subscribes to campaign-created will automatically execute when this event fires. This is how Motia connects your workflow steps.
Tutorial Reference: See Workflow Trigger in the interactive tutorial for how events connect steps.
What's next: This event triggers the user segmentation step. Let's see how that works.
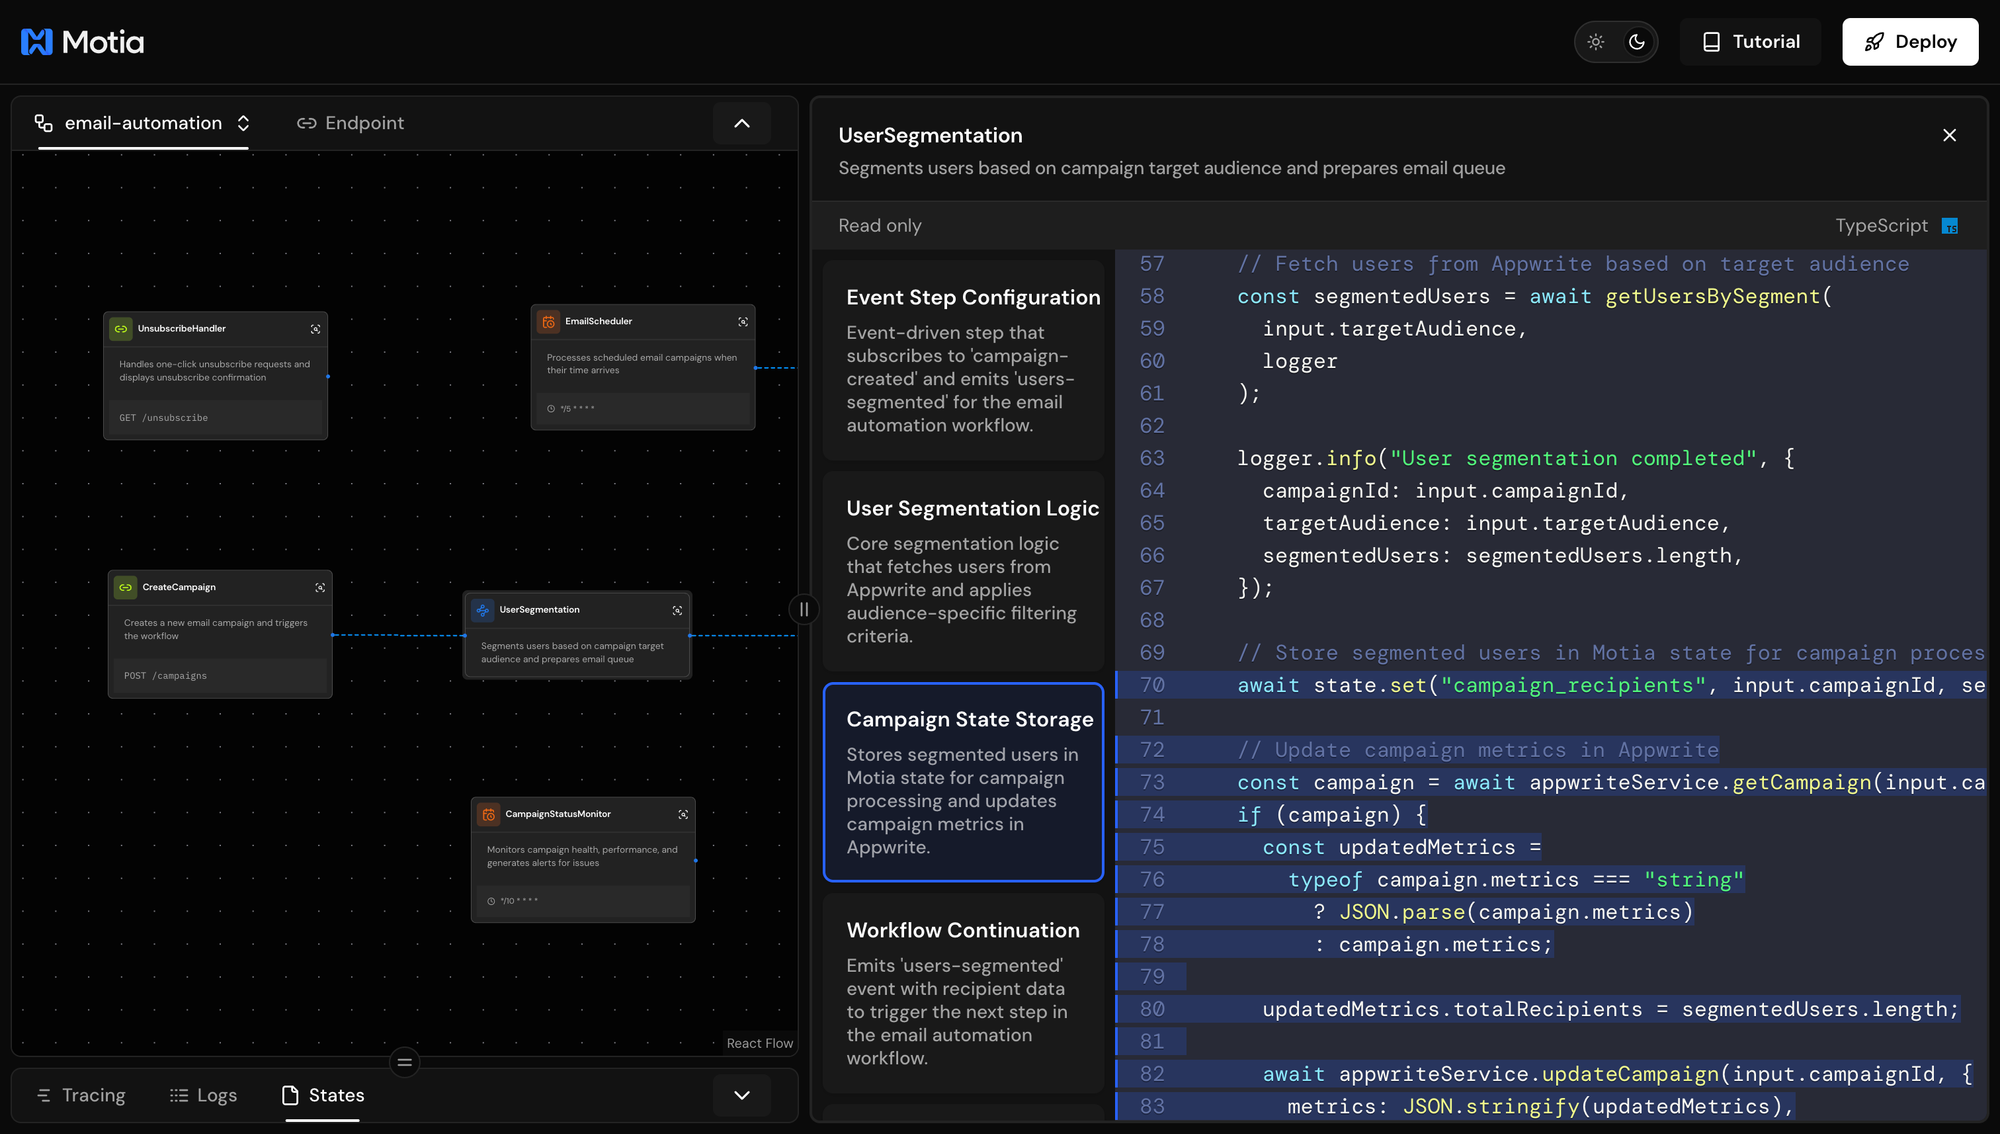
Step 2: User Segmentation
Now that a campaign is created, we need to find the right users to send it to. The user segmentation step listens for the campaign-created event and filters users based on the target audience.
Open steps/02-user-segmentation.step.ts.
Configuration
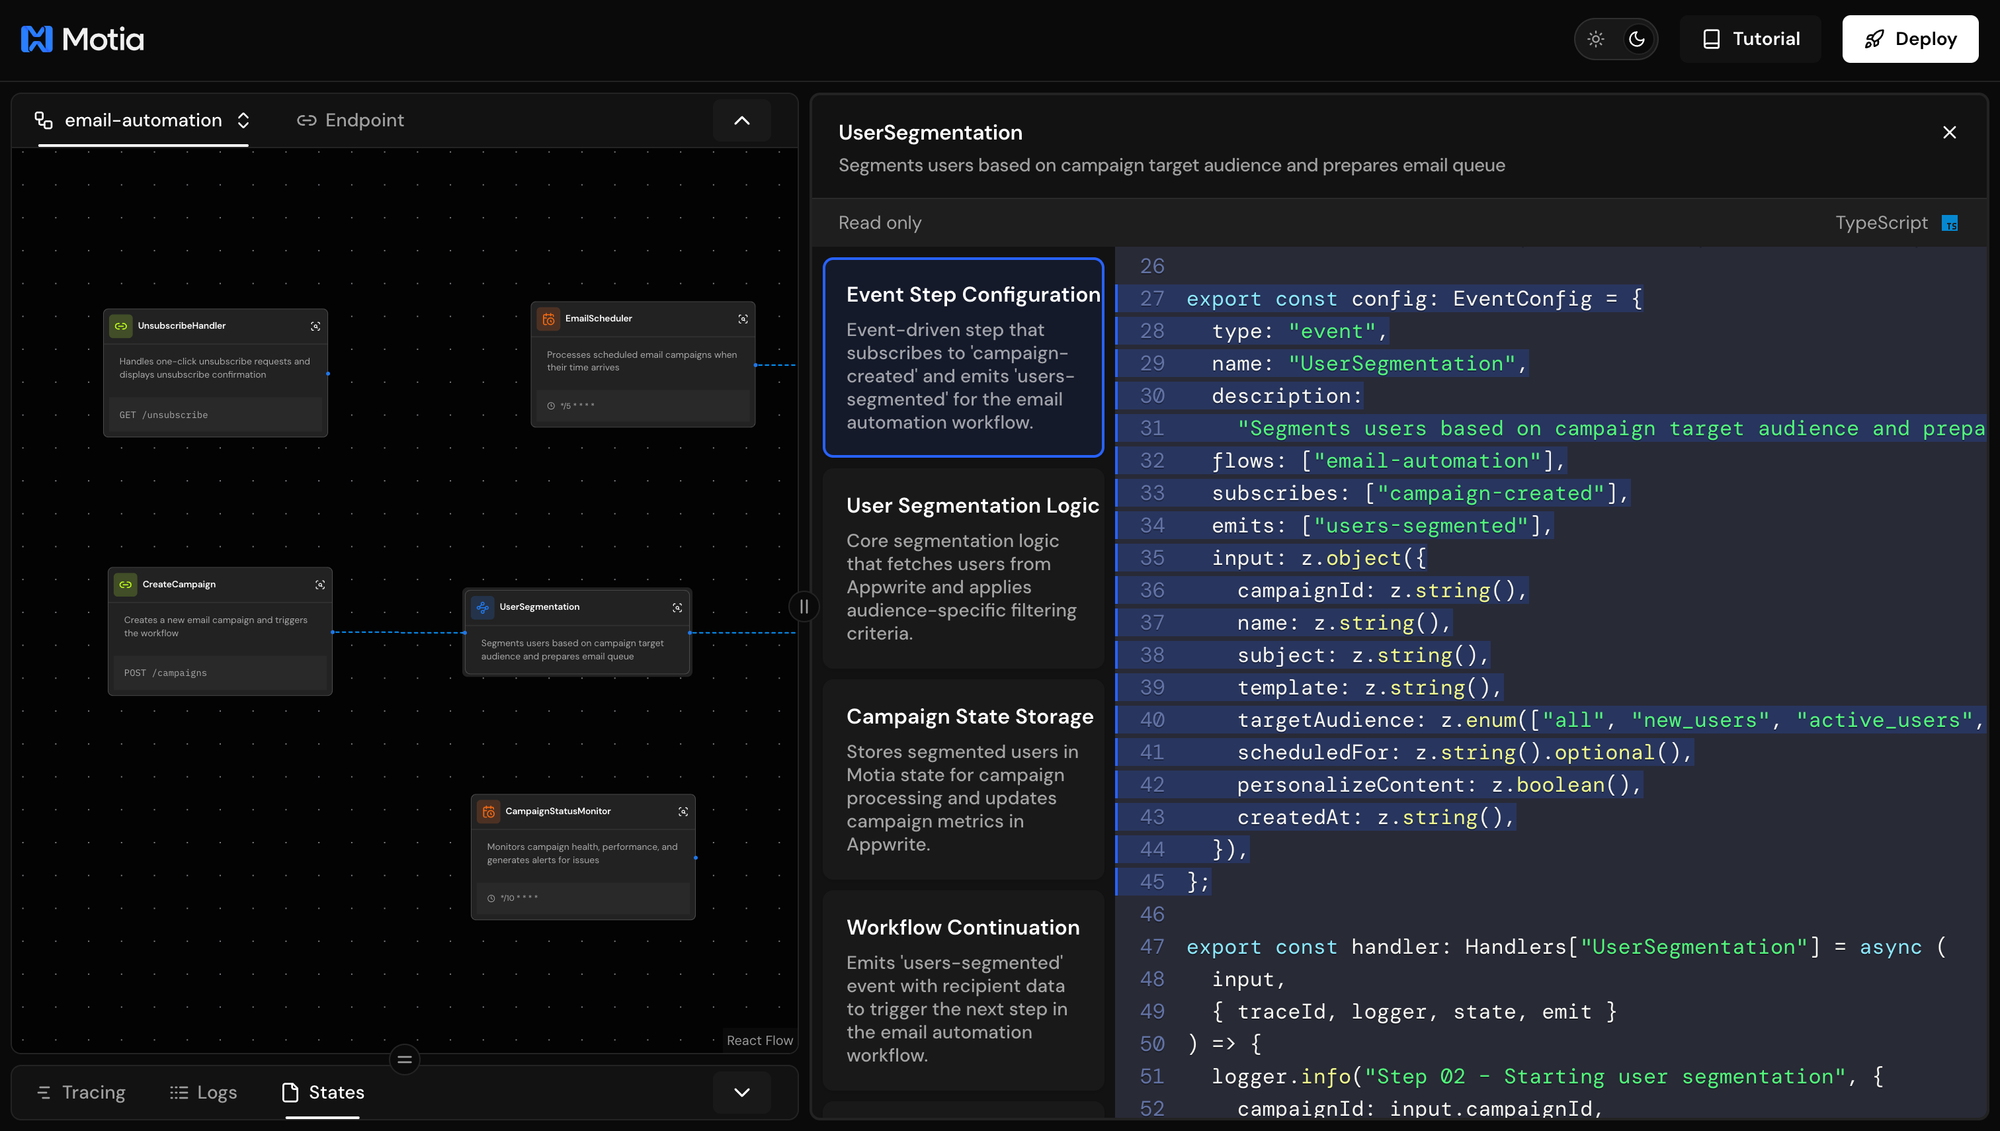
This event config defines:
type: 'event'- This is an event handler, not an API endpointflows: ["email-automation"]- Associates this step with the email-automation workflowsubscribes: ['campaign-created']- Automatically runs when Step 1 emits this eventinputschema - Validates the campaign data received from the previous step (campaignId, targetAudience, etc.)emits: ['users-segmented']- Passes segmented users to the next step
Key concepts:
Audience Targeting: The getUsersBySegment() function filters users based on criteria:
new_users- Signed up in the last 7 daysactive_users- Active in the last 30 daysvip_users- High purchase count or VIP statusall- All users with email marketing enabled
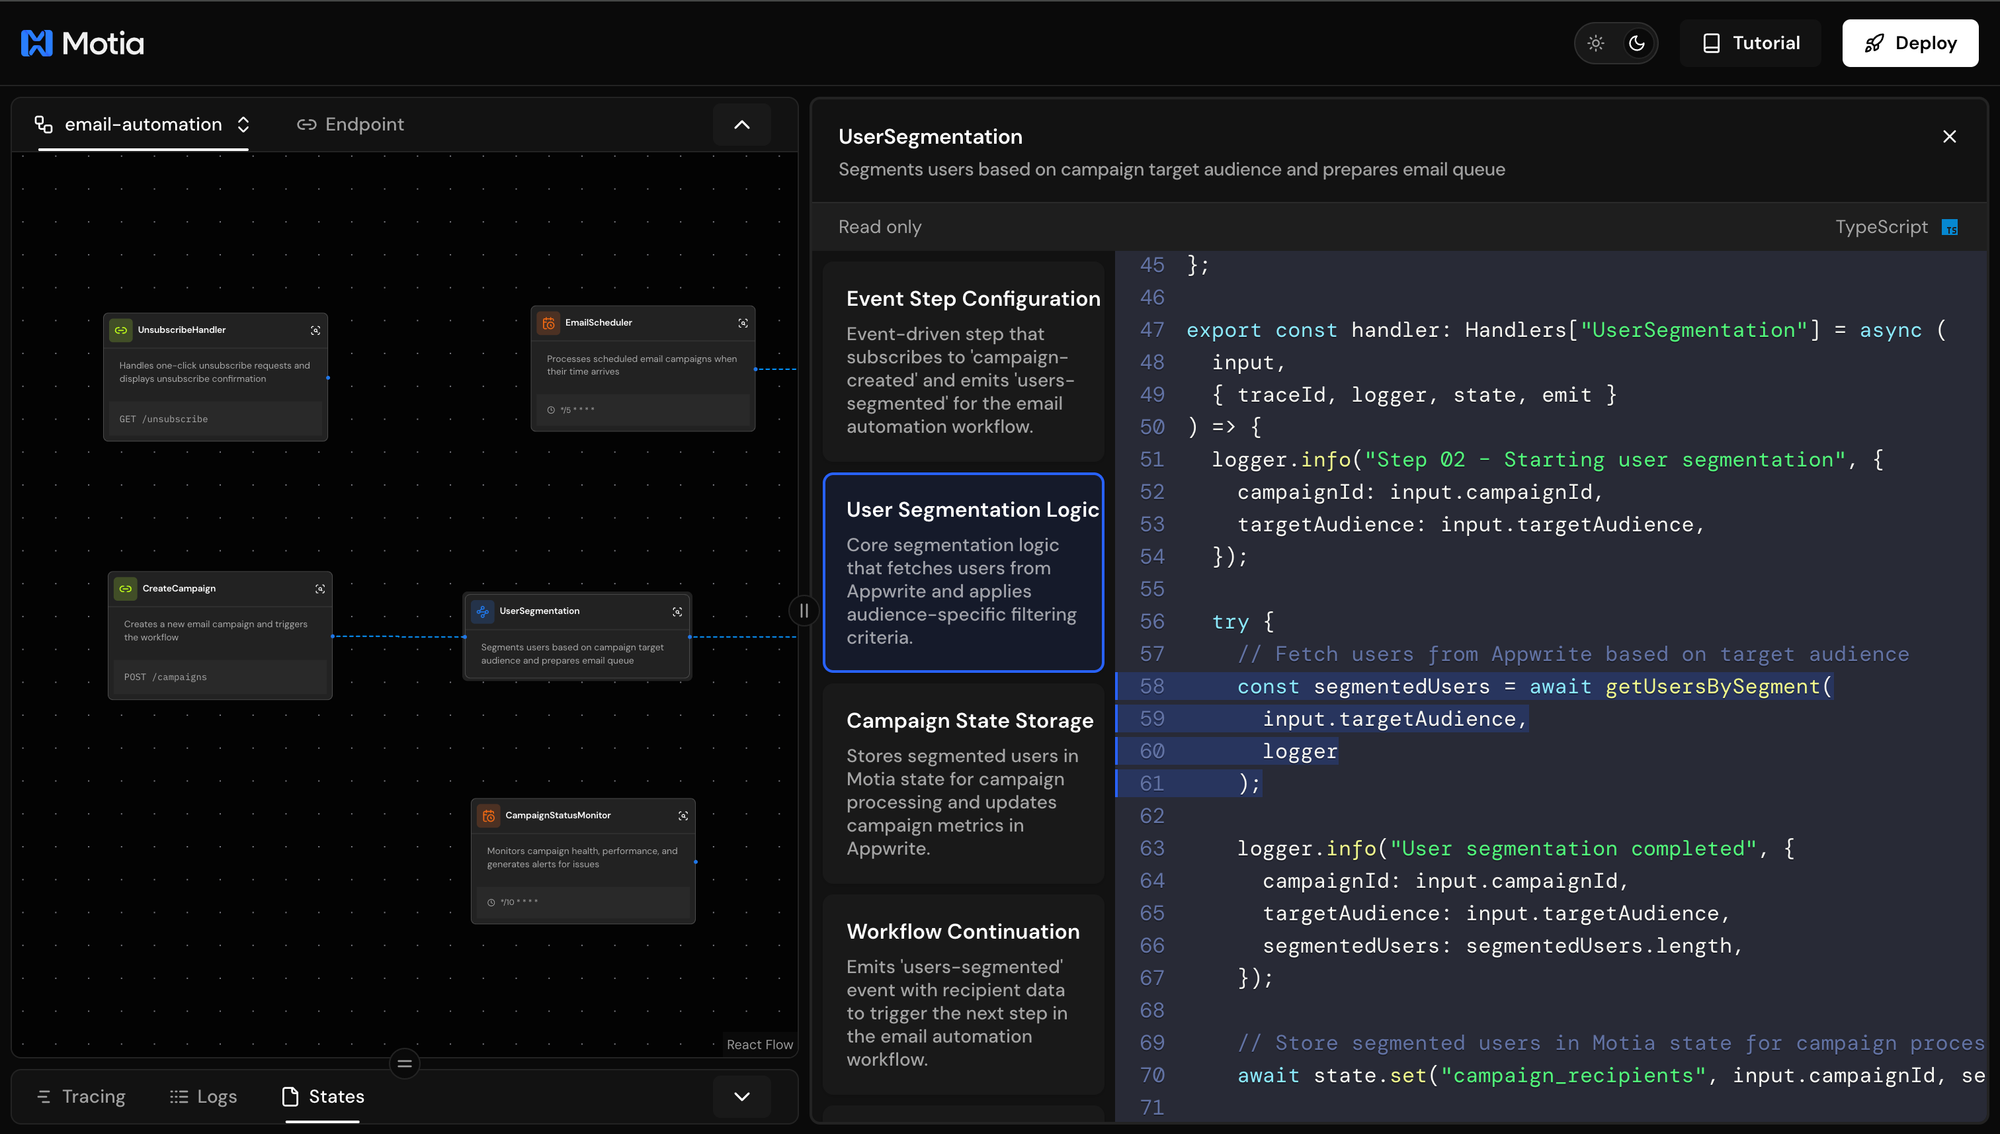
Motia State: state.set() stores data that other steps can access. This keeps recipients available for analytics and monitoring.
What's next: The segmented users are ready for personalization. Step 3 uses AI to customize content for each recipient.
Step 3: AI-Powered Content Personalization
With our users segmented, it's time to personalize the email content. This step uses OpenAI to generate unique, context-aware content for each subscriber.
Open steps/03-content-personalization_step.py
(NOTE: this is a Python step).
Configuration
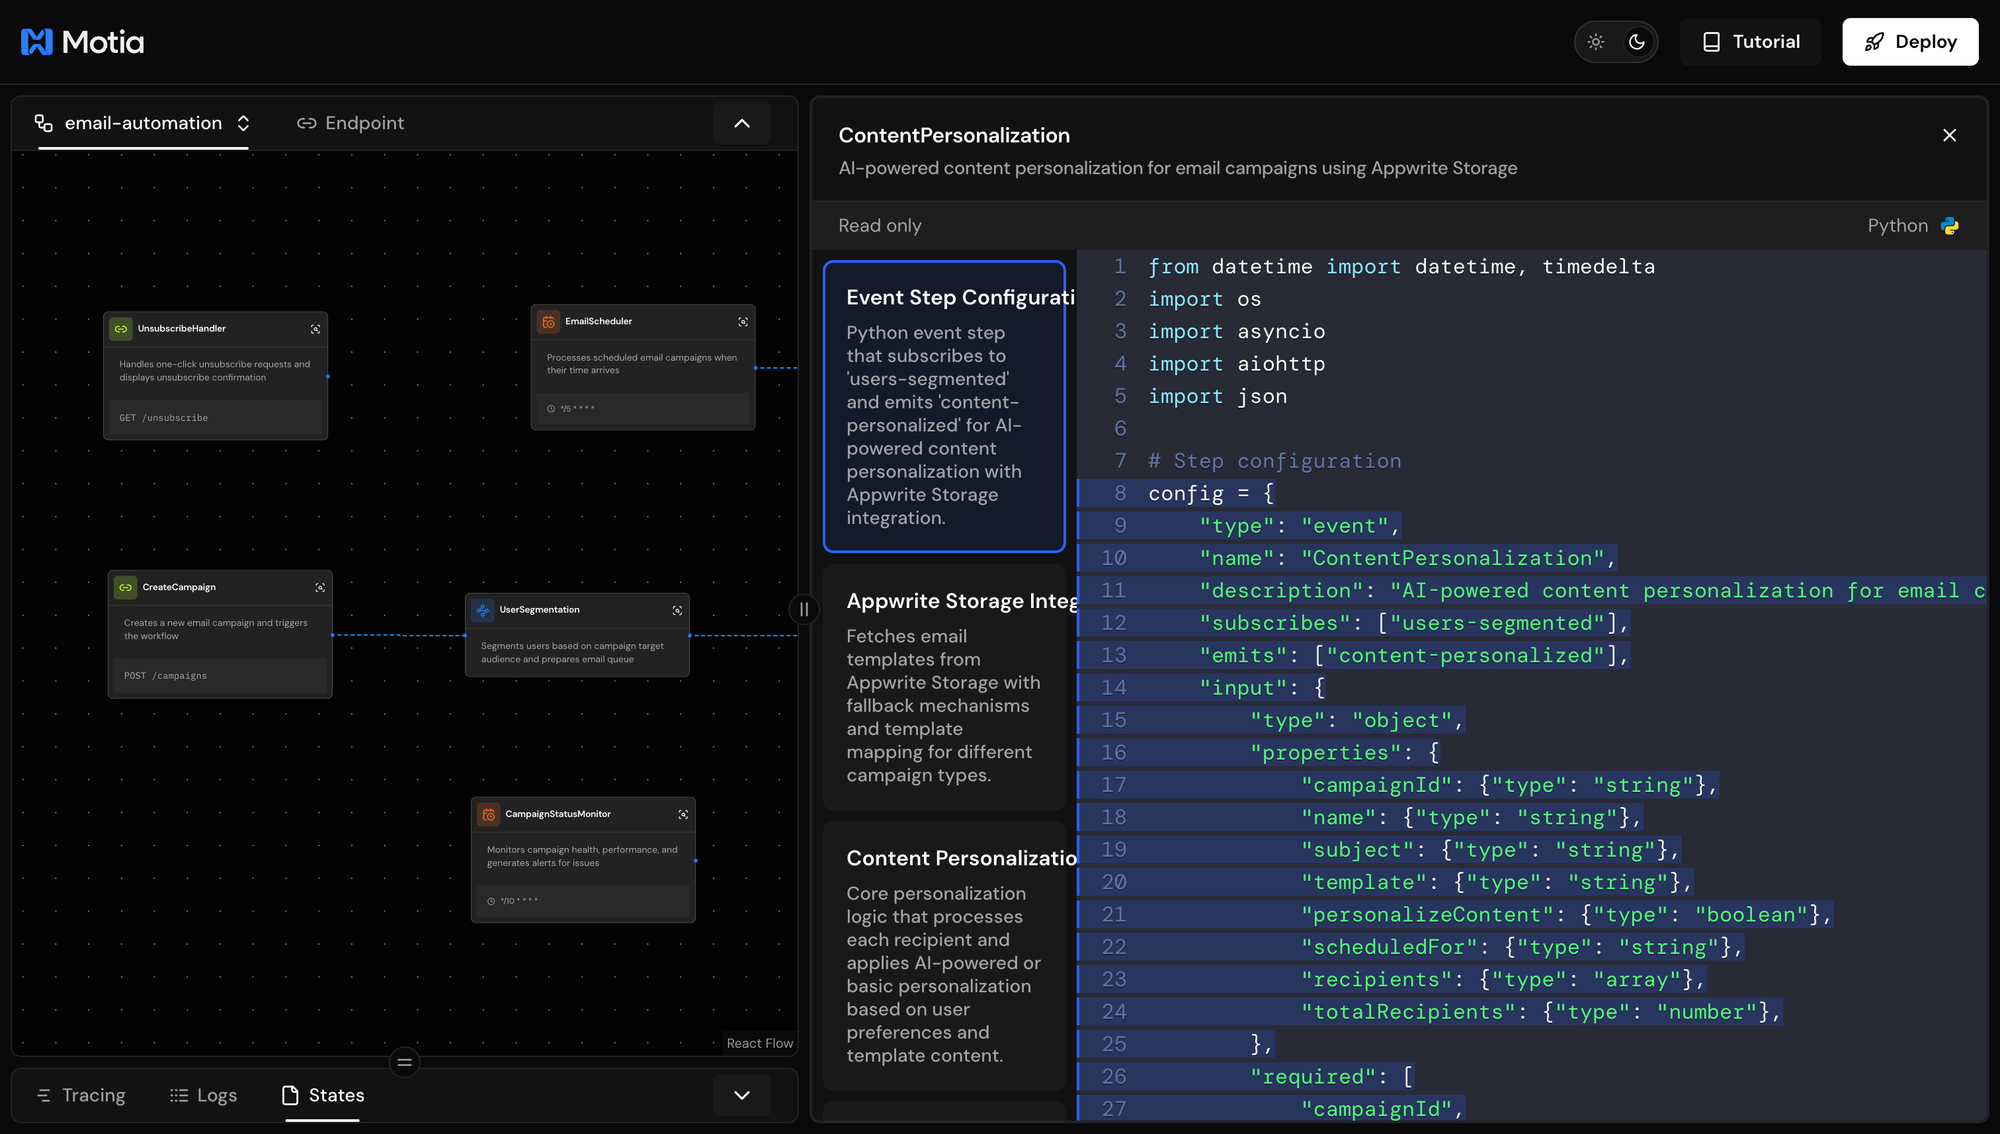
This Python step config defines:
type: "event"- Event-driven step that processes data automaticallyflows: ["email-automation"]- Part of the email-automation workflowsubscribes: ["users-segmented"]- Triggers when user segmentation completesinputschema - Validates received data, including campaignId, recipients array, and personalizeContent flagemits: ["content-personalized"]- Passes personalized content to the email sending step
Motia supports multi-language workflows. This Python step integrates seamlessly with the TypeScript steps we've been working with.
Personalization Handler
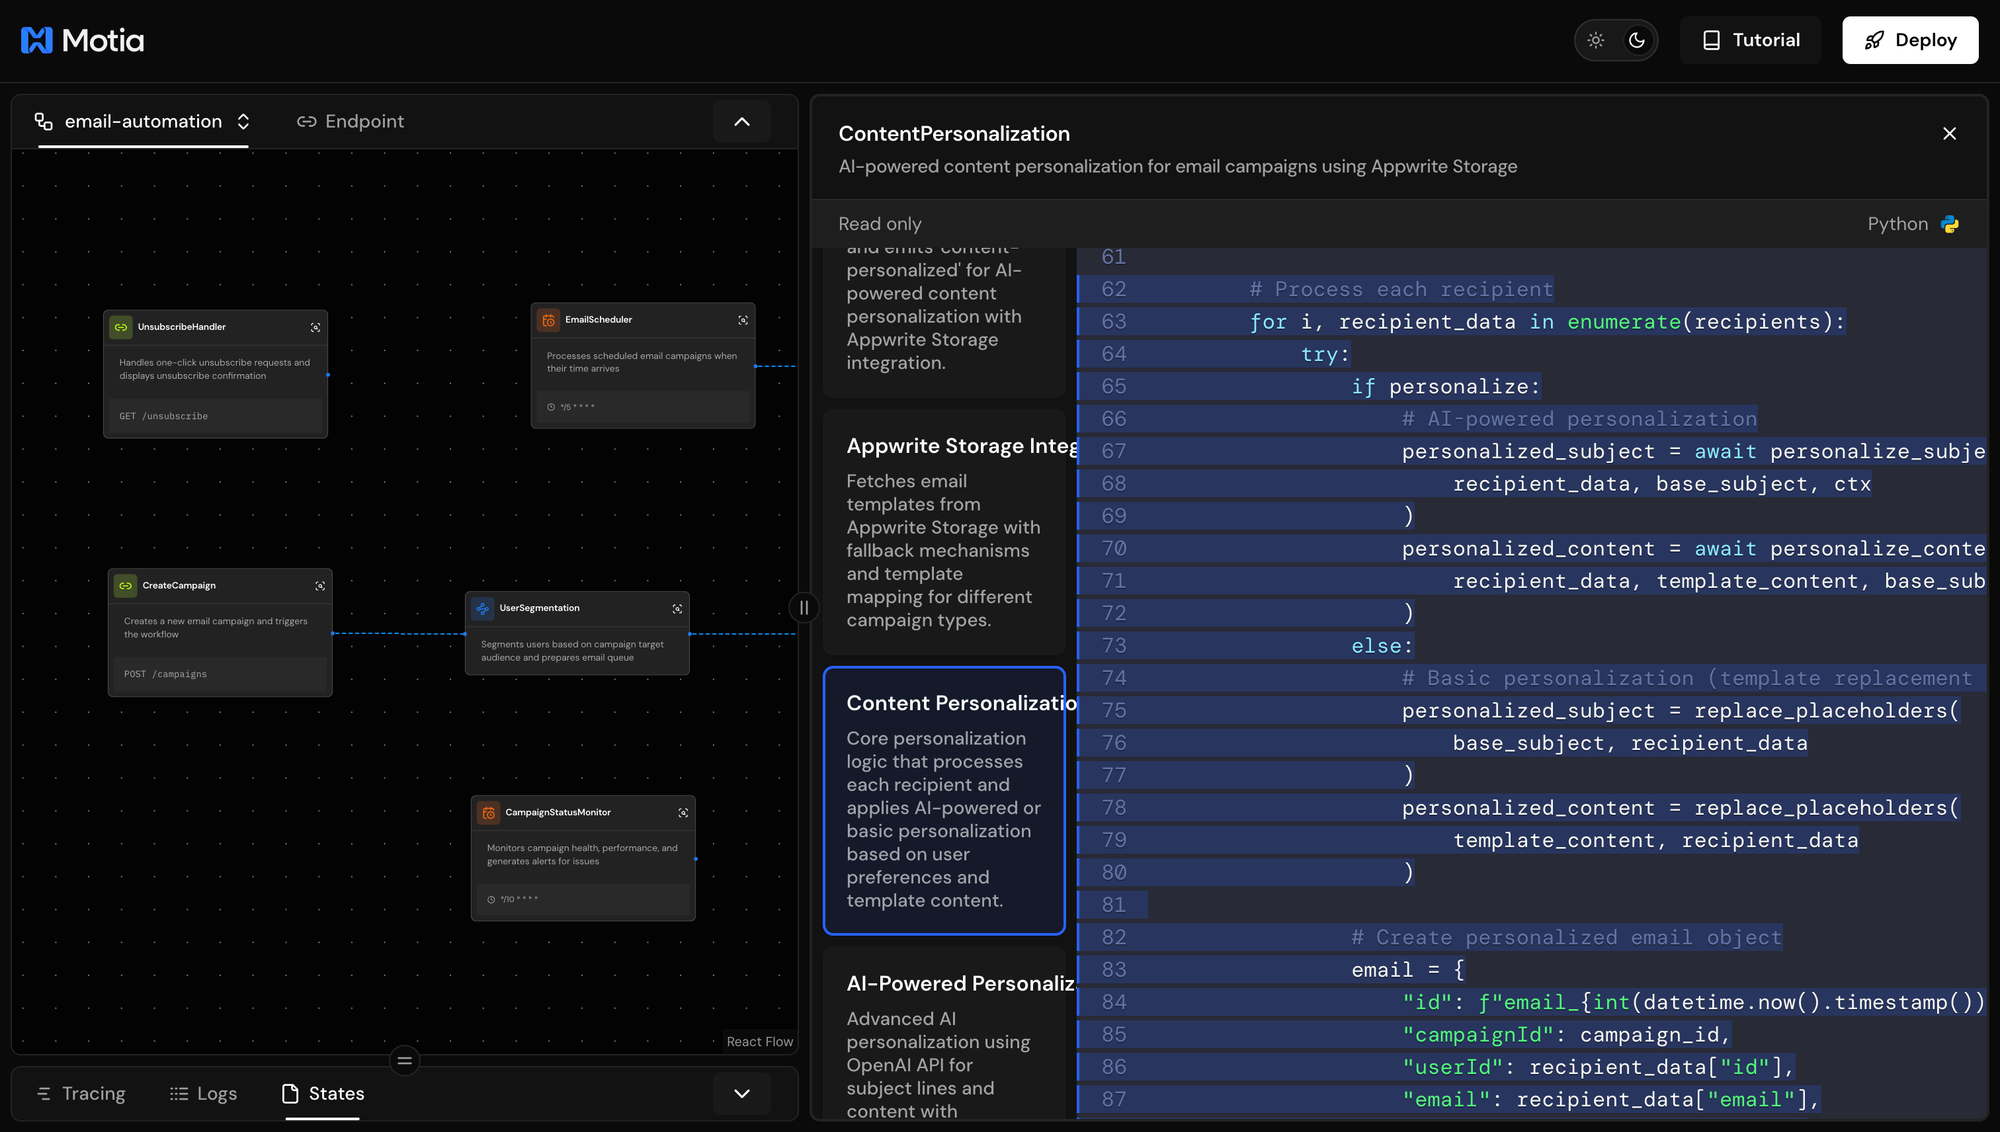
What's happening:
- Template Fetching: Retrieves email templates from Appwrite Storage
- AI Personalization: For each user, OpenAI generates:
- Custom subject lines based on user profile
- Personalized content sections based on engagement level, VIP status, and preferences
- Fallback Handling: If AI is unavailable, uses rule-based personalization
- Email Queue: Creates personalized email objects ready for delivery
Personalization Examples:
For a VIP user:
- Subject: VIP: Exclusive Early Access for Sarah
- Content includes VIP-specific offers and benefits
For a new user:
- Subject: Welcome Sarah! Get Started in 5 Minutes
- Content focuses on onboarding and getting started tips
Step 4: Email Delivery
Now that we have personalized content for each user, it's time to send the emails. This step handles batch processing, rate limiting, and delivery through Appwrite Messaging.
Open steps/04-email-delivery.step.ts.
Configuration

This event config defines:
type: "event"- Event-driven step that processes email delivery automaticallyflows: ["email-automation"]- Part of the email-automation workflowsubscribes: ["content-personalized"]- Triggers when content personalization completesemits: ["email-sent", "email-failed", "campaign-completed"]- Sends delivery status eventsinputschema - Validates incoming data including campaignId, personalizedEmails array, and totalEmails count
Key features:
- Batch Processing: Processes emails in batches of 10 to respect rate limits
- Rate Limiting: Adds delays between batches to avoid overwhelming email providers
- Scheduled Delivery: Handles future-scheduled campaigns by storing them for later processing
- Error Handling: Emits failure events and continues processing remaining emails
- Provider Integration: Uses AppwriteMessagingProvider to send emails through your configured email service
This step transforms personalized email content into actual delivered emails while managing delivery logistics and monitoring success rates.
Delivery Handler

Key Features:
Scheduled Delivery: If scheduledFor is in the future, the emails are stored for later processing by the cron job (Step 5).
Batch Processing: Sends 10 emails at a time to avoid overwhelming the email service and respect rate limits.
Error Handling: Uses Promise.allSettled() to continue processing even if individual emails fail.
Rate Limiting: 1-second delay between batches prevents hitting API rate limits.
Appwrite Integration: The AppwriteMessagingProvider handles:
- Creating Appwrite users if they don't exist
- Setting up email targets
- Sending emails through Appwrite's messaging service
Single Email Delivery

What's next: For scheduled campaigns, Step 5 checks periodically and triggers delivery at the right time.
Step 5: Email Scheduler
Not all campaigns send immediately. The email scheduler is a cron job that checks every 5 minutes for campaigns scheduled to send.
Open steps/05-email-scheduler.step.ts.
Configuration
This cron step config defines:
type: "cron"- Scheduled task that runs automatically at intervalscron: "*/5 * * * *"- Executes every 5 minutes using cron syntaxflows: ["email-automation"]- Part of the email-automation workflowemits: ["content-personalized"]- Triggers email delivery when scheduled time arrivesdescription- Processes scheduled campaigns when their delivery time is reached
The cron expression */5 * * * * means:
*/5- Every 5 minutes*- Every hour*- Every day of month*- Every month*- Every day of week
This step automatically checks for campaigns with future scheduledFor times. When a scheduled campaign's time arrives, it emits the content-personalized event to trigger immediate email delivery, enabling deferred campaign sending.

Scheduler Handler

How It Works:
- Check Every 5 Minutes: The cron job runs automatically
- Query State: Retrieves all scheduled campaigns
- Time Comparison: Checks if current time >= scheduled time
- Trigger Delivery: Emits the content-personalized event (same as Step 3)
- Cleanup: Old triggered campaigns are cleaned up after 24 hours
What's next: Once emails are sent, we need to track engagement. Steps 6-7 handle analytics and monitoring.
Step 6: Email Analytics Tracker
After emails are sent, tracking engagement is crucial. This step listens for email events (opens, clicks, bounces) and updates analytics in real-time.
Open steps/06-email-analytics-tracker.step.ts.
Configuration

This event config defines:
type: "event"- Event-driven step that processes analytics data automaticallyflows: ["email-automation"]- Part of the email-automation workflowsubscribes: [multiple email events]- Listens for 6 different email engagement events:email-sent- When emails are successfully sentemail-delivered- When emails reach recipient inboxesemail-opened- When recipients open emailsemail-clicked- When recipients click linksemail-bounced- When emails bounce backemail-unsubscribed- When users unsubscribe
emits: ["analytics-updated", "engagement-milestone"]- Sends updated analytics and milestone notificationsinputschema - Validates incoming event data including emailId, campaignId, eventType, and timestamp
This step acts as a central analytics hub, automatically processing all email engagement events in real-time to update campaign metrics, track individual email performance, and detect engagement milestones like reaching certain open or click rates.
Campaign-Level Analytics
Metrics Tracked:
- Delivery Rate: % of emails successfully delivered
- Open Rate: % of delivered emails that were opened
- Click Rate: % of opened emails where links were clicked
- Bounce Rate: % of emails that bounced
- Unsubscribe Rate: % of recipients who unsubscribed
View Analytics
In the Workbench, click on the State tab and select campaign_analytics. You'll see real-time metrics for each campaign:
What's next: Step 7 monitors overall campaign health and generates alerts for issues.
Step 7: Campaign Status Monitor
The final step in our core workflow is a health monitoring system. This cron job runs every 10 minutes to check campaign performance and generate alerts for issues.
Open steps/07-campaign-status-monitor.step.ts.
Configuration
This cron step config defines:
type: "cron"- Scheduled task that runs automatically at intervalscron: "*/10 * * * *"- Executes every 10 minutes using cron syntaxflows: ["email-automation"]- Part of the email-automation workflowemits: ["campaign-alert", "campaign-health-report"]- Sends alerts and health reports to other systemsdescription- Monitors campaign performance and generates alerts for issues
The cron expression */10 * * * * means:
*/10- Every 10 minutes*- Every hour*- Every day of month*- Every month*- Every day of week
This step automatically runs in the background to monitor campaign health, detect stuck campaigns, calculate performance metrics, and generate alerts when campaigns have issues like low delivery rates or high bounce rates.

Monitoring Handler
export const handler = async ({ logger, state, emit }) => {
  const campaigns = await state.getGroup('campaigns');
  const activeCampaigns = campaigns.filter(c =>
    ['processing', 'sending', 'sent'].includes(c.status)
  );

  for (const campaign of activeCampaigns) {
    // Calculate health score
    const healthCheck = await monitorCampaignHealth(campaign, state, logger);

    // Generate alerts if needed
    if (healthCheck.alerts.length > 0) {
      await emit({
        topic: 'campaign-alert',
        data: {
          campaignId: campaign.id,
          alerts: healthCheck.alerts
        }
      });
    }

    // Generate health report
    await generateHealthReport(campaign, healthCheck, state, emit, logger);

    // Check for stuck campaigns
    await checkStuckCampaigns(campaign, state, logger);
  }
};
Health Monitoring

What Gets Monitored:
- Delivery rates below 85% (critical if below 70%)
- Bounce rates above 10% (critical if above 20%)
- Open rates below 5% after 100 deliveries
- Stuck campaigns processing for more than 4 hoursampaign health score (0-100 based on metrics)
Beyond the Core Workflow
The system includes three additional steps that handle 3 differenct scenarios. Steps 1-7 form the main campaign workflow, these 3 steps run independently to manage user preferences, onboarding sequences, and behavioral responses.
Step 8: Unsubscribe Handler
When users click unsubscribe in an email, this API endpoint processes the request and updates their preferences. It generates unique tokens for each unsubscribe link, logs the action for compliance, and automatically stops any active email sequences for that user. You can test it by checking the /unsubscribe endpoint in the Workbench, it handles the entire opt-out flow including confirmation pages.
Step 9: Welcome Email Series
New users automatically enter a 4-email welcome sequence when they sign up. The first email sends immediately with account setup tips. The second comes 2 days later with getting started guides. After a week, they receive success stories from other users. Finally, after a month, they get advanced tips and pro features. The timing adapts based on engagement, if someone opens and clicks emails quickly, the next one arrives sooner.
Step 10: Behavioral Trigger Engine
This step watches for specific user actions and responds with targeted campaigns. If someone abandons their cart, it triggers a 3-email recovery sequence. When users go inactive for 30 days, it sends a re-engagement email. High-engagement users get thank you messages and special offers. The engine checks conditions like purchase history and engagement scores before sending, so users only receive relevant messages.
These three steps work alongside your main campaigns, handling the ongoing relationship with subscribers after the initial campaign sends.
Testing the Complete System
Let's test the entire workflow end-to-end using Motia's Workbench.
Test 1: VIP Campaign Creation
Step 1: Create the Campaign
In the Workbench, navigate to the /campaigns endpoint and use this payload:
{
  "name": "VIP Exclusive Offer",
  "subject": "Exclusive early access for our VIP members",
  "template": "vip",
  "targetAudience": "vip_users",
  "personalizeContent": true
}
Click Play to execute the request.

Step 2: Watch the Workflow Execute
Switch to the Tracing tab to see the complete execution flow:
- CreateCampaign creates the campaign
- UserSegmentation filters VIP users
- ContentPersonalization generates AI content
- EmailDelivery sends emails in batches
- EmailAnalyticsTracker logs send events

Step 3: Verify Results
Check Appwrite Database:
Go to Databases → email-marketing-db → campaigns to verify the campaign record was created with the correct details.

Check Appwrite Messaging:
Go to Messaging → Messages in your Appwrite Console to see emails sent.

Check Logs:
In the Logs tab, verify each step completed successfully and view the detailed execution flow.

Test 2: Scheduled Campaign
Create a campaign scheduled for 10 minutes in the future:
{
  "name": "Morning Newsletter",
  "subject": "Your daily tech update",
  "template": "newsletter",
  "targetAudience": "active_users",
  "scheduledFor": "2025-10-08T09:00:00Z",
  "personalizeContent": true
}

After execution, check the Tracing tab to see the campaign queued for future delivery.

Understanding the Event Flow
The power of Motia's event-driven architecture is how steps automatically connect through events. Here's the complete flow:
POST /campaigns
    ↓
CreateCampaign (Step 1)
    └─ emits: campaign-created
           ↓
UserSegmentation (Step 2)
    └─ emits: users-segmented
           ↓
ContentPersonalization (Step 3)
    └─ emits: content-personalized
           ↓
EmailDelivery (Step 4)
    ├─ emits: email-sent → EmailAnalyticsTracker (Step 6)
    └─ emits: campaign-completed

Every 5 min:
EmailScheduler (Step 5)
    └─ checks scheduled_campaigns
    └─ emits: content-personalized (when time arrives)

Every 10 min:
CampaignStatusMonitor (Step 7)
    └─ checks campaign health
    └─ emits: campaign-alert (if issues found)
Key Concepts:
Event-Driven: Steps don't call each other directly. They emit events that trigger subscribers.
Decoupled: Each step is independent. You can add, remove, or modify steps without breaking others.
Scalable: Motia handles the orchestration, state management, and execution automatically.
Observable: Built-in tracing, logging, and state inspection at every step.
Conclusion
You've learned how to build a complete email marketing system using Motia's event-driven architecture with: Steps communicate through events, creating loosely coupled, scalable workflows. Mix TypeScript and Python in the same workflow based on what each task needs. Tracing, logging, and state management come out of the box.
Motia unified what would normally require multiple frameworks (API server, job queue, cron scheduler, state management) into one cohesive system. You focused on business logic while Motia handled the infrastructure.
Ready to build your own workflows? Start with the Motia Quick Start or explore more examples.
Found this helpful? Star the Motia repository and share your experience building with Motia!