Introduction
Your users upload a 5MB photo, and your site crashes. Sound familiar? Or maybe your mobile users are stuck waiting 30 seconds for a massive desktop image to load. We've all been there.
Most image processing solutions are either too complex (hello, microservices nightmare) or too slow (sequential processing that makes users wait). But what if you could upload one image and instantly get three perfectly optimized versions - desktop, mobile, and compressed - all processed at the same time?
This image processing pipeline runs entirely on Motia's event-driven framework. Upload one image, and the system automatically creates three versions in parallel: a crisp desktop version (1920px), a mobile-optimized version (720px), and a compressed low-quality version (480px) for fast loading.
Here's what happens when you upload an image: the system validates the file, saves it to AWS S3, and then triggers three separate resize operations that all run at the same time. While one process creates the desktop version, another handles mobile, and a third creates the compressed version. All of this happens in parallel, so your users get their processed images in seconds, not minutes.
The core technologies we used are Motia for orchestrating the entire pipeline, Sharp for lightning-fast image processing, AWS S3 for cloud storage, and TypeScript for type safety and reliability.
In this tutorial, you'll learn how to build production-ready image processing systems that handle multiple formats simultaneously. You'll see how event-driven architecture makes it easy to add new image sizes without breaking existing functionality, how to handle file uploads and cloud storage efficiently, and how to create systems that scale automatically as your traffic grows.
Why this Architecture
Traditional image processing is painfully slow because everything happens one after another. Upload an image, wait for it to save, then wait for desktop resize, then wait for mobile resize, then wait for compression. By the time it's done, your users have given up.
Motia's event-driven approach changes everything. One upload triggers three simultaneous processes. Think of it like a restaurant kitchen - instead of one chef making your entire meal step by step, you have three chefs working on different parts at the same time. Your meal (processed images) arrives much faster.
The upload step only handles validation and storage. It doesn't know anything about resizing - that's not its job. Once the image is safely stored, it emits an event that wakes up three specialized workers: desktop resizer, mobile resizer, and compression specialist. Each worker focuses on one task and does it really well.
When each worker finishes, they report back to a completion tracker. The tracker keeps score - "desktop done, mobile done, still waiting on compression." Once all three are complete, it emits a final "all done" event. This means you can easily add new formats (like tablet or thumbnail) without changing any existing code.
Project Overview
Here's how the system works when someone uploads an image:
1. Upload and validate → Image arrives via API, gets checked for format and size
2. Save to cloud storage → Original image stored in AWS S3 with unique filename
3. Trigger parallel processing → Single event wakes up three resize workers
4. Simultaneous resizing → Three processes run at the same time:
- Desktop resizer creates 1920px version (90% quality)
- Mobile resizer creates 720px version (85% quality)
- Compression resizer creates 480px version (60% quality)
5. Track completion → Completion tracker monitors all three processes
6. Final confirmation → System confirms when all processing is complete
The five main processing steps are:
- Upload handler: Validates files and saves originals to S3
- Desktop resizer: Creates high-quality desktop versions
- Mobile resizer: Optimizes images for mobile devices
- Compression resizer: Creates fast-loading low-quality versions
- Completion tracker: Monitors and confirms when all processing is done
Each step only runs when needed. If you add a new image size later, the existing steps don't change. If one resize fails, the others keep working. This keeps the system reliable and easy to maintain.
The upload → validate → store → parallel resize → track completion flow means adding new features is just a matter of creating new resize workers that listen for the same event.
Prerequisites
Before building this image processing pipeline, you need these accounts and tools set up:
Required Services and Accounts
AWS Account
- Sign up at https://aws.amazon.com/
- Create an S3 bucket for image storage
- Generate access keys from IAM console
- You'll need this for storing original and processed images
Development Tools
Node.js (v18+)
# Check if installed
node --version
npm --version
Motia CLI
# Install Motia globally
npm install -g motia

# Verify installation
motia --version
Create New Motia Project
Initialize the project:
# Create new Motia project
npx motia@latest create -n image-processor

# Navigate to project
cd image-processor
This creates a basic Motia project structure with:
steps/folder for your processing pipelineshared/folder for utilities and interfacespackage.jsonwith Motia dependencies- Example configuration files
Environment Configuration
Create a .env file in your project root:
# Storage Configuration
STORAGE_TYPE=s3

# AWS S3 Configuration
AWS_ACCESS_KEY_ID=your_access_key_here
AWS_SECRET_ACCESS_KEY=your_secret_key_here
AWS_REGION=us-east-1
AWS_S3_BUCKET_NAME=your-bucket-name
Quick Setup Check
Run this to verify everything works:
# Install dependencies
npm install

# Start Motia development server
npm run dev
If Motia Workbench opens at http://localhost:3000 and shows your project, you're ready to build.
The First Step: Upload and Storage
When someone sends an image to your processing pipeline, it needs to get validated, stored safely, and trigger the resize operations. That's where the upload handler comes in - the entry point that receives images and starts everything else.
Setting up the Image Upload Handler
First, create the upload step that will receive all image uploads:
Create steps/upload-image.step.ts:
import { ApiRouteConfig, Handlers } from 'motia'
import { z } from 'zod'
import type { ImageMetadata } from '../shared/interfaces'
import {
  generateUniqueFilename,
  isValidImageFormat,
  getImageFormat,
  generateStorageKeys,
  saveImageBuffer,
  getImageUrl,
  validateBase64ImageData
} from '../shared/storage-utils'

export const config: ApiRouteConfig = {
  type: 'api',
  name: 'UploadImage',
  description: 'Upload and save image, then trigger parallel resize operations',
  method: 'POST',
  path: '/upload-image',
  emits: ['image-saved'],
  flows: ['image-processing']
}
This creates a POST endpoint at /upload-image that accepts image uploads. The emits: ['image-saved'] tells Motia that this step will trigger other parts of the system when it's done.
Handling File Uploads and Validation
The upload handler needs to accept both file uploads and base64 JSON data:
export const handler: Handlers['UploadImage'] = async (req, { logger, emit, traceId }) => {
  try {
    // Handle both file uploads and base64 JSON
    let filename: string
    let imageBuffer: Buffer

    if (req.body && req.body.filename && req.body.data) {
      // Handle JSON base64 upload
      filename = req.body.filename
      const base64Data = req.body.data.replace(/^data:image\/[a-z]+;base64,/, '')
      imageBuffer = Buffer.from(base64Data, 'base64')
    } else {
      return {
        status: 400,
        body: {
          error: 'Invalid request',
          details: 'Please provide JSON with filename and base64 data'
        }
      }
    }

    logger.info('Starting image upload process', { filename, fileSize: imageBuffer.length })
This handles the most common upload format - JSON with base64 encoded image data. The system strips out any data URL prefixes and converts the base64 string into a proper Buffer for processing.
Image Format and Size Validation
Before processing, we need to make sure the image is valid:
    // Validate image format
    if (!isValidImageFormat(filename)) {
      logger.warn('Invalid image format', { filename })
      return {
        status: 400,
        body: {
          error: 'Invalid image format',
          details: 'Only JPEG, PNG, and WebP formats are supported'
        }
      }
    }

    // Validate file size (50MB limit)
    if (imageBuffer.length > 50 * 1024 * 1024) {
      logger.warn('File too large', { fileSize: imageBuffer.length })
      return {
        status: 400,
        body: {
          error: 'File too large',
          details: 'Maximum file size is 50MB'
        }
      }
    }

    // Validate base64 data integrity
    validateBase64ImageData(req.body.data)
The validation checks three things: file format (JPEG, PNG, WebP only), file size (50MB max), and data integrity (making sure the base64 decodes to a valid image).
Generating Unique Filenames and Storage Keys
To avoid conflicts and organize files properly, we generate unique filenames and storage paths:
    // Generate unique filename and storage keys
    const uniqueFilename = generateUniqueFilename(filename)
    const storageKeys = generateStorageKeys(uniqueFilename)
    const format = getImageFormat(filename)

    logger.info('Generated storage keys', {
      uniqueFilename,
      originalKey: storageKeys.original,
      format
    })
The generateUniqueFilename() function adds a UUID to prevent filename collisions. The generateStorageKeys() function creates organized paths like:
originals/image_uuid.jpg- Original uploaded imagedesktop/image_uuid-desktop.jpg- Desktop versionmobile/image_uuid-mobile.jpg- Mobile versionlowquality/image_uuid-lowquality.jpg- Compressed version
Saving to AWS S3 and Emitting Events
Once validation passes, we save the image to S3 and trigger the resize pipeline:
// Save image to S3 storage
const contentType = getContentTypeFromFilename(filename)
const originalStorageKey = await saveImageBuffer(imageBuffer, storageKeys.original, contentType)
const originalUrl = await getImageUrl(originalStorageKey)
logger.info('Image saved to storage', { originalStorageKey, originalUrl })
// Create image metadata
const imageMetadata: ImageMetadata = {
originalFilename: filename,
uniqueFilename,
format,
originalStorageKey,
originalUrl,
traceId,
uploadedAt: new Date()
}
// Emit event to trigger parallel resize operations
await emit({
topic: 'image-saved',
data: {
...imageMetadata,
uploadedAt: imageMetadata.uploadedAt.toISOString()
}
})
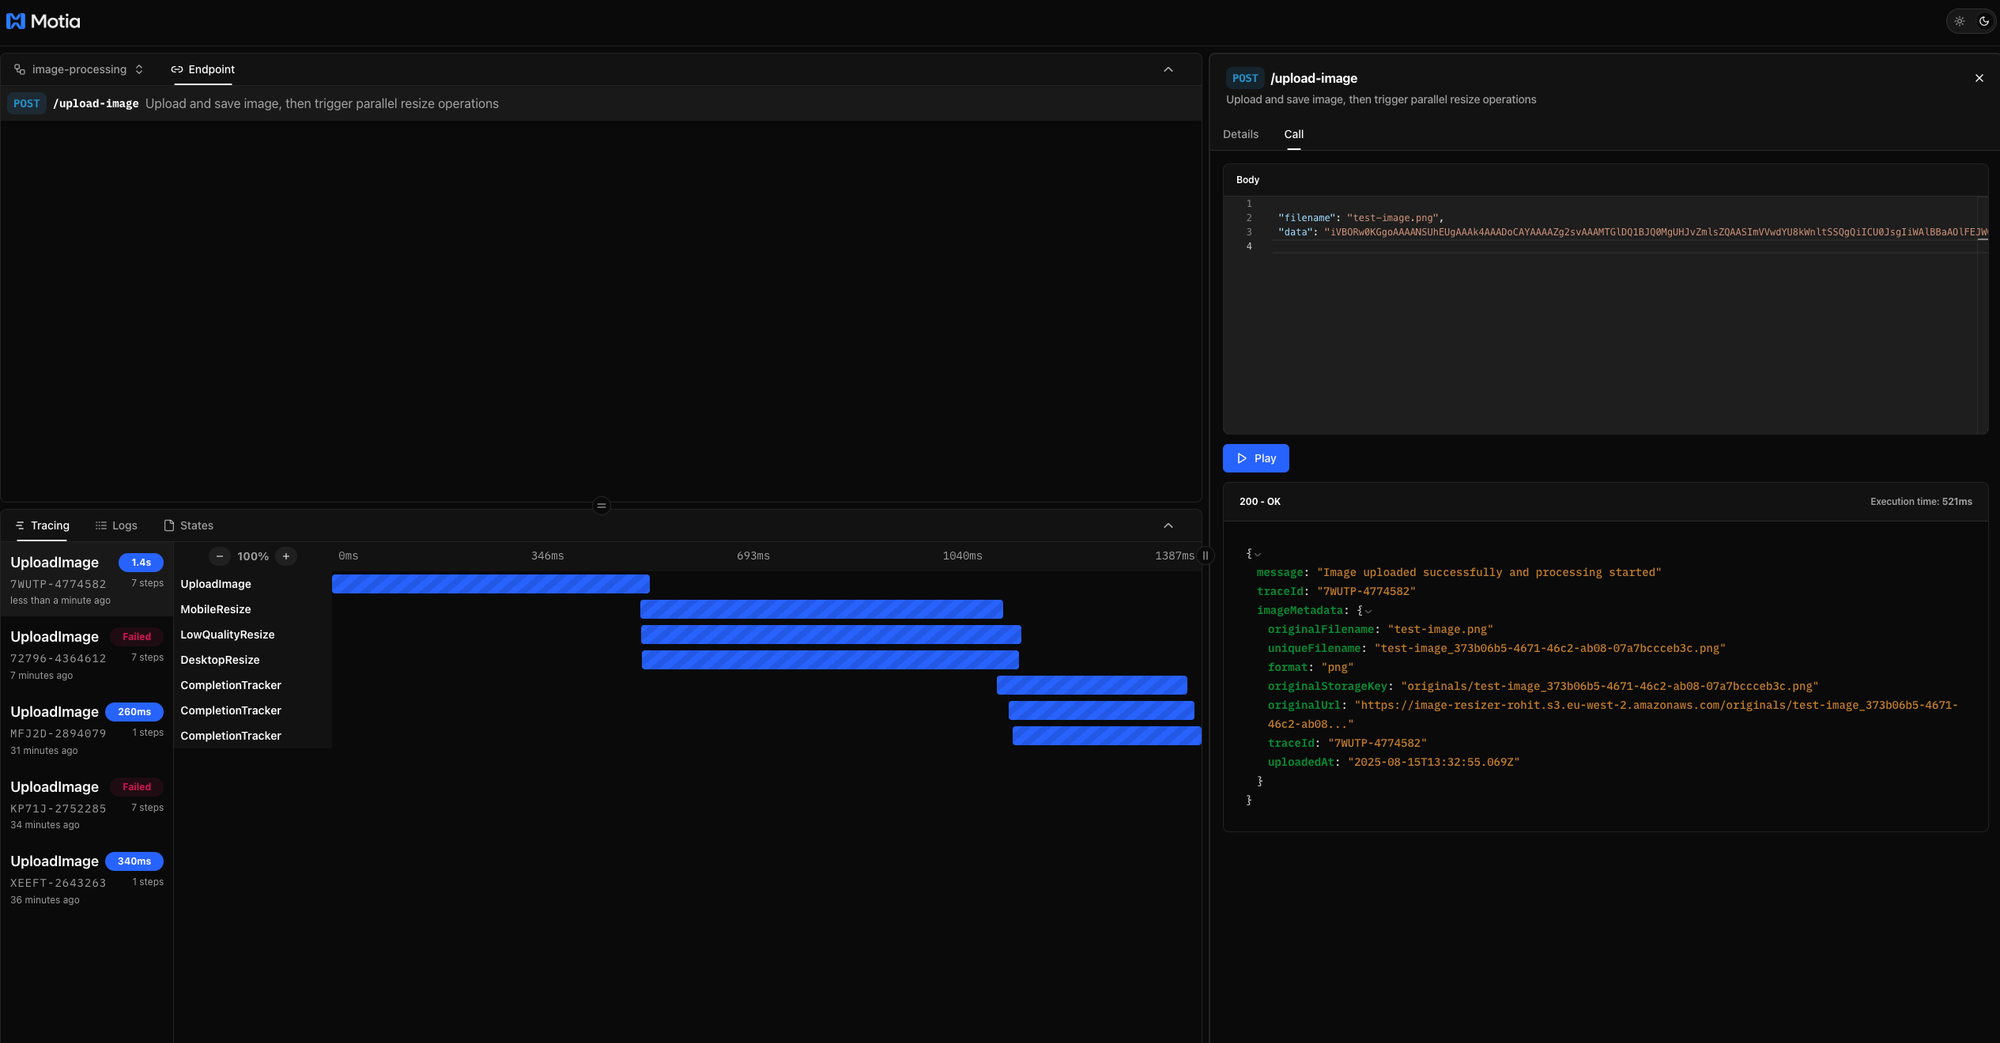
return {
status: 200,
body: {
message: 'Image uploaded successfully and processing started',
traceId,
imageMetadata: {
...imageMetadata,
uploadedAt: imageMetadata.uploadedAt.toISOString()
}
}
}
} catch (error) {
logger.error('Upload failed', { error: error.message })
return {
status: 500,
body: { error: 'Internal server error' }
}
}
}
The emit() function sends an image-saved event with all the metadata needed for processing. Three separate resize workers will receive this event and start working immediately - all at the same time.
Second Step: Parallel Image Resizing
When the upload step emits the image-saved event, three resize workers spring into action simultaneously. Each worker specializes in creating one specific image variant, and they all work at the same time for maximum speed.
Setting up the Desktop Resizer
The desktop resizer creates high-quality images optimized for large screens:
Create steps/desktop-resize.step.ts:
import { EventConfig, Handlers } from 'motia'
import { z } from 'zod'
import sharp from 'sharp'
import {
  generateStorageKeys,
  getImageStream,
  saveImageStream,
  getImageUrl,
  getResizeConfig
} from '../shared/storage-utils'

export const config: EventConfig = {
  type: 'event',
  name: 'DesktopResize',
  description: 'Resize uploaded image for desktop viewing (1920px width)',
  subscribes: ['image-saved'],
  emits: ['desktop-resize-complete'],
  flows: ['image-processing']
}
This step listens for image-saved events and emits desktop-resize-complete when finished. The event-driven design means it automatically starts working whenever an image is uploaded.
Using Sharp for High-Performance Image Processing
Sharp is incredibly fast because it uses native code and streams. Here's how we use it:
export const handler: Handlers['DesktopResize'] = async (imageMetadata, { logger, emit, traceId }) => {
  try {
    logger.info('Starting desktop resize operation', {
      filename: imageMetadata.originalFilename,
      originalKey: imageMetadata.originalStorageKey
    })

    // Get storage keys and resize configuration
    const storageKeys = generateStorageKeys(imageMetadata.uniqueFilename)
    const resizeConfig = getResizeConfig('desktop') // { width: 1920, quality: 90 }

    // Get original image stream from S3
    const originalStream = await getImageStream(imageMetadata.originalStorageKey)

    // Create Sharp transform stream
    const sharpTransform = sharp()
      .resize(resizeConfig.width, null, {
        withoutEnlargement: true,
        fit: 'inside'
      })
      .jpeg({ quality: resizeConfig.quality || 90 })

    // Process and save using streams
    const resizedStream = originalStream.pipe(sharpTransform)
    const outputStorageKey = await saveImageStream(resizedStream, storageKeys.desktop)
    const outputUrl = await getImageUrl(outputStorageKey)

    logger.info('Desktop resize completed', {
      targetWidth: resizeConfig.width,
      outputKey: outputStorageKey
    })
The magic happens in the Sharp transform. We pipe the original image stream through Sharp's resize operation, which processes the image in chunks without loading the entire file into memory. This makes it incredibly fast and memory-efficient.
Mobile and Compression Resizers
The mobile and compression resizers work the same way, but with different settings:
Mobile Resizer (steps/mobile-resize.step.ts):
// Mobile optimization: 720px width, 85% quality
const sharpTransform = sharp()
  .resize(720, null, {
    withoutEnlargement: true,
    fit: 'inside'
  })
  .jpeg({ quality: 85 })
Compression Resizer (steps/lowquality-resize.step.ts):
// Heavy compression: 480px width, 60% quality
const sharpTransform = sharp()
  .resize(480, null, {
    withoutEnlargement: true,
    fit: 'inside'
  })
  .jpeg({ quality: 60 })
Each resizer emits its own completion event when done. This allows the completion tracker to monitor progress and know when all processing is finished.
Emitting Completion Events
When each resize operation finishes, it reports back:
    // Emit completion event
    await emit({
      topic: 'desktop-resize-complete',
      data: {
        ...imageMetadata,
        resizeType: 'desktop',
        outputStorageKey,
        outputUrl,
        completedAt: new Date().toISOString()
      }
    })

    logger.info('Desktop resize completed successfully', {
      outputKey: outputStorageKey,
      outputUrl,
      processingTime: Date.now() - startTime
    })

  } catch (error) {
    logger.error('Desktop resize failed', { error: error.message })
    throw new Error(`Desktop resize failed: ${error.message}`)
  }
}
The completion event includes all the original metadata plus information about what was created. This lets other parts of the system know exactly what happened and where to find the results.
Third Step: Completion Tracking and Orchestration
With three resize operations running in parallel, we need a way to track when everything is done. That's where the completion tracker comes in - it monitors all three processes and emits a final "all complete" event when the entire pipeline finishes.
Building the Completion Tracker
The completion tracker listens for completion events from all three resizers:
Create steps/completion-tracker.step.ts:
import { EventConfig, Handlers } from 'motia'
import { z } from 'zod'
import type { ProcessingStatus } from '../shared/interfaces'

export const config: EventConfig = {
  type: 'event',
  name: 'CompletionTracker',
  description: 'Track completion of all resize operations and emit final processing-complete event',
  subscribes: ['desktop-resize-complete', 'mobile-resize-complete', 'lowquality-resize-complete'],
  emits: ['processing-complete'],
  flows: ['image-processing']
}
This step subscribes to all three completion events and emits a final processing-complete event when everything is done.
Using Motia State for Progress Tracking
Motia's built-in state management lets us track progress across multiple events:
export const handler: Handlers['CompletionTracker'] = async (completionData, { logger, emit, traceId, state }) => {
  try {
    logger.info('Processing resize completion', {
      resizeType: completionData.resizeType,
      filename: completionData.originalFilename
    })

    // Get or initialize processing status
    const statusKey = `processing_${traceId}`
    let status: ProcessingStatus = state.get(statusKey) || {
      traceId,
      originalStorageKey: completionData.originalStorageKey,
      desktopComplete: false,
      mobileComplete: false,
      lowqualityComplete: false
    }

    // Update completion status based on resize type
    switch (completionData.resizeType) {
      case 'desktop':
        status.desktopComplete = true
        break
      case 'mobile':
        status.mobileComplete = true
        break
      case 'lowquality':
        status.lowqualityComplete = true
        break
    }

    // Save updated status
    state.set(statusKey, status)
The state system lets us maintain a scoreboard of what's complete. Each time a resize finishes, we update the corresponding flag and save the state.
Detecting Complete Processing
Once we have the updated status, we check if everything is done:
    logger.info('Updated processing status', { status })

    // Check if all resize operations are complete
    const allComplete = status.desktopComplete && status.mobileComplete && status.lowqualityComplete

    if (allComplete) {
      status.completedAt = new Date()
      state.set(statusKey, status)

      // Emit final completion event
      await emit({
        topic: 'processing-complete',
        data: {
          ...status,
          completedAt: status.completedAt.toISOString()
        }
      })

      logger.info('All processing completed successfully', {
        traceId,
        finalStatus: status,
        processingTime: Date.now() - startTime
      })
    } else {
      logger.info('Waiting for remaining operations', {
        pendingOperations: {
          desktop: !status.desktopComplete,
          mobile: !status.mobileComplete,
          lowquality: !status.lowqualityComplete
        }
      })
    }

  } catch (error) {
    logger.error('Completion tracking failed', { error: error.message })
    throw new Error(`Completion tracking failed: ${error.message}`)
  }
}
The completion tracker only emits the final event when all three resize operations are done. Until then, it just logs what's still pending.
Why This Architecture Works
This completion tracking approach has several benefits:
Resilient: If one resize fails, the others keep working and the tracker knows what's missing
Scalable: Adding new resize variants just means updating the tracker to listen for more events
Observable: You can see exactly what's happening at each step through the logs
Flexible: The final completion event can trigger additional processing like sending notifications or updating databases
The event-driven design means each piece does one job well. The upload handler doesn't know about resizing. The resizers don't know about completion tracking. The completion tracker doesn't know about image processing. This separation makes the system easy to understand, test, and modify.
Running the Complete Project
Now that you've built all the components, let's see the image processing pipeline in action. This section shows how to start the system and demonstrates real image processing workflows.
Starting the System
First, start your Motia development server:
npm run dev
The logs show all your steps being created - upload handler, desktop resizer, mobile resizer, compression resizer, and completion tracker. When you see "Server ready and listening on port 3000," your system is running.
Testing Image Upload
Upload a test image to see the complete processing flow:
# First, convert an image to base64
node scripts/convert-to-base64.js path/to/your/test-image.jpg

# This creates a JSON file you can use for testing
The conversion script will show you the base64 data and save it to a JSON file. Use this data to test the upload:
curl -X POST http://localhost:3000/upload-image \
  -H "Content-Type: application/json" \
  -d '{
    "filename": "test-image.jpg",
    "data": "base64-encoded-image-data-here"
  }'
Watching the Processing Pipeline
When you upload an image, watch the logs to see the complete workflow:
1. Upload and Validation:
[2:32:54 PM] 7WUTP-4774582 [INFO] UploadImage Upload Image Step – Starting image upload process
├ filename: test-image.png
├ uploadType: base64
├ fileSize: 28294
└ timestamp: 2025-08-15T13:32:54.868Z
[2:32:54 PM] 7WUTP-4774582 [INFO] UploadImage Upload Image Step – Base64 data validation passed
├ filename: test-image.png
├ uploadType: base64
├ fileSize: 28294
├ timestamp: 2025-08-15T13:32:54.869Z
├ dataValidation: passed
└ dataLength: 37728
[2:32:54 PM] 7WUTP-4774582 [INFO] UploadImage Upload Image Step – Generated unique filename and storage keys
├ filename: test-image.png
├ uploadType: base64
├ fileSize: 28294
├ timestamp: 2025-08-15T13:32:54.870Z
├ uniqueFilename: test-image_373b06b5-4671-46c2-ab08-07a7bccceb3c.png
├ originalStorageKey: originals/test-image_373b06b5-4671-46c2-ab08-07a7bccceb3c.png
├ format: png
└ keyGeneration: success
[2:32:55 PM] 7WUTP-4774582 [INFO] UploadImage Upload Image Step – Successfully saved image to storage
├ filename: test-image.png
├ uploadType: base64
├ fileSize: 28294
├ timestamp: 2025-08-15T13:32:55.068Z
├ originalStorageKey: originals/test-image_373b06b5-4671-46c2-ab08-07a7bccceb3c.png
├ originalUrl: https://<your-s3-buclet>.s3.<your-region>.amazonaws.com/originals/test-image_373b06b5-4671-46c2-ab08-07a7bccceb3c.png
└ storageSave: success
[2:32:55 PM] 7WUTP-4774582 [INFO] UploadImage Upload Image Step – Image buffer validation passed
├ filename: test-image.png
├ uploadType: base64
├ fileSize: 28294
├ timestamp: 2025-08-15T13:32:55.069Z
├ bufferSize: 28294
└ bufferValidation: success
[2:32:55 PM] 7WUTP-4774582 [INFO] UploadImage Upload Image Step – Created image metadata
├ filename: test-image.png
├ uploadType: base64
├ fileSize: 28294
├ timestamp: 2025-08-15T13:32:55.069Z
├ imageMetadata: {
│ ├ originalFilename: test-image.png
│ ├ uniqueFilename: test-image_373b06b5-4671-46c2-ab08-07a7bccceb3c.png
│ ├ format: png
│ ├ originalStorageKey: originals/test-image_373b06b5-4671-46c2-ab08-07a7bccceb3c.png
│ ├ originalUrl: https://<your-s3-buclet>.s3.<your-region>.amazonaws.com/originals/test-image_373b06b5-4671-46c2-ab08-07a7bccceb3c.png
│ ├ traceId: 7WUTP-4774582
│ └ uploadedAt: 2025-08-15T13:32:55.069Z
│ }
└ metadataCreation: success
[2:32:55 PM] 7WUTP-4774582 [INFO] UploadImage Upload Image Step – Successfully emitted image-saved event
├ filename: test-image.png
├ uploadType: base64
├ fileSize: 28294
├ timestamp: 2025-08-15T13:32:55.078Z
├ eventTopic: image-saved
├ eventEmission: success
└ processingTriggered: true
[2:32:55 PM] 7WUTP-4774582 [INFO] UploadImage Upload Image Step – Upload completed successfully
├ filename: test-image.png
├ uploadType: base64
├ fileSize: 28294
├ timestamp: 2025-08-15T13:32:55.078Z
├ processingTimeMs: 210
└ uploadSuccess: true
2. Parallel Resize Operations:
[2:32:55 PM] 7WUTP-4774582 [INFO] MobileResize Mobile Resize Step – Starting mobile resize operation
├ originalFilename: test-image.png
├ uniqueFilename: test-image_373b06b5-4671-46c2-ab08-07a7bccceb3c.png
├ originalStorageKey: originals/test-image_373b06b5-4671-46c2-ab08-07a7bccceb3c.png
└ timestamp: 2025-08-15T13:32:55.378Z
[2:32:55 PM] 7WUTP-4774582 [INFO] LowQualityResize Low-Quality Resize Step – Starting low-quality resize operation
├ originalFilename: test-image.png
├ uniqueFilename: test-image_373b06b5-4671-46c2-ab08-07a7bccceb3c.png
├ originalStorageKey: originals/test-image_373b06b5-4671-46c2-ab08-07a7bccceb3c.png
└ timestamp: 2025-08-15T13:32:55.385Z
[2:32:55 PM] 7WUTP-4774582 [INFO] DesktopResize Desktop Resize Step – Starting desktop resize operation
├ originalFilename: test-image.png
├ uniqueFilename: test-image_373b06b5-4671-46c2-ab08-07a7bccceb3c.png
├ originalStorageKey: originals/test-image_373b06b5-4671-46c2-ab08-07a7bccceb3c.png
└ timestamp: 2025-08-15T13:32:55.386Z
[2:32:55 PM] 7WUTP-4774582 [INFO] MobileResize Mobile Resize Step – Retrieved original image stream from storage
├ originalFilename: test-image.png
├ uniqueFilename: test-image_373b06b5-4671-46c2-ab08-07a7bccceb3c.png
├ originalStorageKey: originals/test-image_373b06b5-4671-46c2-ab08-07a7bccceb3c.png
└ timestamp: 2025-08-15T13:32:55.378Z
[2:32:55 PM] 7WUTP-4774582 [INFO] LowQualityResize Low-Quality Resize Step – Retrieved original image stream from storage
├ originalFilename: test-image.png
├ uniqueFilename: test-image_373b06b5-4671-46c2-ab08-07a7bccceb3c.png
├ originalStorageKey: originals/test-image_373b06b5-4671-46c2-ab08-07a7bccceb3c.png
└ timestamp: 2025-08-15T13:32:55.385Z
[2:32:55 PM] 7WUTP-4774582 [INFO] DesktopResize Desktop Resize Step – Retrieved original image stream from storage
├ originalFilename: test-image.png
├ uniqueFilename: test-image_373b06b5-4671-46c2-ab08-07a7bccceb3c.png
├ originalStorageKey: originals/test-image_373b06b5-4671-46c2-ab08-07a7bccceb3c.png
└ timestamp: 2025-08-15T13:32:55.386Z
[2:32:55 PM] 7WUTP-4774582 [INFO] MobileResize Mobile Resize Step – Resize operation completed
├ originalFilename: test-image.png
├ uniqueFilename: test-image_373b06b5-4671-46c2-ab08-07a7bccceb3c.png
├ originalStorageKey: originals/test-image_373b06b5-4671-46c2-ab08-07a7bccceb3c.png
├ timestamp: 2025-08-15T13:32:55.378Z
├ targetWidth: 720
└ outputStorageKey: mobile/test-image_373b06b5-4671-46c2-ab08-07a7bccceb3c-mobile.png
[2:32:55 PM] 7WUTP-4774582 [INFO] MobileResize Mobile Resize Step – Mobile resize completed successfully
├ originalFilename: test-image.png
├ uniqueFilename: test-image_373b06b5-4671-46c2-ab08-07a7bccceb3c.png
├ originalStorageKey: originals/test-image_373b06b5-4671-46c2-ab08-07a7bccceb3c.png
├ timestamp: 2025-08-15T13:32:55.378Z
├ outputStorageKey: mobile/test-image_373b06b5-4671-46c2-ab08-07a7bccceb3c-mobile.png
├ outputUrl: https://<your-s3-buclet>.s3.<your-region>.amazonaws.com/originals/test-image_373b06b5-4671-46c2-ab08-07a7bccceb3c.png
└ processingTimeMs: 266
[2:32:55 PM] 7WUTP-4774582 [INFO] DesktopResize Desktop Resize Step – Resize operation completed
├ originalFilename: test-image.png
├ uniqueFilename: test-image_373b06b5-4671-46c2-ab08-07a7bccceb3c.png
├ originalStorageKey: originals/test-image_373b06b5-4671-46c2-ab08-07a7bccceb3c.png
├ timestamp: 2025-08-15T13:32:55.386Z
├ targetWidth: 1920
└ outputStorageKey: desktop/test-image_373b06b5-4671-46c2-ab08-07a7bccceb3c-desktop.png
[2:32:55 PM] 7WUTP-4774582 [INFO] DesktopResize Desktop Resize Step – Desktop resize completed successfully
├ originalFilename: test-image.png
├ uniqueFilename: test-image_373b06b5-4671-46c2-ab08-07a7bccceb3c.png
├ originalStorageKey: originals/test-image_373b06b5-4671-46c2-ab08-07a7bccceb3c.png
├ timestamp: 2025-08-15T13:32:55.386Z
├ outputStorageKey: desktop/test-image_373b06b5-4671-46c2-ab08-07a7bccceb3c-desktop.png
├ outputUrl: https://<your-s3-buclet>.s3.<your-region>.amazonaws.com/originals/test-image_373b06b5-4671-46c2-ab08-07a7bccceb3c.png
└ processingTimeMs: 277
[2:32:55 PM] 7WUTP-4774582 [INFO] LowQualityResize Low-Quality Resize Step – Resize operation completed
├ originalFilename: test-image.png
├ uniqueFilename: test-image_373b06b5-4671-46c2-ab08-07a7bccceb3c.png
├ originalStorageKey: originals/test-image_373b06b5-4671-46c2-ab08-07a7bccceb3c.png
├ timestamp: 2025-08-15T13:32:55.385Z
├ targetWidth: 480
├ quality: 60
└ outputStorageKey: lowquality/test-image_373b06b5-4671-46c2-ab08-07a7bccceb3c-lowquality.png
[2:32:55 PM] 7WUTP-4774582 [INFO] LowQualityResize Low-Quality Resize Step – Low-quality resize completed successfully
├ originalFilename: test-image.png
├ uniqueFilename: test-image_373b06b5-4671-46c2-ab08-07a7bccceb3c.png
├ originalStorageKey: originals/test-image_373b06b5-4671-46c2-ab08-07a7bccceb3c.png
├ timestamp: 2025-08-15T13:32:55.385Z
├ outputStorageKey: lowquality/test-image_373b06b5-4671-46c2-ab08-07a7bccceb3c-lowquality.png
├ outputUrl: https://<your-s3-buclet>.s3.<your-region>.amazonaws.com/originals/test-image_373b06b5-4671-46c2-ab08-07a7bccceb3c.png
└ processingTimeMs: 285
3. Completion Tracking:
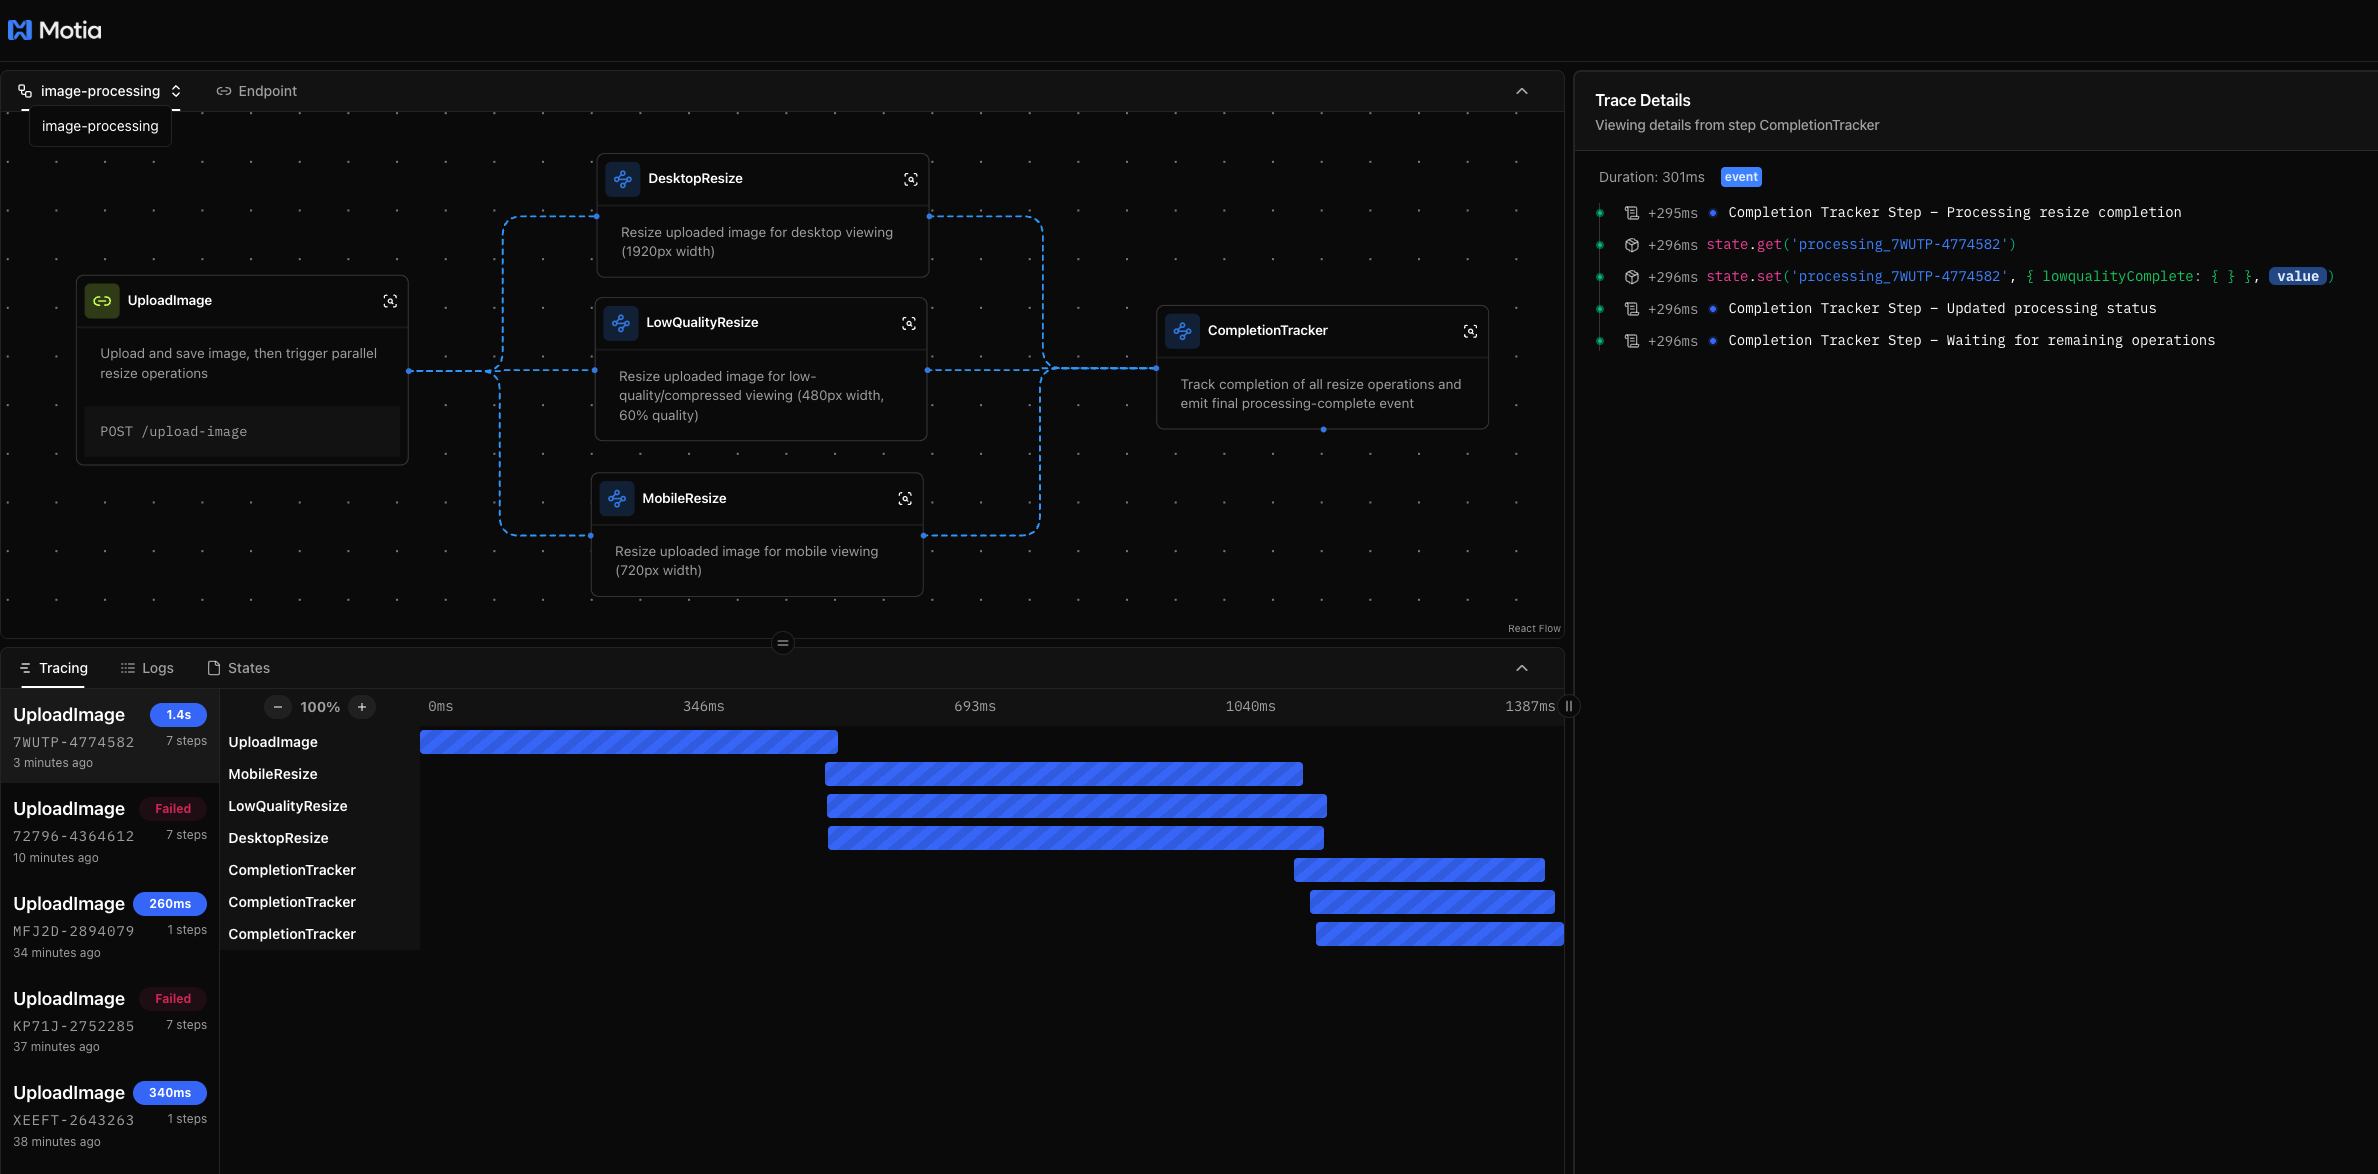
[2:32:55 PM] 7WUTP-4774582 [INFO] CompletionTracker Completion Tracker Step – Processing resize completion
├ resizeType: mobile
├ originalFilename: test-image.png
└ timestamp: 2025-08-15T13:32:55.935Z
[2:32:55 PM] 7WUTP-4774582 [INFO] CompletionTracker Completion Tracker Step – Updated processing status
├ resizeType: mobile
├ originalFilename: test-image.png
├ timestamp: 2025-08-15T13:32:55.935Z
├ status: {
│ └ mobileComplete: true
└ }
[2:32:55 PM] 7WUTP-4774582 [INFO] CompletionTracker Completion Tracker Step – Waiting for remaining operations
├ resizeType: mobile
├ originalFilename: test-image.png
├ timestamp: 2025-08-15T13:32:55.935Z
├ pendingOperations: {
│ ├ desktop: true
│ ├ mobile: false
│ └ lowquality: true
└ }
[2:32:55 PM] 7WUTP-4774582 [INFO] CompletionTracker Completion Tracker Step – Processing resize completion
├ resizeType: desktop
├ originalFilename: test-image.png
└ timestamp: 2025-08-15T13:32:55.944Z
[2:32:55 PM] 7WUTP-4774582 [INFO] CompletionTracker Completion Tracker Step – Updated processing status
├ resizeType: desktop
├ originalFilename: test-image.png
├ timestamp: 2025-08-15T13:32:55.944Z
├ status: {
│ └ desktopComplete: true
└ }
[2:32:55 PM] 7WUTP-4774582 [INFO] CompletionTracker Completion Tracker Step – Waiting for remaining operations
├ resizeType: desktop
├ originalFilename: test-image.png
├ timestamp: 2025-08-15T13:32:55.944Z
├ pendingOperations: {
│ ├ desktop: false
│ ├ mobile: true
│ └ lowquality: true
└ }
[2:32:55 PM] 7WUTP-4774582 [INFO] CompletionTracker Completion Tracker Step – Processing resize completion
├ resizeType: lowquality
├ originalFilename: test-image.png
└ timestamp: 2025-08-15T13:32:55.962Z
[2:32:55 PM] 7WUTP-4774582 [INFO] CompletionTracker Completion Tracker Step – Updated processing status
├ resizeType: lowquality
├ originalFilename: test-image.png
├ timestamp: 2025-08-15T13:32:55.962Z
├ status: {
│ └ lowqualityComplete: true
└ }
[2:32:55 PM] 7WUTP-4774582 [INFO] CompletionTracker Completion Tracker Step – Waiting for remaining operations
├ resizeType: lowquality
├ originalFilename: test-image.png
├ timestamp: 2025-08-15T13:32:55.962Z
├ pendingOperations: {
│ ├ desktop: true
│ ├ mobile: true
│ └ lowquality: false
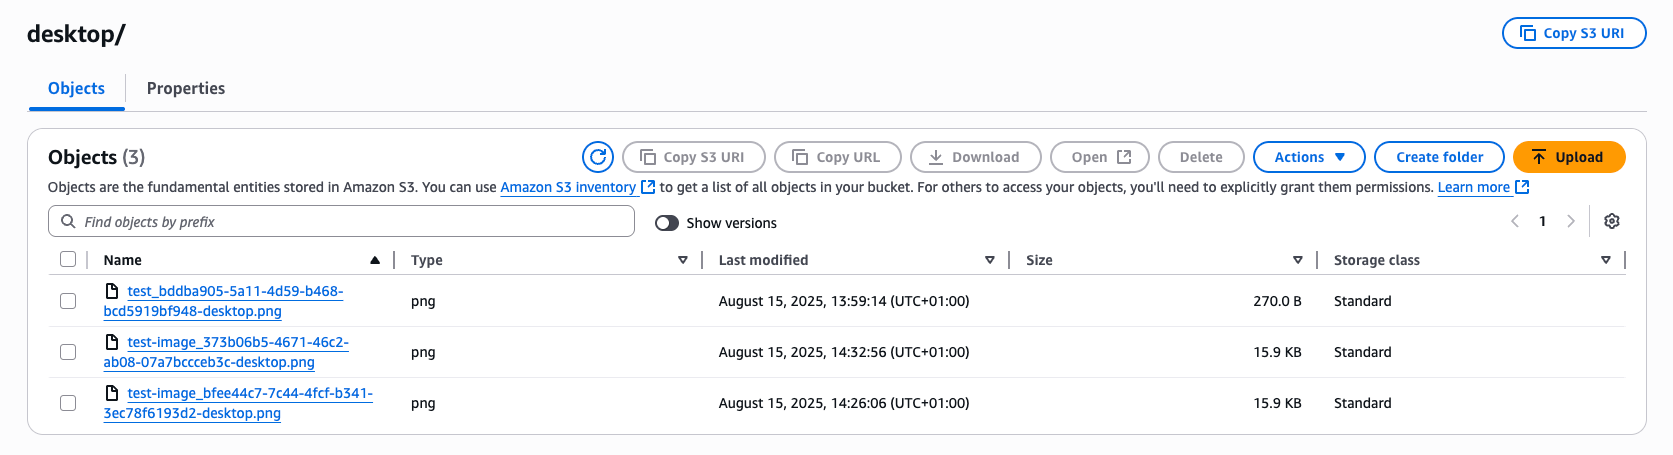
└ }Checking Your S3 Bucket
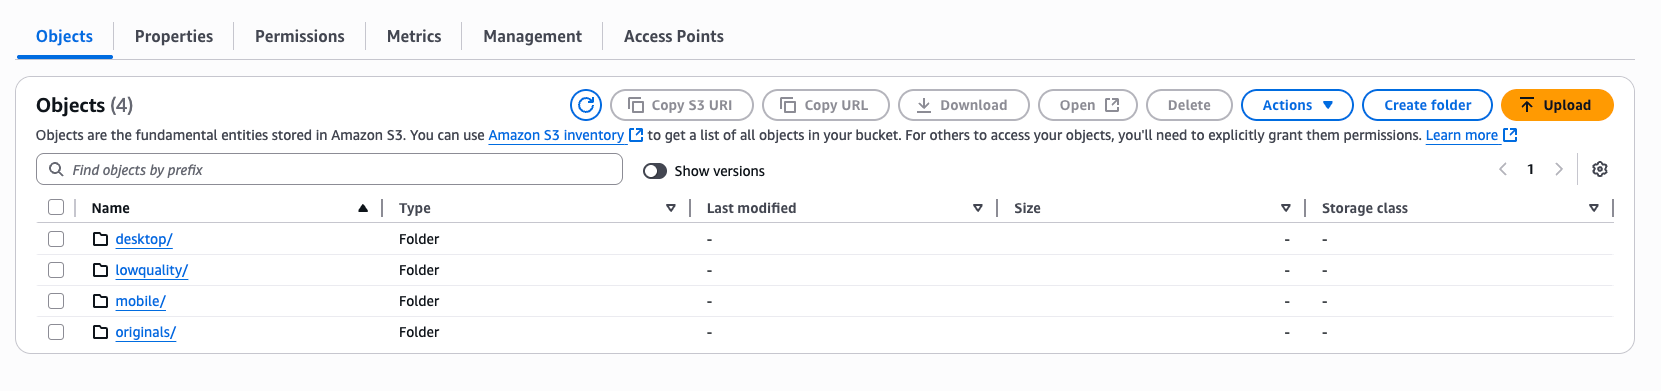
After processing completes, check your S3 bucket to see the organized results:
your-bucket/
├── originals/
│   └── test-image_uuid.jpg          # Original uploaded image
├── desktop/
│   └── test-image_uuid-desktop.jpg  # 1920px desktop version
├── mobile/
│   └── test-image_uuid-mobile.jpg   # 720px mobile version
└── lowquality/
    └── test-image_uuid-lowquality.jpg # 480px compressed version
Each image is properly organized and has a unique filename to prevent conflicts.
Testing Different Image Formats
Try uploading different image formats to see how the system handle them:
JPEG Image:
# Upload a JPEG - gets processed as-is with JPEG compression
curl -X POST http://localhost:3000/upload-image \
  -H "Content-Type: application/json" \
  -d '{"filename": "photo.jpg", "data": "base64-data"}'
PNG Image:
# Upload a PNG - gets converted to JPEG for smaller file sizes
curl -X POST http://localhost:3000/upload-image \
  -H "Content-Type: application/json" \
  -d '{"filename": "graphic.png", "data": "base64-data"}'
WebP Image:
# Upload a WebP - gets converted to JPEG for better compatibility
curl -X POST http://localhost:3000/upload-image \
  -H "Content-Type: application/json" \
  -d '{"filename": "modern.webp", "data": "base64-data"}'
Testing Error Handling
Try uploading invalid data to see the error handling:
Invalid Format:
curl -X POST http://localhost:3000/upload-image \
  -H "Content-Type: application/json" \
  -d '{"filename": "document.pdf", "data": "base64-data"}'

# Response: "Invalid image format - Only JPEG, PNG, and WebP formats are supported"
File Too Large:
# Upload a massive image
curl -X POST http://localhost:3000/upload-image \
  -H "Content-Type: application/json" \
  -d '{"filename": "huge.jpg", "data": "very-long-base64-string"}'

# Response: "File too large - Maximum file size is 50MB"
Common Issues We Faced
PayloadTooLargeError with Large Images: During testing with a 1.3MB image, we hit Express body parser limits. Base64 encoding increases file size by ~33%, so our 1.3MB image became 1.7MB. The default Express limit couldn't handle it.
Quick Fix: Update your server.config.js:
module.exports = {
  express: {
    bodyParser: {
      json: { limit: '50mb' },
      urlencoded: { limit: '50mb', extended: true }
    }
  }
};
Restart your server and large images will upload successfully. This configuration allows up to 50MB payloads, which handles most real-world image uploads.
Performance Testing
Upload multiple images simultaneously to see parallel processing:
# Upload 3 images at the same time
curl -X POST http://localhost:3000/upload-image \
  -H "Content-Type: application/json" \
  -d '{"filename": "image1.jpg", "data": "base64-1"}' &

curl -X POST http://localhost:3000/upload-image \
  -H "Content-Type: application/json" \
  -d '{"filename": "image2.jpg", "data": "base64-2"}' &

curl -X POST http://localhost:3000/upload-image \
  -H "Content-Type: application/json" \
  -d '{"filename": "image3.jpg", "data": "base64-3"}' &
Watch the logs to see how Motia handles multiple processing pipelines simultaneously. Each image gets its own trace ID and processes independently.
Conclusion
You've built a complete image processing pipeline that handles uploads, validates files, stores them safely in the cloud, and creates multiple optimized versions - all automatically and in parallel. The system handles format conversion, error recovery, and completion tracking, all using Motia's event-driven architecture.
The key benefits of this approach:
- Lightning fast processing - Three resize operations run simultaneously instead of sequentially
- Event-driven reliability - Each step does one job well and passes work along through events
- Easy to extend - Add new image sizes by creating new resize workers that listen for the same events
- Production ready - Built-in error handling, logging, and cloud storage integration
The event-driven architecture makes it simple to add new features like watermarking, format conversion, or thumbnail generation. Just create new steps that listen for the image-saved event and emit their own completion events. The completion tracker can easily be updated to monitor the new operations.
Your users upload one image and get multiple optimized versions in seconds. Your mobile users get fast-loading compressed images. Your desktop users get crisp high-quality versions. And your servers handle it all automatically, scaling with your traffic and recovering gracefully from errors.
The upload → validate → store → parallel process → track completion flow means your image processing system is ready for production workloads from day one.
Thanks for reading till the end, Please Star (⭐️) our repo, while you're here.