Introduction
Most health apps sit unused on people's phones. You download them with good intentions, log a few workouts, then forget they exist. But there's one app everyone uses daily - WhatsApp.
What if your health coach lived right inside your messages? No new app to download, no complex interfaces to learn. Just text "I ran 5km today" and get back personalized advice, meal plans, and habit insights.
This AI health and fitness agent runs entirely through WhatsApp using Motia's event-driven framework. The agent understands when you send regular text messages like "I ran 5km today" or "suggest a meal plan" and responds intelligently.
Here's what happens when you text the agent: it figures out what you want (logging activity, getting a plan, or analyzing habits), processes your request using AI, and responds back with helpful information. All of this works through simple text messages.
The core technologies we used are Motia for connecting all the fragmented pieces together, OpenAI for understanding and generating responses, WhatsApp Cloud API for messaging, and SQLite for storing health data.
In this tutorial, you'll learn how to build chat-based health apps that work through messaging platforms. You'll see how event-driven architecture makes it easy to handle different types of health-related conversations, how to extract structured data from casual text messages, and how to create AI agents that feel natural to talk with about your fitness goals.
Why this Architecture
Motia's event-driven architecture was used because health conversations have many moving parts. When someone texts "I had pizza for lunch and ran 3 miles," the system needs to understand what they said, pull out the important data, save it to a database, and send back a confirmation. That is at least four different jobs.
With traditional setups, you'd write a long bloated function that tries to do everything. This gets messy fast. If you want to change how meal logging works, you might accidentally break the workout tracking part.
Motia's event-driven approach splits each job into its own "step." One step handles incoming messages. Another step figures out what the user wants. A third step extracts the health data. Each step does one thing well and passes the work along through events. This approach lets different AI agents specialize in specific functions.
The intent classifier only focuses on understanding what users want - it doesn't know about database storage or WhatsApp messaging. The meal planner focuses on creating good nutrition advice and doesn't handle message parsing. When each piece has a single job, it's easier to build, test, and fix. If you want to add a new feature like sleep tracking, you just add new steps for that specific task.
Project Overview
If you directly want to dive into code, here's the repo:

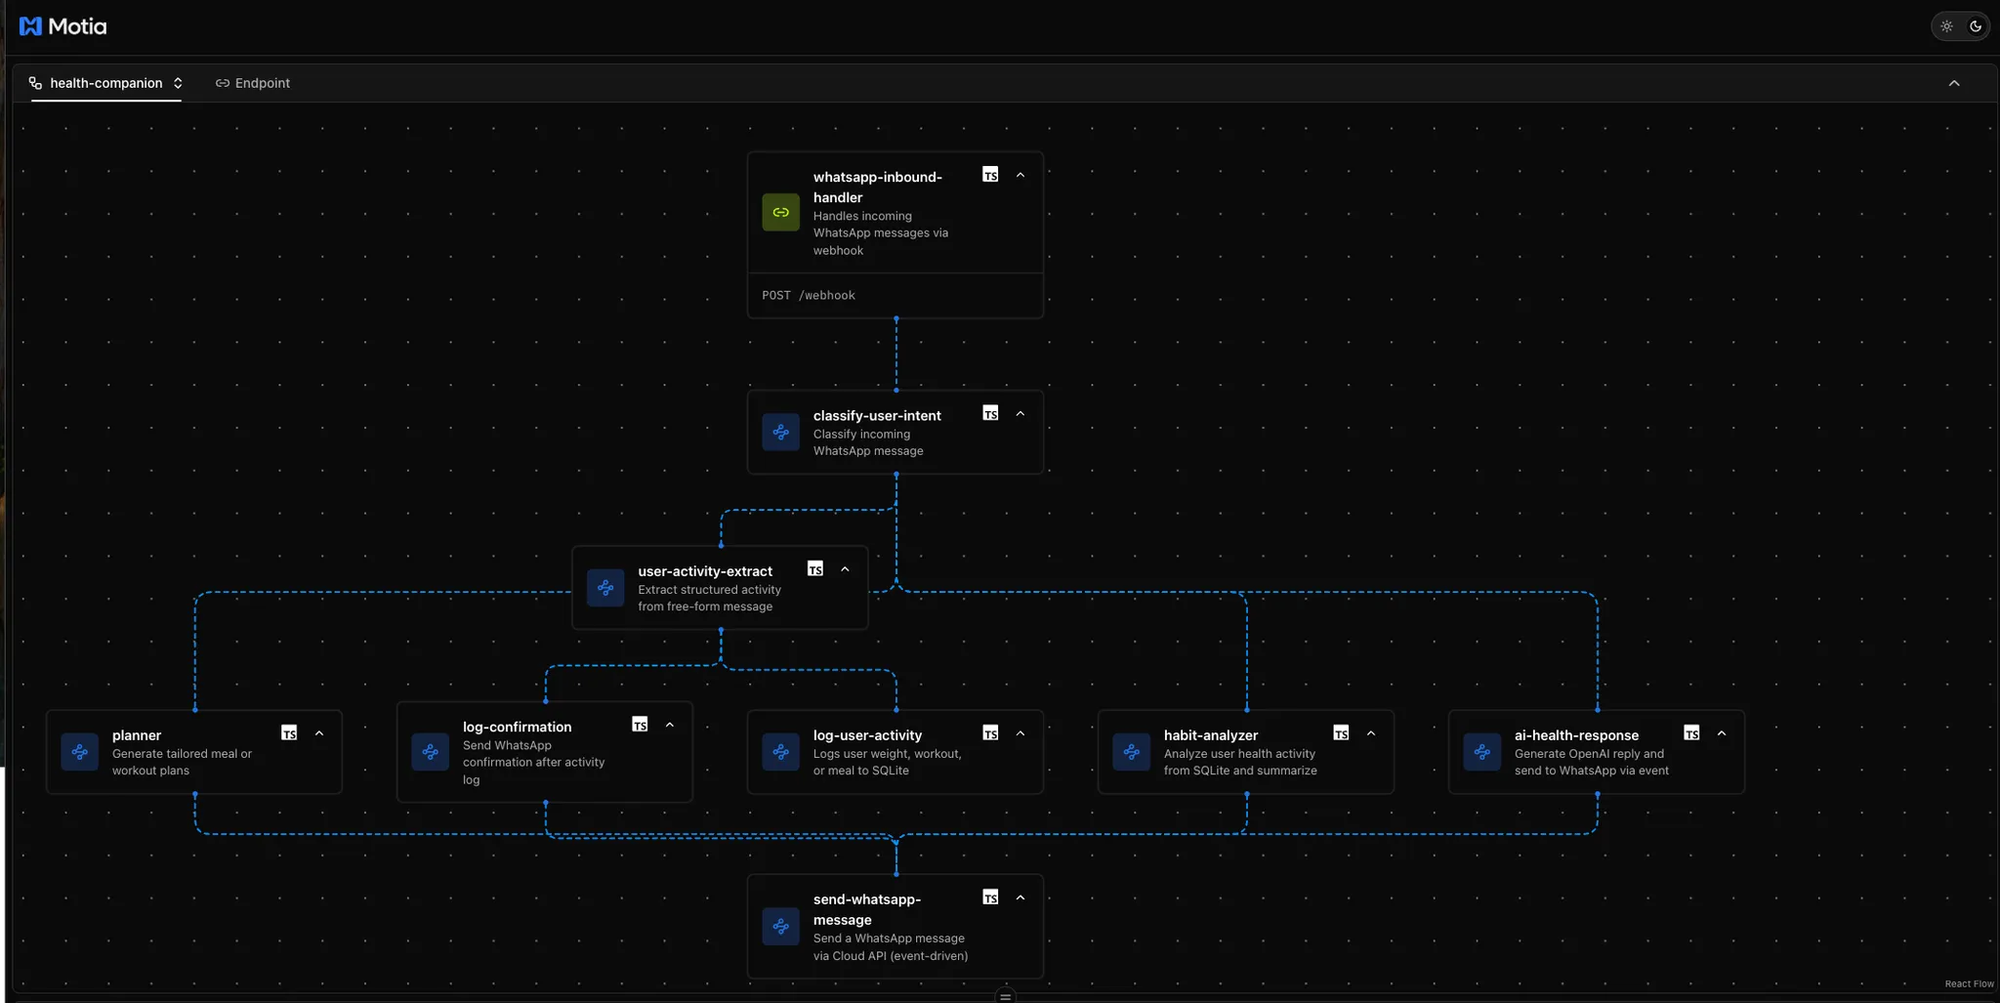
Here's how the system works when someone sends a WhatsApp message:
1. Message comes in → WhatsApp webhook receives it and triggers the first event
2. Intent classification → AI figures out what the user wants (meal plan, log activity, analyze habits, or just chat)
3. Specialized processing → Based on the intent, one of these happens:
- Extract health data from text and save to the database
- Generate meal/workout plans using GPT-4
- Analyze stored health data for insights
- Have a general health conversation
4. Response delivery → Send the AI response back through WhatsApp
5. Confirmation → User gets feedback that their request was handled
The five main AI-powered steps are:
- Intent classifier: Understands "I ran 5km" vs "suggest a workout"
- Data extractor: Pulls structured info from "I had eggs and ran 3 miles"
- Planner: Creates meal plans and workout routines
- Analyzer: Reviews your logged data for patterns and suggestions
- Chat responder: Handles general health questions
Each step only runs when needed. If you ask for a meal plan, the data extractor and analyzer steps don't run. If you log activities, the planner step stays off. This keeps the system fast and focused.
The webhook → classifier → specialized step → response flow means adding new features is just a matter of adding new steps to the chain.
Prerequisites
Before building this AI health agent, you need these accounts and tools set up:
Required API Keys and Accounts
OpenAI Account
- Sign up at https://platform.openai.com/
- Generate an API key from the API keys page
- You'll need this for GPT-4o to power intent classification and responses
Meta Developer Account (WhatsApp Cloud API)
- Go to https://developers.facebook.com
- Create a new app and choose "Business" type
- Navigate to WhatsApp > Getting Started
- Copy these values:
- Phone Number ID
- Access Token
- App ID and App Secret
Development Tools
Node.js (v16+)
ngrok (for webhook testing)
# Install ngrok globally
npm install -g ngrok

# Or download from ngrok.com
Create New Motia Project
Initialize the project:
# Create new Motia project
npx motia@latest create -n ai-health-agent

# Navigate to project
cd ai-health-agent
This creates a basic Motia project structure with:
steps/folder for your workflow stepspackage.jsonwith Motia dependencies- Example steps to get you started
Environment Configuration
Create a .env file in your project root:
# OpenAI
OPENAI_API_KEY=sk-...

# WhatsApp Cloud API
WHATSAPP_TOKEN=EAANZ...
PHONE_NUMBER_ID=1234567890
META_APP_ID=1234567890
META_APP_SECRET=abcd1234...
RECEIVER_PHONE=+1234567890
VERIFY_TOKEN=12345
Quick Setup Check
Run this to verify everything works:
# Install dependencies
npm install

# Start Motia development server
npm run dev

# In another terminal, test ngrok
ngrok http 3000
If Motia Workbench opens at http://localhost:3000 And ngrok shows a public URL, then you're ready to build.
The First Step
When someone sends a WhatsApp message to your health agent, it has to get into your Motia system somehow. That's where the webhook comes in. It is the entry point that receives messages from WhatsApp and starts everything else.
Setting up the WhatsApp Webhook Handler
First, create the webhook step that will receive all incoming WhatsApp messages:
Create steps/whatsapp-webhook.step.ts:
import { ApiRouteConfig, Handlers } from 'motia'
import { z } from 'zod'

export const config: ApiRouteConfig = {
  type: 'api',
  name: 'whatsapp-inbound-handler',
  description: 'Handles incoming WhatsApp messages via webhook',
  path: '/webhook',
  method: 'POST',
  emits: ['message-received'],
  bodySchema: z.object({
    entry: z.array(
      z.object({
        changes: z.array(
          z.object({
            value: z.object({
              messages: z
                .array(
                  z.object({
                    from: z.string(),
                    text: z.object({ body: z.string() })
                  })
                )
                .optional()
            })
          })
        )
      })
    )
  }),
  flows: ['health-companion']
}
This creates a POST endpoint at /webhook that WhatsApp will send messages to. The bodySchema uses Zod to validate that incoming data matches WhatsApp's webhook format.
Parsing the Webhook Payload from Meta
WhatsApp sends a complex nested JSON structure. Here's how we extract the actual messages:
export const handler: Handlers['whatsapp-inbound-handler'] = async (req, { emit, logger }) => {
  const body = req.body
  let messages: { from: string, text: { body: string } }[] = [];

  try {
    messages =
      body.entry
        ?.flatMap((entry: any) =>
          entry.changes?.flatMap((change: any) =>
            change.value.messages ?? []
          ) ?? []
        ) ?? [];
  } catch (e) {
    logger.error('Failed to extract WhatsApp messages from webhook body', { body, error: e });
  }

  if (!messages.length) {
    logger.info('No WhatsApp messages in incoming webhook payload (non-user event)', { body });
    return {
      status: 200,
      body: { message: 'No user message to process' }
    }
  }
WhatsApp webhook payloads can contain multiple messages and various event types (like read receipts). This code safely extracts only the actual user messages we need.
Emitting Events to Trigger the Rest of the Workflow
Once we have clean message data, we emit an event for each message:
// Emit one event per message received
  for (const msg of messages) {
    const user = msg.from;
    const message = msg.text?.body;

    if (!user || !message) {
      logger.error('Malformed WhatsApp message - missing user or text body', { msg });
      continue;
    }

    logger.info('Emitting WhatsApp message-received event', { user, message });
    await emit({
      topic: 'message-received',
      data: { user, message }
    });
  }

  return {
    status: 200,
    body: { message: 'Webhook processed successfully' }
  }
The emit() function sends a message-received event with clean data: just the user's phone number and their message text. Other steps in our workflow will listen for this event.
Second Step - Understanding User Intent
When your health agent receives a message like "I ran 5km today" or "suggest a healthy breakfast," it needs to figure out what the user actually wants. That's where intent classification comes in. It's the brain that decides which part of your system should handle each message.
The intent classifier is an event step that listens for incoming messages and uses OpenAI to understand what users want:
Create steps/classify-user-intent.step.ts:
import { EventConfig, Handlers } from 'motia';
import OpenAI from 'openai';
import { z } from 'zod';
import Mustache from 'mustache';
import fs from 'fs/promises';

const openai = new OpenAI({ apiKey: process.env.OPENAI_API_KEY! });

const INTENTS = ['plan_meal', 'plan_workout', 'log_activity', 'analyze_habits'];

export const config: EventConfig = {
  type: 'event',
  name: 'classify-user-intent',
  description: 'Classify incoming WhatsApp message',
  subscribes: ['message-received'],
  emits: ['planner-request', 'user-activity-extract', 'analyze-user-habits', 'health-chat-message'],
  input: z.object({
    user: z.string(),
    message: z.string()
  }),
  flows: ['health-companion']
};
This step subscribes to message-received events from the webhook and can emit four different types of events based on what it thinks the user wants.
Using OpenAI to Determine User Intent
We use a simple prompt template to get consistent classifications from GPT-4o:
Create prompts/classify-intent.mustache:
Classify this WhatsApp message into one of these intents:
{{#intents}}
- {{.}}
{{/intents}}
Message: "{{message}}"
Only respond with the intent (just one word).
The handler loads this template and asks OpenAI to classify each message:
export const handler: Handlers['classify-user-intent'] = async (input, { emit, logger }) => {
  const { user, message } = input;

  // Load the prompt template
  let template: string;
  try {
    template = await fs.readFile('prompts/classify-intent.mustache', 'utf-8');
  } catch (err) {
    logger.error('Failed to load prompt template file', { error: err });
    // Fallback to general chat if template fails
    await emit({
      topic: 'health-chat-message',
      data: {
        message: "Sorry, I'm having trouble classifying your message right now.",
        conversationId: undefined,
        assistantMessageId: crypto.randomUUID()
      }
    });
    return;
  }

  const prompt = Mustache.render(template, { intents: INTENTS, message });
Getting AI Classification Results
We call OpenAI with a simple system prompt and the rendered template:
let response;
  try {
    response = await openai.chat.completions.create({
      model: 'gpt-4o-mini',
      messages: [
        { role: 'system', content: 'You classify user intents for a health assistant.' },
        { role: 'user', content: prompt }
      ]
    });
  } catch (err) {
    logger.error('Error calling OpenAI completion API', { error: err });
    // Fallback to general chat on API errors
    await emit({
      topic: 'health-chat-message',
      data: {
        message: "Sorry, I couldn't understand your message due to a system error.",
        conversationId: undefined,
        assistantMessageId: crypto.randomUUID()
      }
    });
    return;
  }

  const content = response.choices?.[0]?.message?.content;
  const intent = content.trim().toLowerCase();

  logger.info(`AI classified intent: "${intent}" for user: ${user}`);
Emitting Different Events Based on Intent
Once we have the classified intent, we route it to the right part of the system:
// Validate intent, fallback if unexpected
  if (!INTENTS.includes(intent)) {
    logger.warn(`Unrecognized intent from AI: "${intent}", falling back to health-chat-message.`);
    await emit({
      topic: 'health-chat-message',
      data: {
        message,
        conversationId: undefined,
        assistantMessageId: crypto.randomUUID()
      }
    });
    return;
  }

  switch (intent) {
    case 'plan_meal':
    case 'plan_workout':
      await emit({
        topic: 'planner-request',
        data: { user, type: intent === 'plan_meal' ? 'meal' : 'workout', prompt: message }
      });
      break;
    case 'log_activity':
      await emit({ topic: 'user-activity-extract', data: { user, message } });
      break;
    case 'analyze_habits':
      await emit({ topic: 'analyze-user-habits', data: { user } });
      break;
  }
Third Step: Extracting Health Data
When someone texts:
"I weighed 72kg today, had a spinach salad for lunch, and did a 20-minute jog", the system needs to pull out the structured data: weight=72kg, meal=spinach salad, workout=20-minute jog.
This is where data extraction comes in - turning normal text into database-ready information.
Converting Natural Language to Structured Data
The data extractor listens for activity logging requests and uses OpenAI's structured output feature to get reliable JSON:
Create steps/user-activity-extract.step.ts:
import { EventConfig, Handlers } from 'motia';
import OpenAI from 'openai';
import { z } from 'zod';
import zodToJsonSchema from 'zod-to-json-schema';
import Mustache from 'mustache';
import fs from 'fs/promises';

const openai = new OpenAI({ apiKey: process.env.OPENAI_API_KEY! });

const Activity = z.object({
  weight: z.string().optional(),
  meal: z.string().optional(),
  workout: z.string().optional(),
});

const ActivitiesPayload = z.object({
  activities: z.array(Activity).nonempty(),
});

export const config: EventConfig = {
  type: 'event',
  name: 'user-activity-extract',
  description: 'Extract structured activity from free-form message',
  subscribes: ['user-activity-extract'],
  emits: ['user-activity-log'],
  input: z.object({ user: z.string(), message: z.string() }),
  flows: ['health-companion'],
};
This step listens for user-activity-extract events (sent by the intent classifier) and emits user-activity-log events with clean data.
Using OpenAI's JSON Schema Feature
We define what we want using Zod schemas, then convert them to JSON Schema for OpenAI:
Create prompts/user-activity-extract.mustache:
You are a health-data extractor.
From the text below, extract structured health activity data as JSON that matches the given schema.

Text:
"""
{{message}}
"""
The handler uses OpenAI's structured output to get reliable JSON:
export const handler: Handlers['user-activity-extract'] = async (
  input,
  { emit, logger }
) => {
  const { user, message } = input;

  let template: string;
  try {
    template = await fs.readFile('prompts/user-activity-extract.mustache', 'utf-8');
  } catch (err) {
    logger.error('Failed to load prompt template file', { error: err });
    return;
  }

  const prompt = Mustache.render(template, { message });

  try {
    const schema = zodToJsonSchema(ActivitiesPayload);

    const completion = await openai.chat.completions.create({
      model: 'gpt-4o-mini',
      messages: [{ role: 'user', content: prompt }],
      temperature: 0,
      response_format: {
        type: 'json_schema',
        json_schema: {
          name: 'activities_payload',
          schema,
        },
      },
    });
Processing the Structured Response
Once OpenAI returns structured JSON, we validate it and emit events for each activity:
const raw = completion.choices[0].message.content!;
    const parsed = ActivitiesPayload.parse(JSON.parse(raw));

    for (const activity of parsed.activities) {
      await emit({
        topic: 'user-activity-log',
        data: { user, ...activity },
      });
    }

    logger.info(`Emitted ${parsed.activities.length} activity log(s)`);
  } catch (err) {
    logger.error('Activity extraction failed:', err);
  }
};
How the Extraction Works in Practice
Here are examples of how different messages get processed:
Input: "I weighed 72kg today, had a spinach salad for lunch, and did a 20-minute jog."
OpenAI Returns:
{
  "activities": [
    {
      "weight": "72kg",
      "meal": "spinach salad",
      "workout": "20-minute jog"
    }
  ]
}
Events Emitted: One user-activity-log event with all three data points
Input: "I had eggs for breakfast and later ate pizza for dinner"
OpenAI Returns:
{
  "activities": [
    {
      "meal": "eggs for breakfast"
    },
    {
      "meal": "pizza for dinner"
    }
  ]
}
Events Emitted: Two separate user-activity-log events, one for each meal
Emitting Structured Data Events
Each extracted activity becomes a separate event:
await emit({
  topic: 'user-activity-log',
  data: { user, ...activity },
});
The user-activity-log event contains:
user: Phone number of who sent the messageweight: Weight measurement (if mentioned)meal: Food eaten (if mentioned)workout: Exercise done (if mentioned)
Other steps in the system listen for these events to log data to the database and send confirmations back to the user.
Fourth Step: AI-Powered Planning and Analysis
The health agent doesn't just log data; it also creates meal plans and workout routines, and analyzes your health patterns. This is where the AI really comes into play, using GPT-4o to generate personalized recommendations and insights based on user requests and stored data.
Building the Meal and Workout Planning System
The planner step handles both meal and workout requests using a single handler:
Create steps/planner.step.ts:
import { EventConfig, Handlers } from 'motia'
import { z } from 'zod'
import OpenAI from 'openai'

const openai = new OpenAI({ apiKey: process.env.OPENAI_API_KEY! })

const schema = z.object({
  user: z.string(),
  type: z.enum(['meal', 'workout']),
  prompt: z.string()
})

export const config: EventConfig = {
  type: 'event',
  name: 'planner',
  description: 'Generate tailored meal or workout plans',
  subscribes: ['planner-request'],
  emits: ['send-whatsapp-message-request'],
  input: schema,
  flows: ['health-companion']
}
This step listens for planner-request events from the intent classifier and sends responses directly back to WhatsApp.
Generating Personalized Recommendations
The planner uses GPT-4o with a focused system prompt:
export const handler: Handlers['planner'] = async (input, { logger, emit }) => {
  const { user, prompt, type } = input

  logger.info(`Planner prompt from ${user}: ${prompt}`)

  const chat = await openai.chat.completions.create({
    model: 'gpt-4o-mini',
    messages: [
      { role: 'system', content: 'You are a fitness and diet planning assistant.' },
      { role: 'user', content: prompt }
    ]
  })

  const response = chat.choices[0].message.content
  logger.info(`AI ${type} plan for ${user}: ${response}`)

  await emit({
    topic: 'send-whatsapp-message-request',
    data: {
      user,
      message: response
    }
  })
}
The beauty of this approach is that it passes the user's original message directly to GPT-4o. So "suggest a low-carb dinner for weight loss" gets the full context, not just "meal planning request."
Creating the Health Habit Analyzer
The analyzer is more complex - it pulls data from SQLite and uses templates to create structured prompts:
Create steps/analyzer.step.ts:
import { EventConfig, Handlers } from 'motia'
import { z } from 'zod'
import OpenAI from 'openai'
import sqlite3 from 'sqlite3'
import { open } from 'sqlite'
import Mustache from 'mustache'
import fs from 'fs/promises';

const openai = new OpenAI({ apiKey: process.env.OPENAI_API_KEY! })

const schema = z.object({
  user: z.string()
})

export const config: EventConfig = {
  type: 'event',
  name: 'habit-analyzer',
  description: 'Analyze user health activity from SQLite and summarize',
  subscribes: ['analyze-user-habits'],
  emits: ['send-whatsapp-message-request'],
  input: schema,
  flows: ['health-companion']
}
Using SQLite Data for Analysis
The analyzer first pulls the user's recent activity logs:
export const handler: Handlers['habit-analyzer'] = async (input, { logger, emit }) => {
  const { user } = input
  logger.info(`Analyzing tracker logs for user: ${user}`)

  const db = await open({ filename: 'health_data.db', driver: sqlite3.Database })
  const logs = await db.all('SELECT * FROM tracker WHERE user = ? ORDER BY timestamp DESC LIMIT 10', [user])

  if (!logs.length) {
    const msg = 'No activity logs found to analyze.'
    logger.info(msg)

    await emit({
      topic: 'send-whatsapp-message-request',
      data: {
        user,
        message: msg
      }
    })
    return
  }
This grabs the last 10 activity entries for the user. If there's no data, it sends a helpful message explaining that.
Using Mustache Templates for Insights
Instead of building prompts in code, we use templates for clean, maintainable AI prompts:
Create prompts/analyze-health.mustache:
Analyze the following health activity logs and provide suggestions or insights for improvement:

{{#logs}}
- Date: {{timestamp}}, Weight: {{weight}}, Workout: {{workout}}, Meal: {{meal}}
{{/logs}}
The analyzer loads this template and fills it with user data:
const template = await fs.readFile('prompts/analyze-health.mustache', 'utf-8');
  const prompt = Mustache.render(template, { logs });

  const response = await openai.chat.completions.create({
    model: 'gpt-4o-mini',
    messages: [
      { role: 'system', content: 'You are a health coach helping users reflect on their habits.' },
      { role: 'user', content: prompt }
    ]
  });

  const summary = response.choices[0].message.content
  logger.info('Insight received from AI', { user, summary })

  await emit({
    topic: 'send-whatsapp-message-request',
    data: {
      user,
      message: summary
    }
  })
Fifth Step: Responding Through WhatsApp
This step handles all outgoing WhatsApp messages - confirmations, meal plans, habit analysis, and error messages.
Setting Up WhatsApp Message Sending
Create steps/send-whatsapp-message.step.ts:
import { EventConfig, Handlers } from 'motia'
import { z } from 'zod'
import axios from 'axios'

const token = process.env.WHATSAPP_TOKEN!
const phoneNumberId = process.env.PHONE_NUMBER_ID!
const userPhone = process.env.RECEIVER_PHONE!

const schema = z.object({
  message: z.string(),
  user: z.string().optional()
})

export const config: EventConfig = {
  type: 'event',
  name: 'send-whatsapp-message',
  description: 'Send a WhatsApp message via Cloud API (event-driven)',
  subscribes: ['send-whatsapp-message-request'],
  emits: [],
  input: schema,
  flows: ['health-companion']
}
This step listens for send-whatsapp-message-request events from all other parts of the system.
Handling Message Delivery
The handler formats messages for WhatsApp's API and sends them:
export const handler: Handlers['send-whatsapp-message'] = async (input, { logger }) => {
  const { message, user } = input

  if (!message || typeof message !== 'string') {
    logger.warn('Invalid or empty message received.')
    return
  }

  const payload = {
    messaging_product: 'whatsapp',
    to: user || userPhone,
    text: { body: message }
  }

  const headers = {
    Authorization: `Bearer ${token}`,
    'Content-Type': 'application/json'
  }

  try {
    const response = await axios.post(
      `https://graph.facebook.com/v18.0/${phoneNumberId}/messages`,
      payload,
      { headers }
    )

    logger.info(`WhatsApp message sent to ${payload.to}: ${response.status}`)
  } catch (error: any) {
    const errRes = error.response?.data || error.message
    logger.error('WhatsApp Send Error:', errRes)
  }
}
API Token and Phone Configuration
The step uses environment variables for WhatsApp Cloud API credentials:
- WHATSAPP_TOKEN: Bearer token from Meta Developer Console
- PHONE_NUMBER_ID: Your WhatsApp Business phone number ID
- RECEIVER_PHONE: Fallback phone number for testing
Error Handling and Message Formatting
The system handles several error cases:
- Empty messages: Log warning and skip
- API failures: Log full error details for debugging
- Missing user: Falls back to
RECEIVER_PHONEfrom environment - Invalid tokens: Logs authentication errors
WhatsApp expects a specific JSON format:
{
  "messaging_product": "whatsapp",
  "to": "+1234567890",
  "text": { "body": "Your message text here" }
}
Every part of the system that needs to respond (planner, analyzer, confirmation, chat) emits the same send-whatsapp-message-request event. This single step handles all outgoing messages, making the system simple and consistent.
Running the Complete Project
Now that you've built all the components, let's see the AI health agent in action. This section shows how to start the system and demonstrates real WhatsApp conversations with the agent.
Starting the System
First, start your Motia development server:
npm run dev
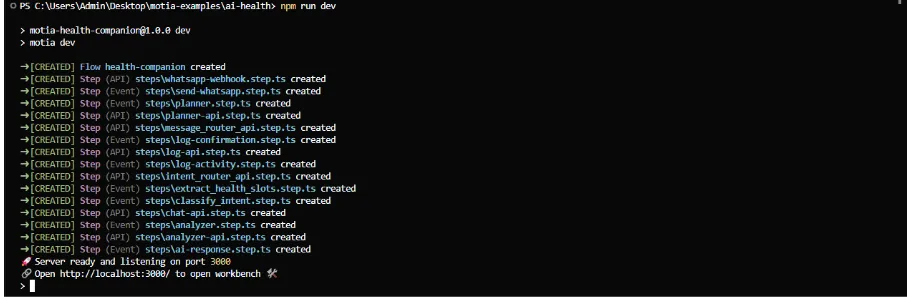
The logs show all your steps being created - webhook handler, intent classifier, planner, analyzer, and message sender. When you see "Server ready and listening on port 3000," your system is running. Next, expose your local server with ngrok:
ngrok http 3000
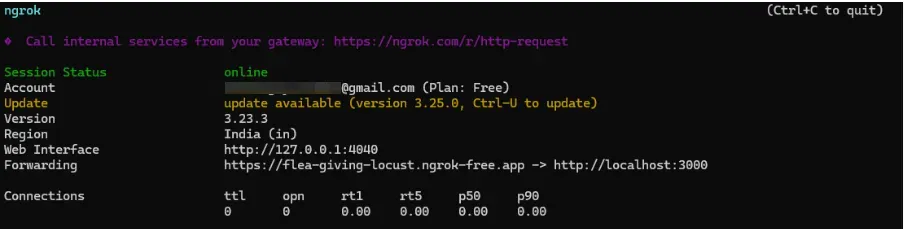
Copy the ngrok URL and register https://your-ngrok-url.app/webhook as your webhook URL in the Meta Developer Console.
Testing Activity Logging
Send a simple activity message to test the logging flow:
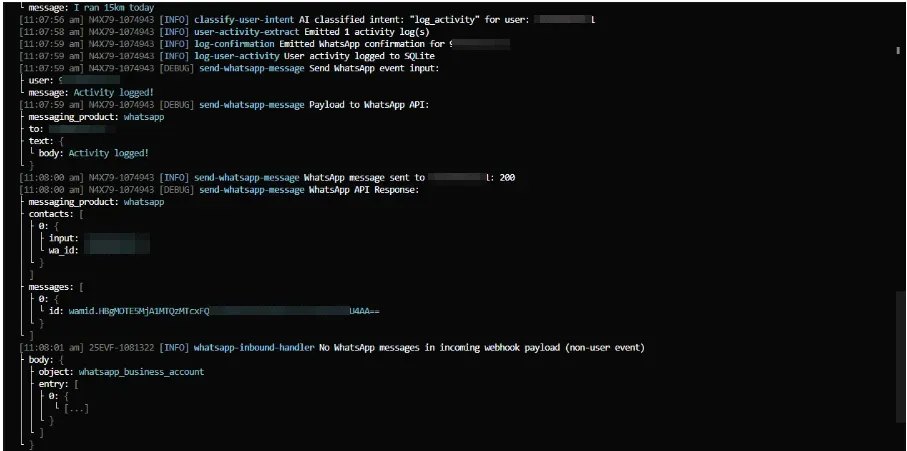
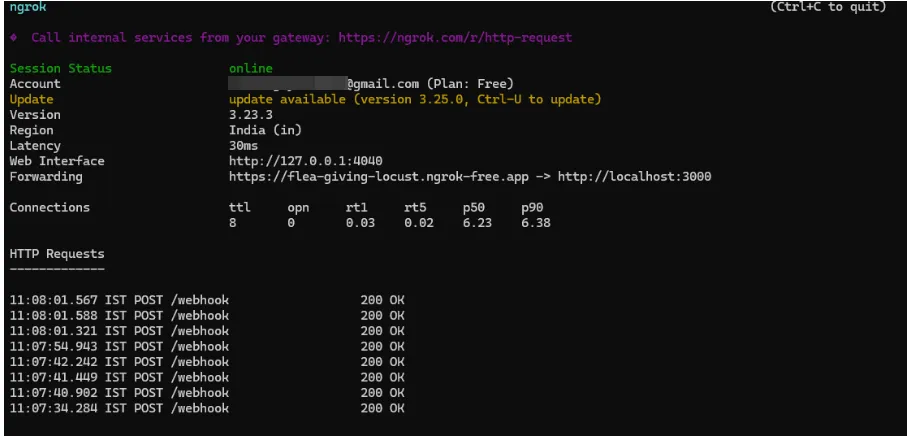
ngrok log:
WhatsApp Interface chat:
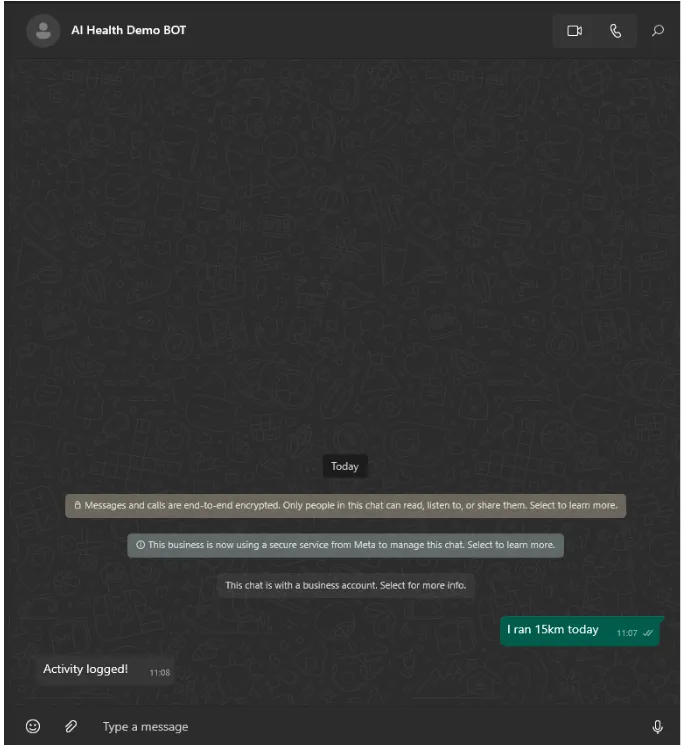
The logs show the complete flow:
- Webhook receives the message
- The intent classifier determines its activity logging
- Data extractor pulls out "15km run"
- Database logger saves to SQLite
- Confirmation sent back to WhatsApp
Testing Meal Planning
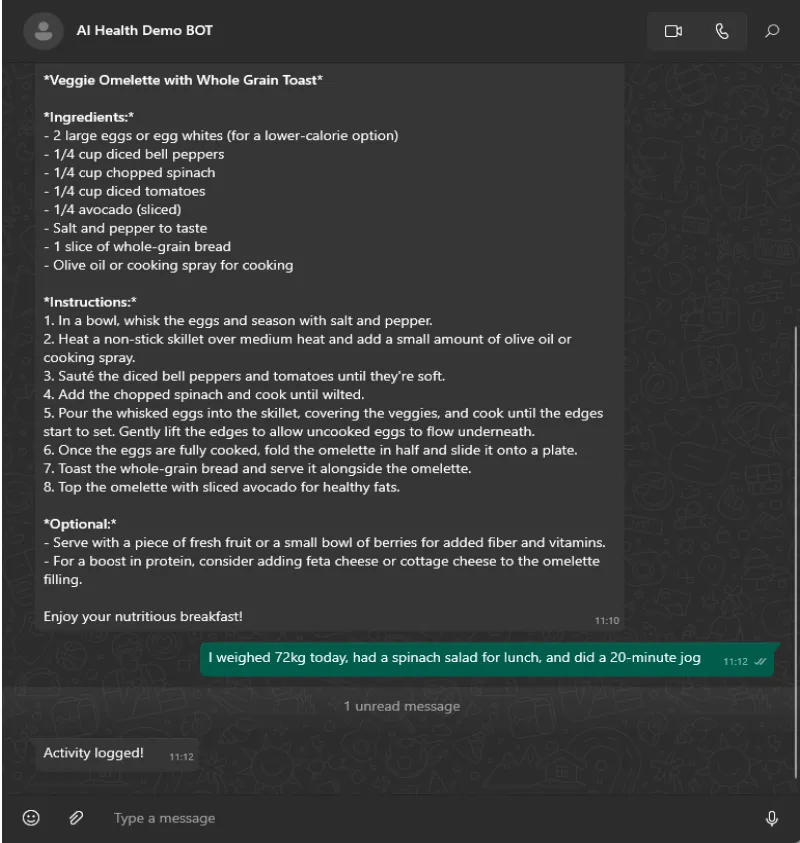
Request a meal plan to see the AI planning system:

WhatsApp Interface Chat:
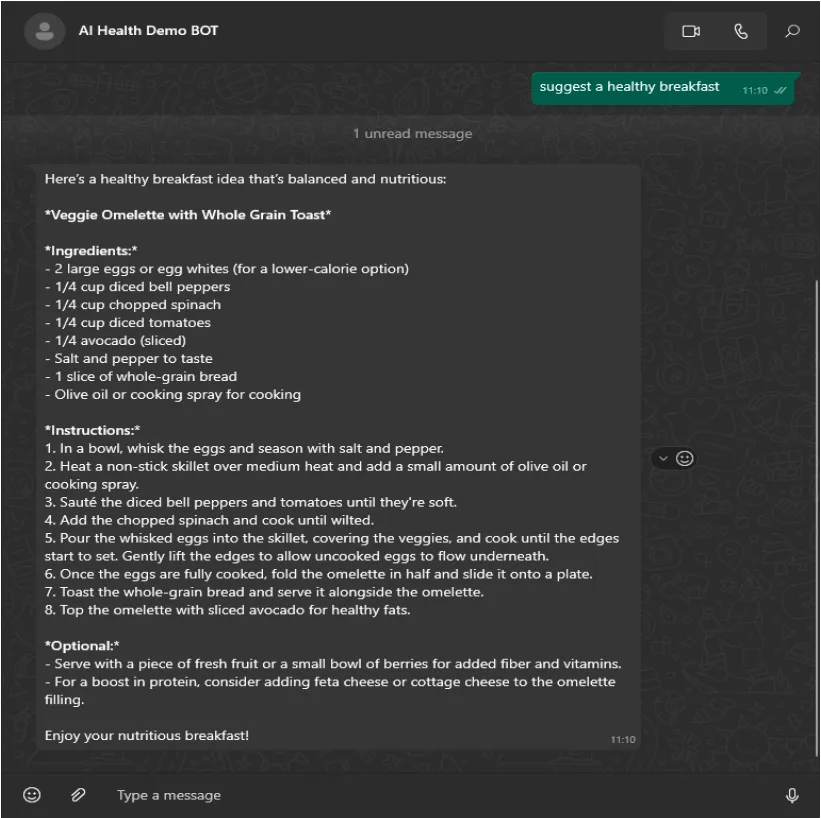
The system:
- Classifies the intent as "plan_meal"
- GPT-4o generates a detailed breakfast plan
- Sends the complete recipe back via WhatsApp
Testing Complex Activity Extraction
Send a message with multiple data points.
Prompt: I weighed 72kg today, had a spinach salad for lunch, and did a 20-minute jog
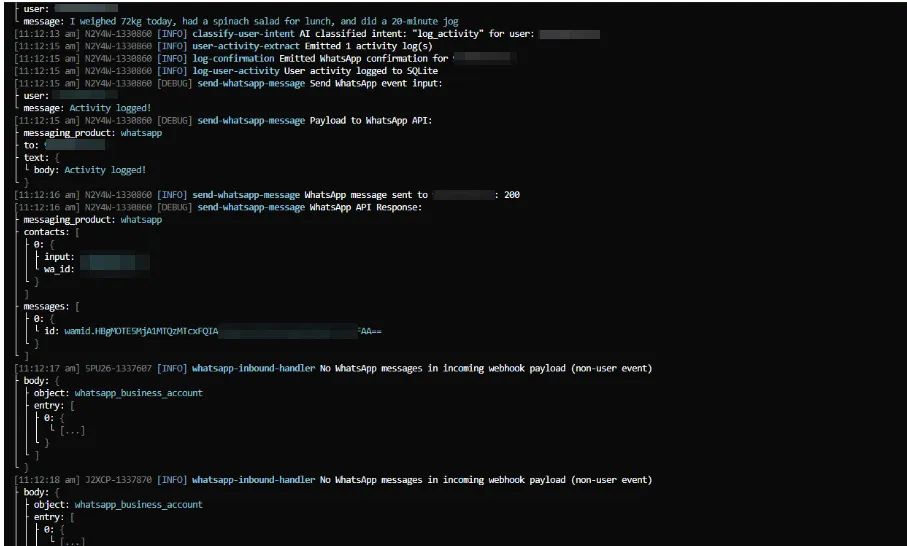
The data extractor successfully pulls out:
- Weight: 72kg
- Meal: spinach salad
- Workout: 20-minute jog
All three pieces of data are saved to the database in a single interaction.
Testing Habit Analysis
Request an analysis of your logged activities.
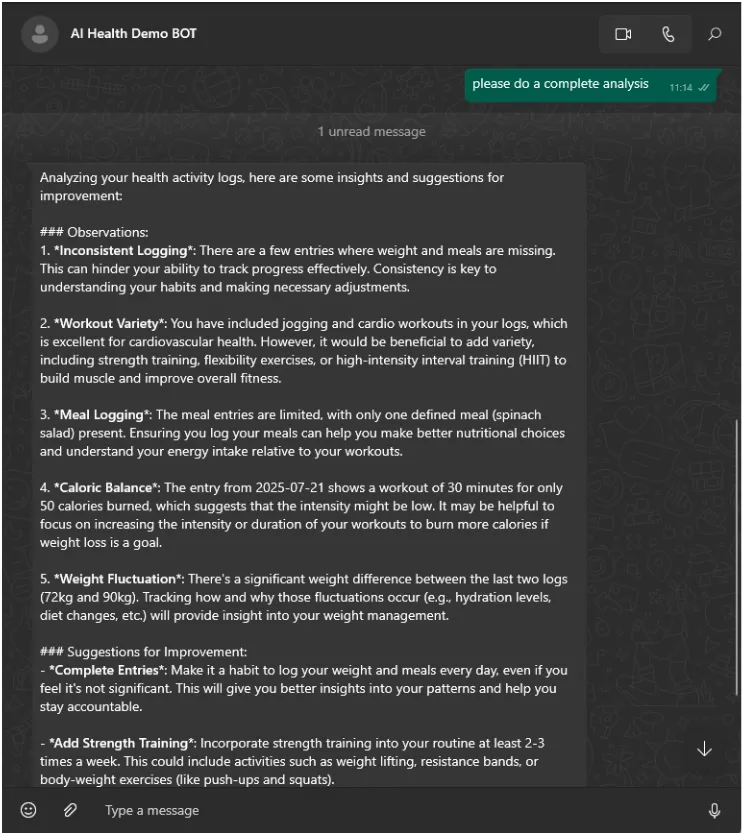
Prompt: please do a complete analysis
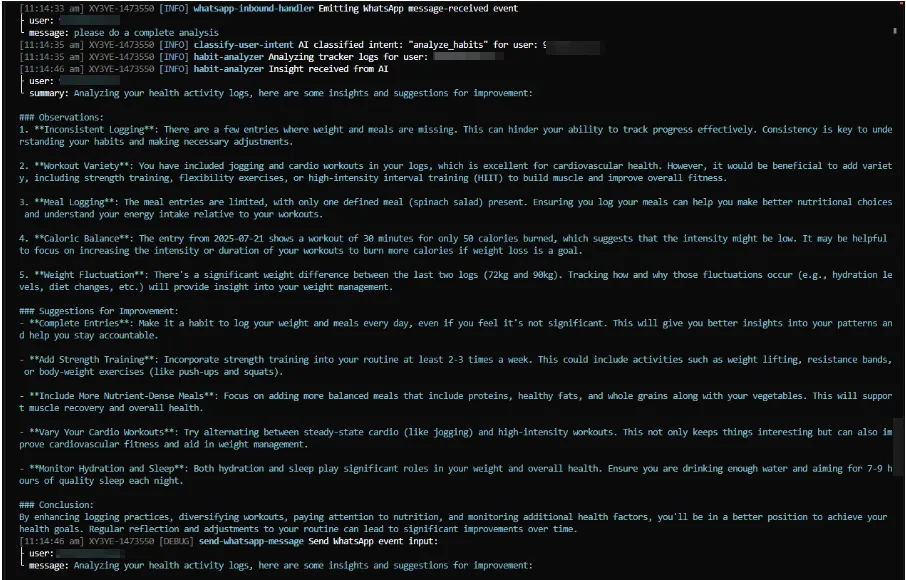
The habit analyzer:
- Pulls your recent activity logs from SQLite
- Uses GPT-4o to analyze patterns and trends
- Provides personalized insights and recommendations
- Sends detailed feedback via WhatsApp
Check out Motia GitHub Repo for more such examples:
Conclusion
You've built a complete AI health agent that works entirely through WhatsApp. The system handles natural language messages, extracts structured data, generates personalized plans, and analyzes health patterns, all using Motia's event-driven architecture.
The key benefits of this approach:
- One conversation interface - Users don't need another app
- Event-driven reliability - Each step does one job well
- Easy to extend - Add new features by creating new steps
- AI-powered intelligence - Understands casual text and responds naturally
The event-driven architecture makes it simple to add new features like sleep tracking, medication reminders, or progress photos. All you need to do is just create new steps that listen for the right events and emit responses.