
Discover how to build an intelligent documentation system that automatically analyzes GitHub repositories and generates comprehensive documentation, diagrams, and tests. This tutorial walks you through a workflow that combines NVIDIA's AI models with Motia's event-driven architecture for automated documentation generation
Introduction
Your project has 10,000 lines of code and a README with three sentences. Sound familiar? Or maybe you spent hours writing documentation that's already outdated by the time you push it. We've all been there. Most documentation approaches are either too manual or too generic. But what if you could point at any GitHub repository and get comprehensive documentation, visual diagrams, and test suites, all generated automatically with AI?
In this project, we'll build an AI documentation generator that uses NVIDIA NIM to analyze repositories, Motia to orchestrate the workflow, and intelligent AI prompts to create documentation automatically.
Here's how it works: when you submit a repository URL, AI analyzes the codebase structure and generates intelligent summaries. Motia automatically creates comprehensive documentation with multiple sections, reviews content for quality and completeness, generates visual Mermaid diagrams for architecture understanding, and also test suites.
Why This Architecture
Traditional documentation generation have multiple disconnected tools: repository analysis, content generation, quality review, diagram creation, and test generation, each requiring separate configurations, deployments, and complex coordination between different systems.
Motia simplifies this by using an event-driven design where each step is a focused function that listens for events and emits new ones. The framework automatically manages service orchestration, state persistence, error recovery, and observability. This eliminates the overhead of microservice coordination while preserving modularity and separation of concerns.
Project Overview
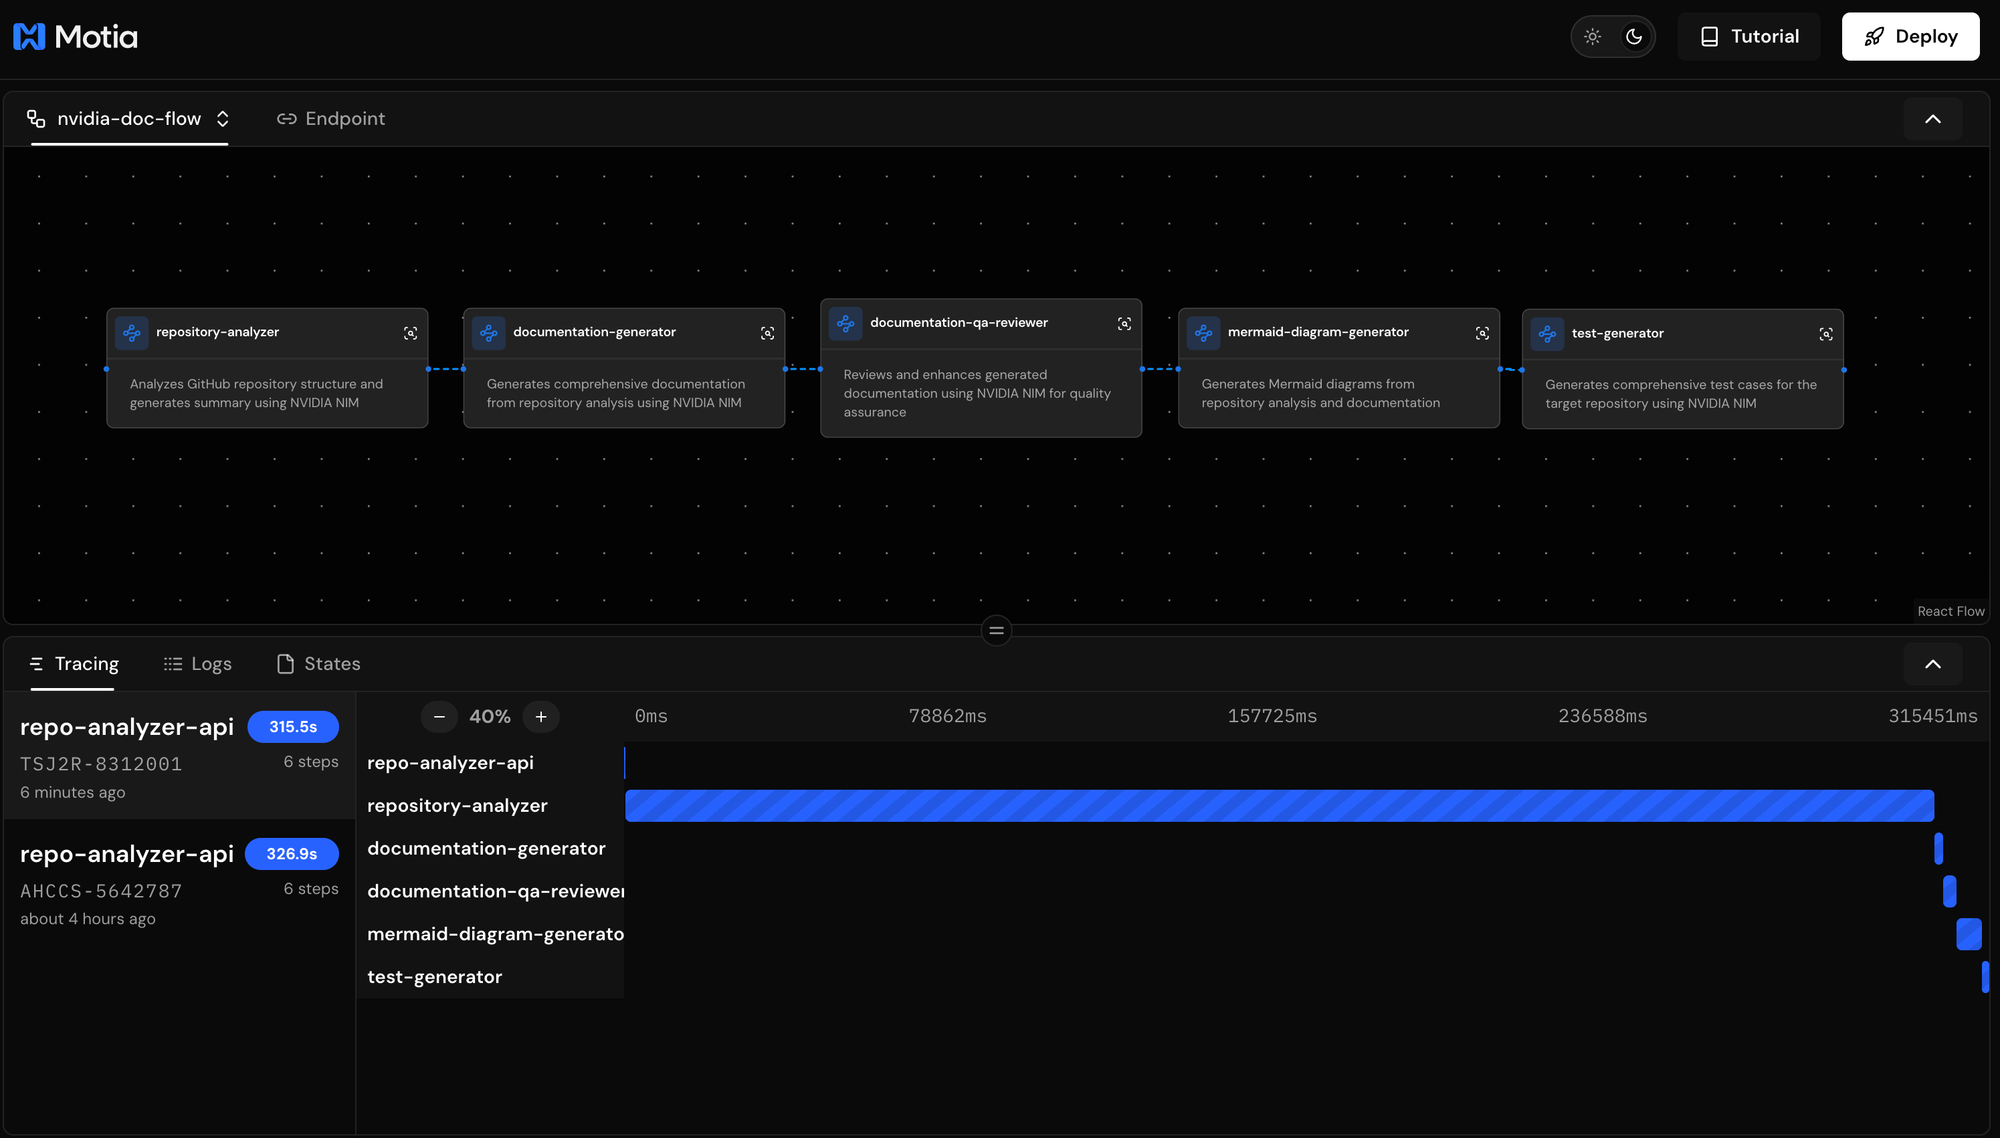
Here's how the AI documentation generator works when you submit a github repository URL:
- Repository Analysis → API endpoint accepts GitHub repository URLs, clones and analyzes file structure, languages, and generates intelligent summaries using NVIDIA NIM models.
- Documentation Generation → NVIDIA NIM creates comprehensive sections including overview, architecture details, getting started guides, API references, and file structure documentation.
- Quality Review & Enhancement → System analyzes generated documentation for completeness, clarity, and accuracy, then automatically improve weak sections and adds executive summaries.
- Visual Diagram Creation → Generates 5 types of Mermaid diagrams: architecture diagrams, workflow diagrams, component relationships, data flow charts, and directory structure visualizations.
- Test Suite Generation → NVIDIA NIM creates comprehensive test cases including unit tests, integration tests, and end-to-end test scenarios based on detected languages and frameworks.
- Asset Organization → All generated content gets saved to organized folders:
assets/docs/,assets/diagrams/, andassets/generated_tests/with proper indexing and README files.
The steps involved in building this project are:
- Repository Analyzer: Clones GitHub repositories, analyzes file structure and languages, generates AI-powered summaries using NVIDIA NIM
- Documentation Generator: Creates comprehensive markdown documentation with multiple specialized sections
- QA Reviewer: Analyzes quality metrics (completeness, clarity, accuracy) and improves content automatically
- Diagram Generator: Creates visual Mermaid charts for architecture, workflows, components, data flow, and directory structure
- Test Generator: Builds comprehensive test suites for multiple languages and frameworks (Jest, Pytest, Playwright, JUnit)
- API Trigger: RESTful endpoint that initiates the entire documentation pipeline
Prerequisites
To follow along with this tutorial, you should have:
- Node.js (v18+)
- NVIDIA NIM Account: Sign up at https://build.nvidia.com/ and generate an API Key
Get Started in 2 Minutes
Clone the complete working example using the command below:
git clone <https://github.com/MotiaDev/motia-examples.git>
cd motia-examples/examples/nvidia-docs-motia
npm install
npm run dev
Run this to verify everything works:
# Install dependencies (from the cloned repo)
npm install

# Start Motia development server
npm run dev
If Motia Workbench opens at http://localhost:3000 and shows the documentation generator project, you're ready to explore how the system works.
Environment Configuration
After cloning the repository, create a .env file in the project root:
# NVIDIA NIM Configuration
NVIDIA_NIM_API_KEY=nvapi-xxxxx
NVIDIA_BASE_URL=https://integrate.api.nvidia.com/v1
Check out GitHub Repository for code:
The First Step: Repository Analysis
The first step creates an HTTP endpoint that receives GitHub repository URLs and starts the comprehensive analysis workflow.
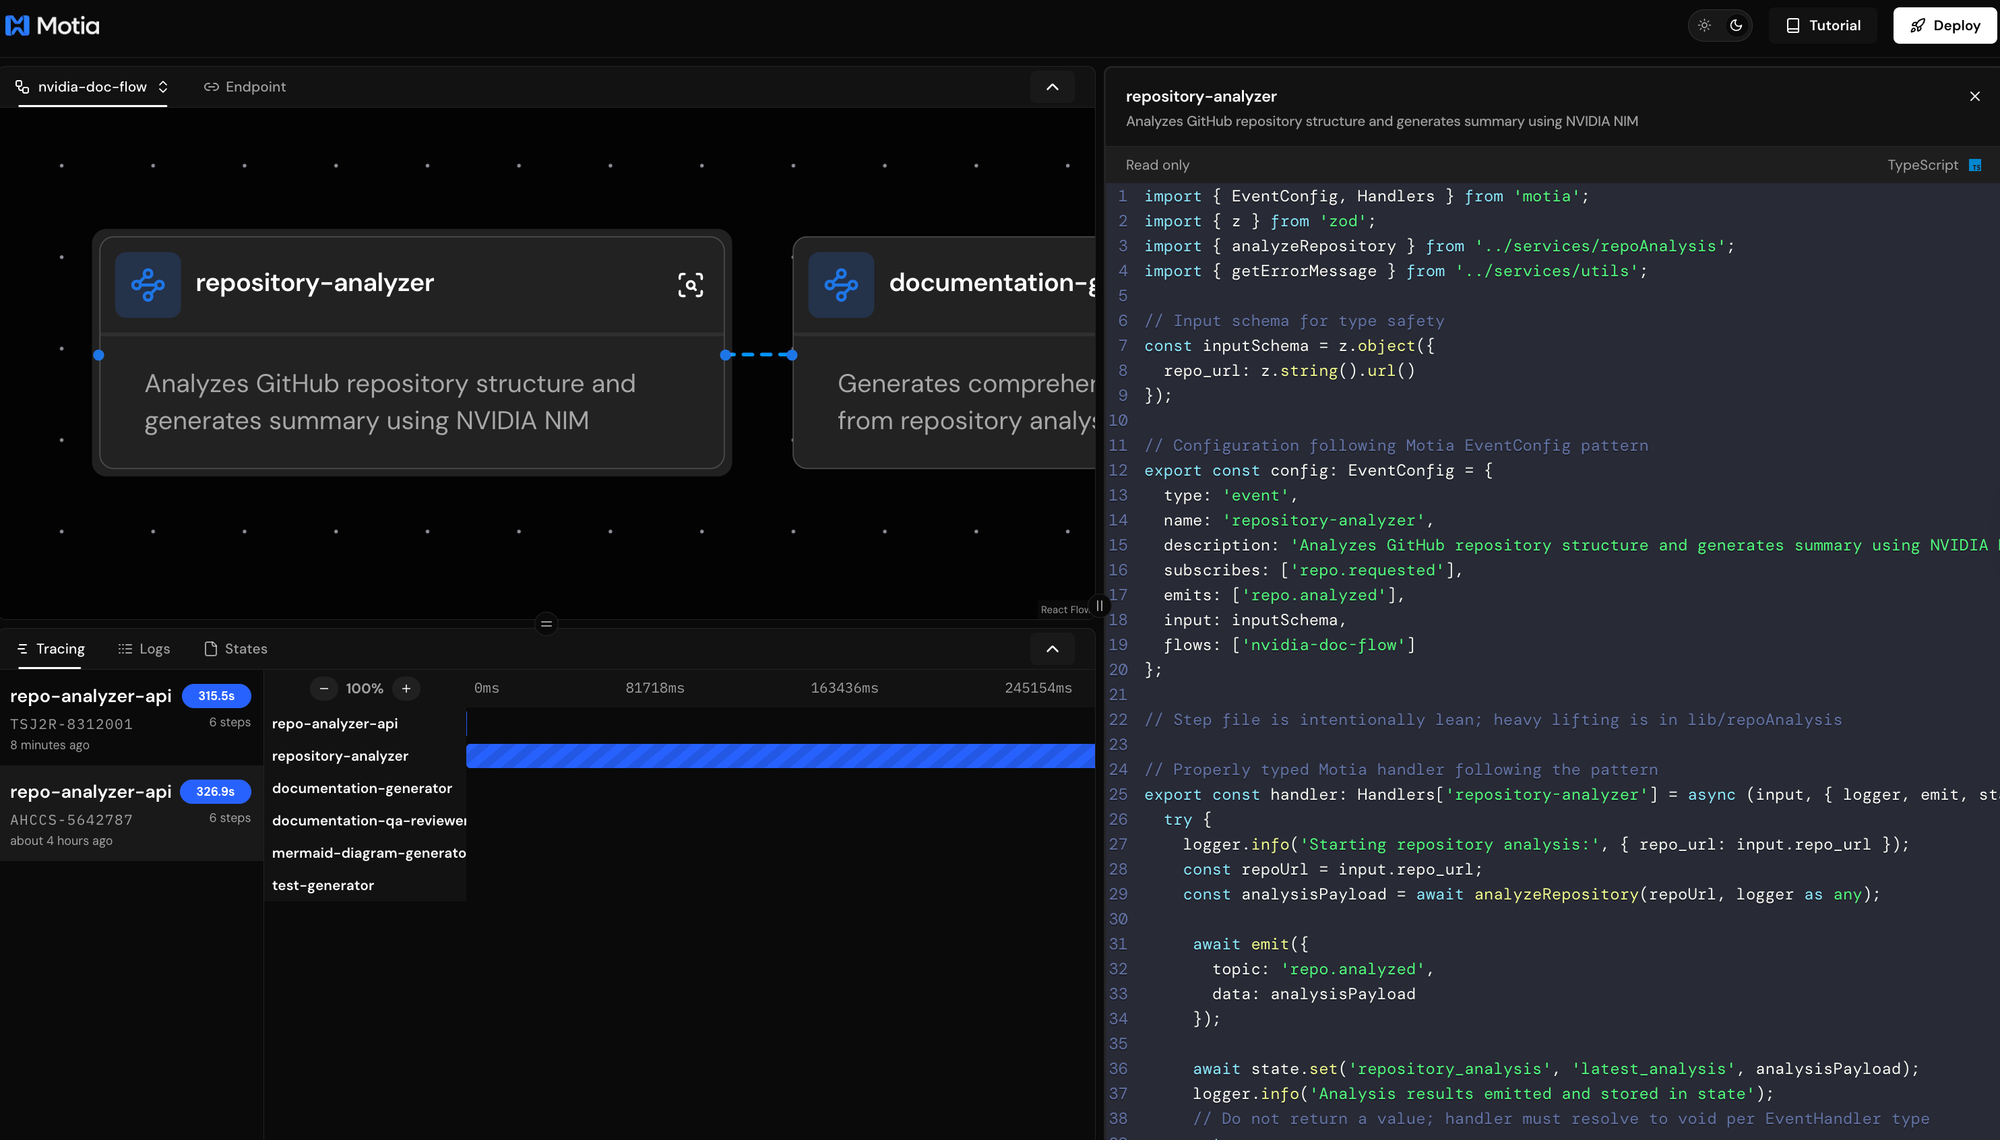
What This Step Does
The API accepts repository URLs, validates the input, clones the repository for analysis, and emits a repo.requested event to trigger intelligent analysis. It generates unique analysis IDs for tracking each repository through the complete workflow.
The configuration defines this as an API endpoint that accepts POST requests and emits events when repository analysis is requested.
export const config: ApiRouteConfig = {
  type: 'api',
  name: 'repo-analyzer-api',
  path: '/analyze-repo',
  method: 'POST',
  emits: ['repo.requested'],
  bodySchema: z.object({
    repo_url: z.string().url('Must be a valid URL')
  }),
  description: 'Trigger repository analysis via API endpoint'
}
Input Validation
The step uses Zod schemas to validate that submissions contain valid GitHub repository URLs:
This ensures every submission has a valid repository to analyze while providing clear error messages for invalid inputs.
The Handler Function
The handler processes incoming requests and manages the workflow. It extracts the validated repository URL from the request, logs the analysis request for monitoring and debugging, and then emits the repo.requested event with the repository data for the next step. This pattern keeps each step focused on its specific responsibility while passing data seamlessly through the workflow.
export const handler: Handlers['repo-analyzer-api'] = async (req, { emit, logger }) => {
  const { repo_url } = req.body
  logger.info(`Requesting repository analysis for: ${repo_url}`)

  await emit({
    topic: 'repo.requested',
    data: { repo_url }
  })

  return {
    status: 200,
    body: {
      message: 'Repository analysis requested successfully',
      repo_url,
      status: 'queued'
    }
  }
}
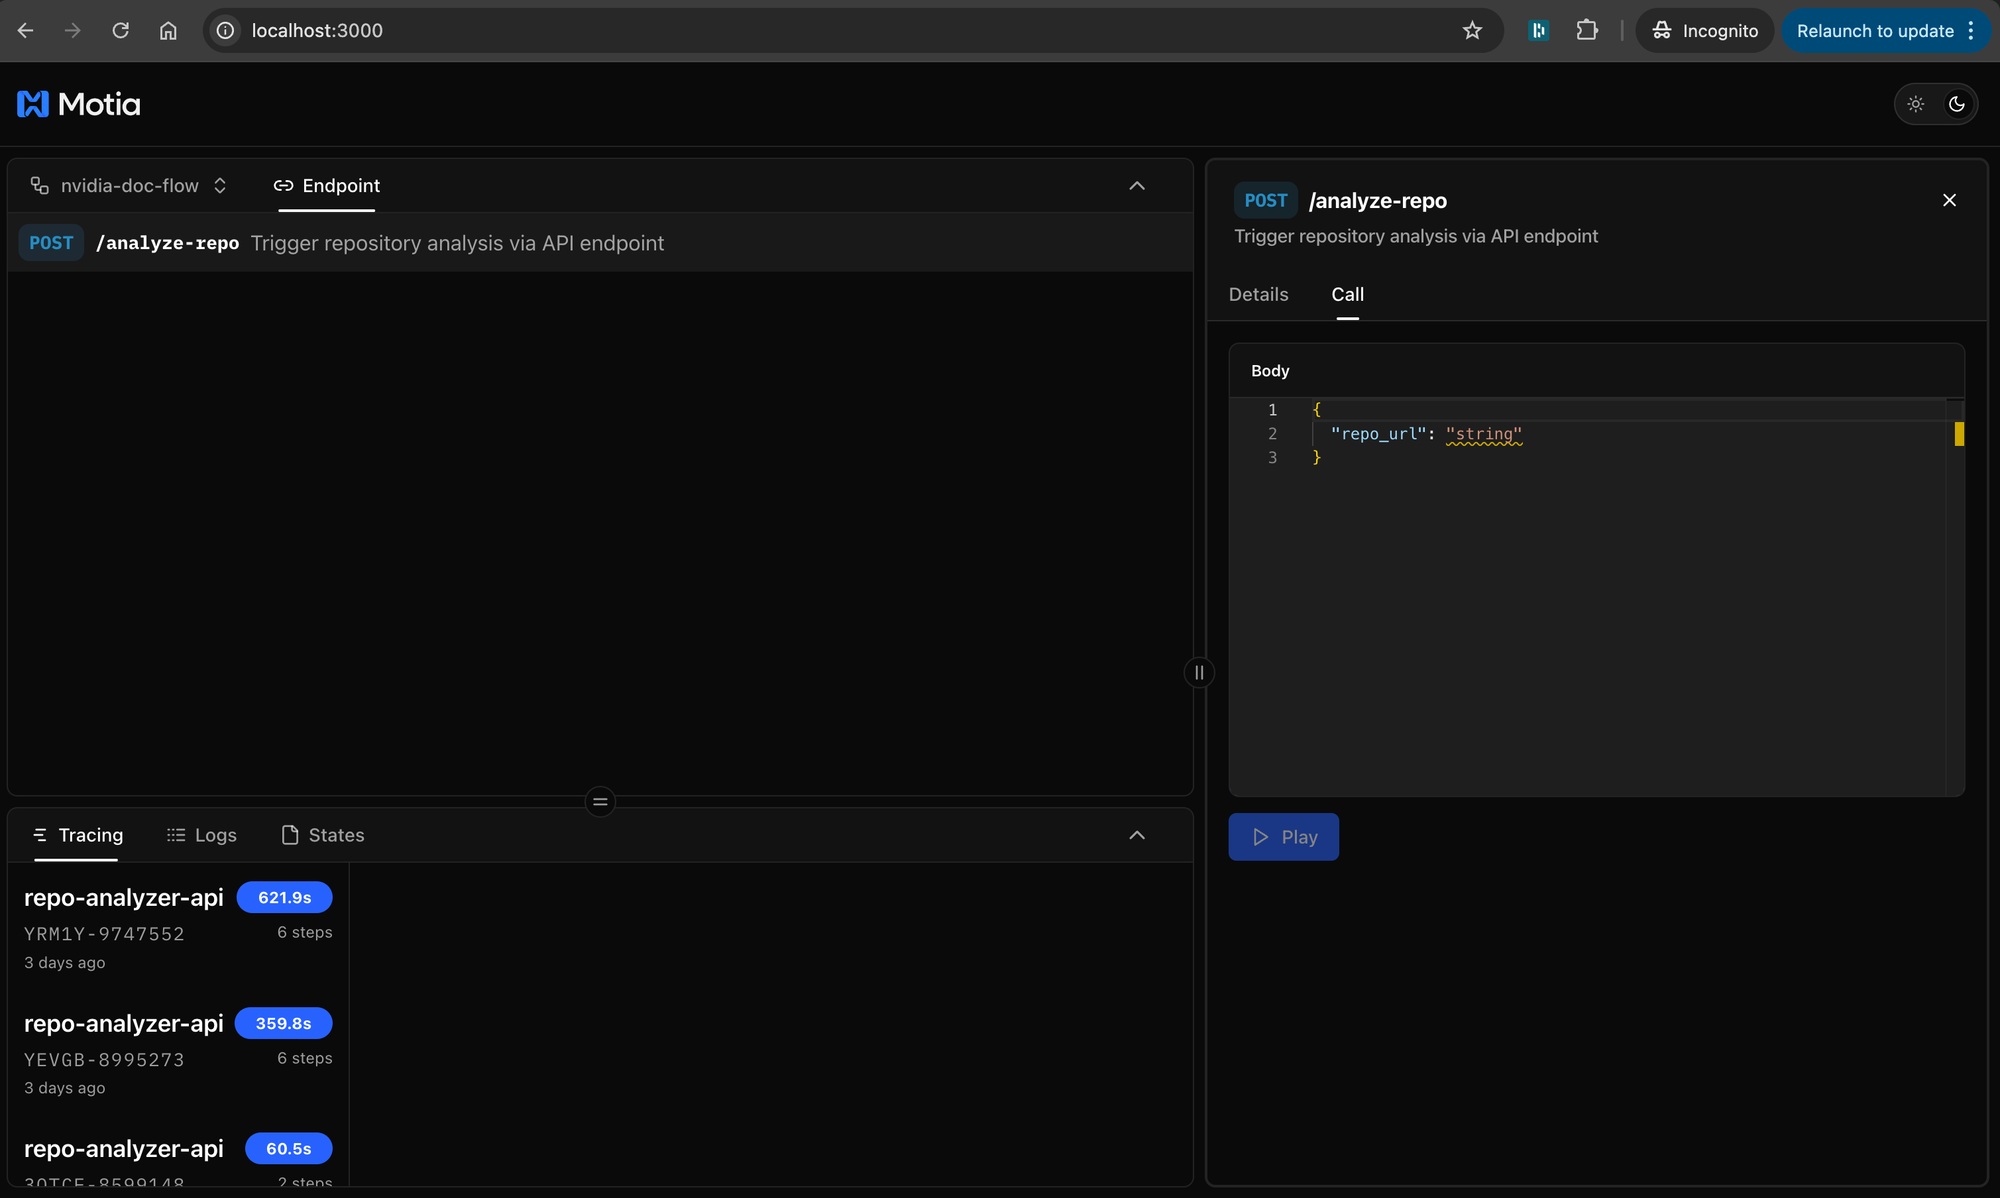
Testing the API
In the Workbench, navigate to the Endpoints tab and test with:
{
  "repo_url": "<https://github.com/MotiaDev/github-stars-counter>"
}
What Happens Next
When a repository is submitted, the handler emits a repo.requested event containing the repository URL. This event automatically triggers the next step in the workflow: the AI-powered repository analyzer.
The Second Step: AI-Powered Repository Analysis
The second step analyzes submitted repositories using NVIDIA NIM to understand codebase structure, language distribution, and generate intelligent summaries. This is where the system builds foundational knowledge for documentation generation.
What This Step Does
The analyzer subscribes to repo.requested events and performs comprehensive repository analysis. It clones repositories locally, analyzes file structures and language distributions, identifies project patterns and frameworks, and uses NVIDIA NIM to generate intelligent summaries of the codebase purpose and architecture.
This step listens for repository submissions and emits analysis results. Unlike the API step, this is an event-driven step that runs intelligent analysis in the background.
Comprehensive Repository Analysis
The handler processes repositories through multiple analysis phases:
// Clone repository and analyze structure
const tempDir = cloneRepository(repoUrl);
const { files, languageCounts } = analyzeDirectory(tempDir);

// Generate statistics and identify primary language
const stats = {
  total_files: files.length,
  total_size_kb: Math.round((totalSize / 1024) * 100) / 100,
  language_breakdown: languageCounts,
  primary_language: primaryLanguage
};

// Analyze repository structure and patterns
const structure = analyzeRepositoryStructure(files);
The system performs intelligent file analysis, language detection using file extensions and patterns, project structure identification (tests, documentation, configuration), and framework detection for later test generation.
AI-Powered Summary Generation
After structural analysis, the step uses NVIDIA NIM to generate intelligent summaries:
// Use NVIDIA NIM for intelligent summary generation
const summaryPrompt = Mustache.render(template, {
  repoUrl,
  totalFiles: stats.total_files,
  primaryLanguage: stats.primary_language,
  topLanguages,
  totalSizeKb: stats.total_size_kb,
  // ... repository structure data
});

const summary = await nim.chat(summaryPrompt, 'meta/llama-3.3-70b-instruct');
The AI analyzes repository purpose and functionality, identifies main technology stack and architecture patterns, determines target audience and use cases, and highlights notable features and development patterns.
State Management and Event Emission
After analysis completion, the step stores comprehensive data and emits events:
await state.set('repository_analysis', 'latest_analysis', analysisPayload);

await emit({
  topic: 'repo.analyzed',
  data: analysisPayload
});
This creates the foundation data that all subsequent steps use for documentation generation, quality review, diagram creation, and test generation.
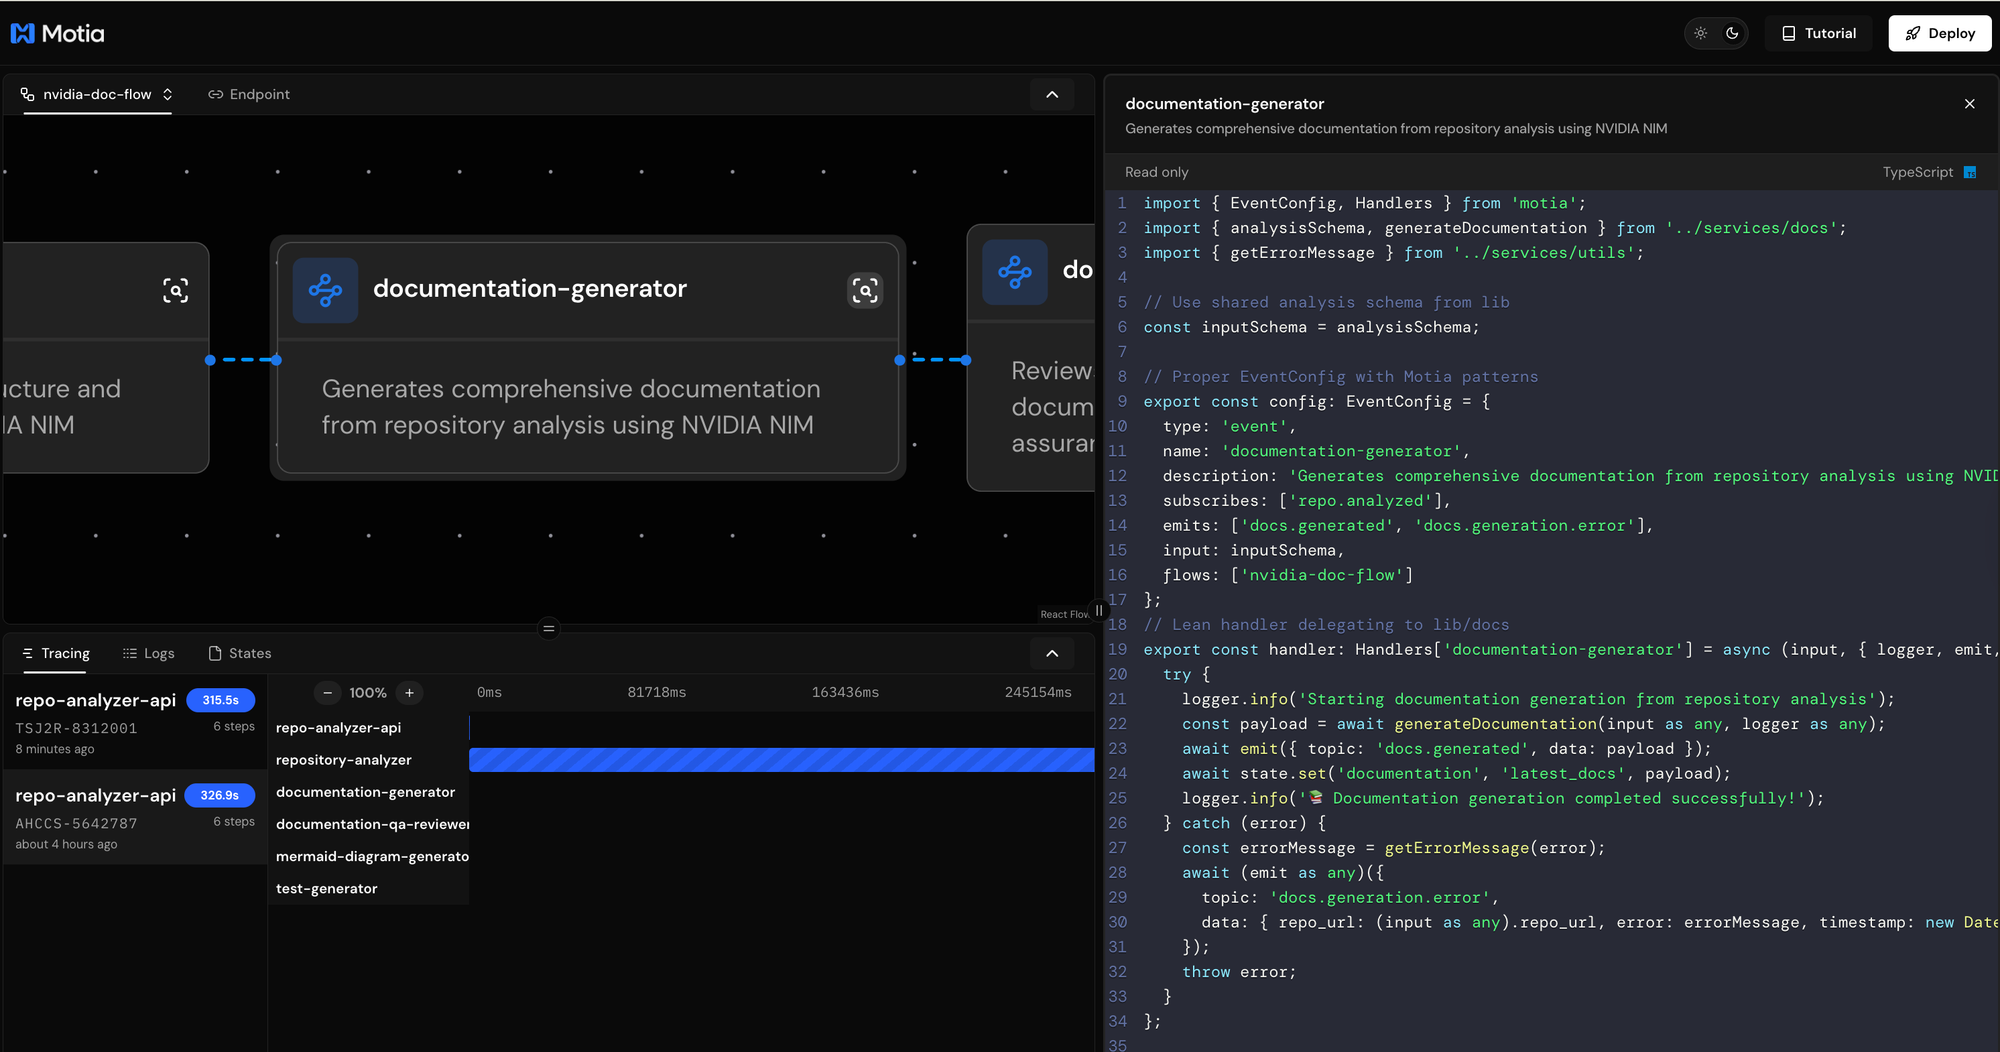
The Third Step: AI Documentation Generation
The third step creates comprehensive documentation using NVIDIA NIM models to generate professional, multi-section documentation based on the repository analysis.
What This Step Does
The documentation generator subscribes to repo.analyzed events and creates comprehensive documentation including overview sections, architecture descriptions, getting started guides, API references, and file structure documentation. Each section is tailored to the specific repository type and technology stack.
This step processes analysis results and generates professional documentation. The content generation is intelligent and adapts to different project types and complexity levels.
Multi-Section Documentation Strategy
The handler generates documentation through parallel AI processing:
// Generate multiple documentation sections in parallel
const [overview, architecture, gettingStarted, apiReference] = await Promise.all([
  generateOverview(analysis),
  generateArchitecture(analysis),
  generateGettingStarted(analysis),
  generateApiReference(analysis)
]);
Each section uses specialized prompts and templates designed for specific documentation purposes. The system creates contextual content based on detected languages, frameworks, and project patterns.
Intelligent Content Generation
The documentation generator uses Mustache templates and NVIDIA NIM for context-aware content:
async function generateOverview(analysis: RepositoryAnalysis): Promise<string> {
  const template = await fs.promises.readFile('prompts/write_docs/overview.mustache', 'utf-8');
  const templateData = {
    repoUrl: analysis.repo_url,
    summary: analysis.summary,
    primaryLanguage: analysis.statistics.primary_language,
    // ... contextual data
  };
  const prompt = Mustache.render(template, templateData);
  return await nim.chat(prompt, 'meta/llama-3.1-8b-instruct');
}
The system generates professional project overviews with clear value propositions, detailed architecture explanations based on actual code structure, comprehensive getting started guides with language-specific instructions, and relevant API documentation or usage examples.
Documentation Assembly and Storage
The step combines generated sections into complete documentation:
const completeDocumentation = await generateCompleteDocumentation(
  analysis,
  generatedDocs,
  languageTable,
  fileStructure
);

// Save to organized assets folder
const docPath = path.join('assets', 'docs', `${repoName}_documentation.md`);
await fs.promises.writeFile(docPath, completeDocumentation);
The final documentation includes professional formatting, language breakdown tables, complete file structure representations, and metadata for tracking and updates.
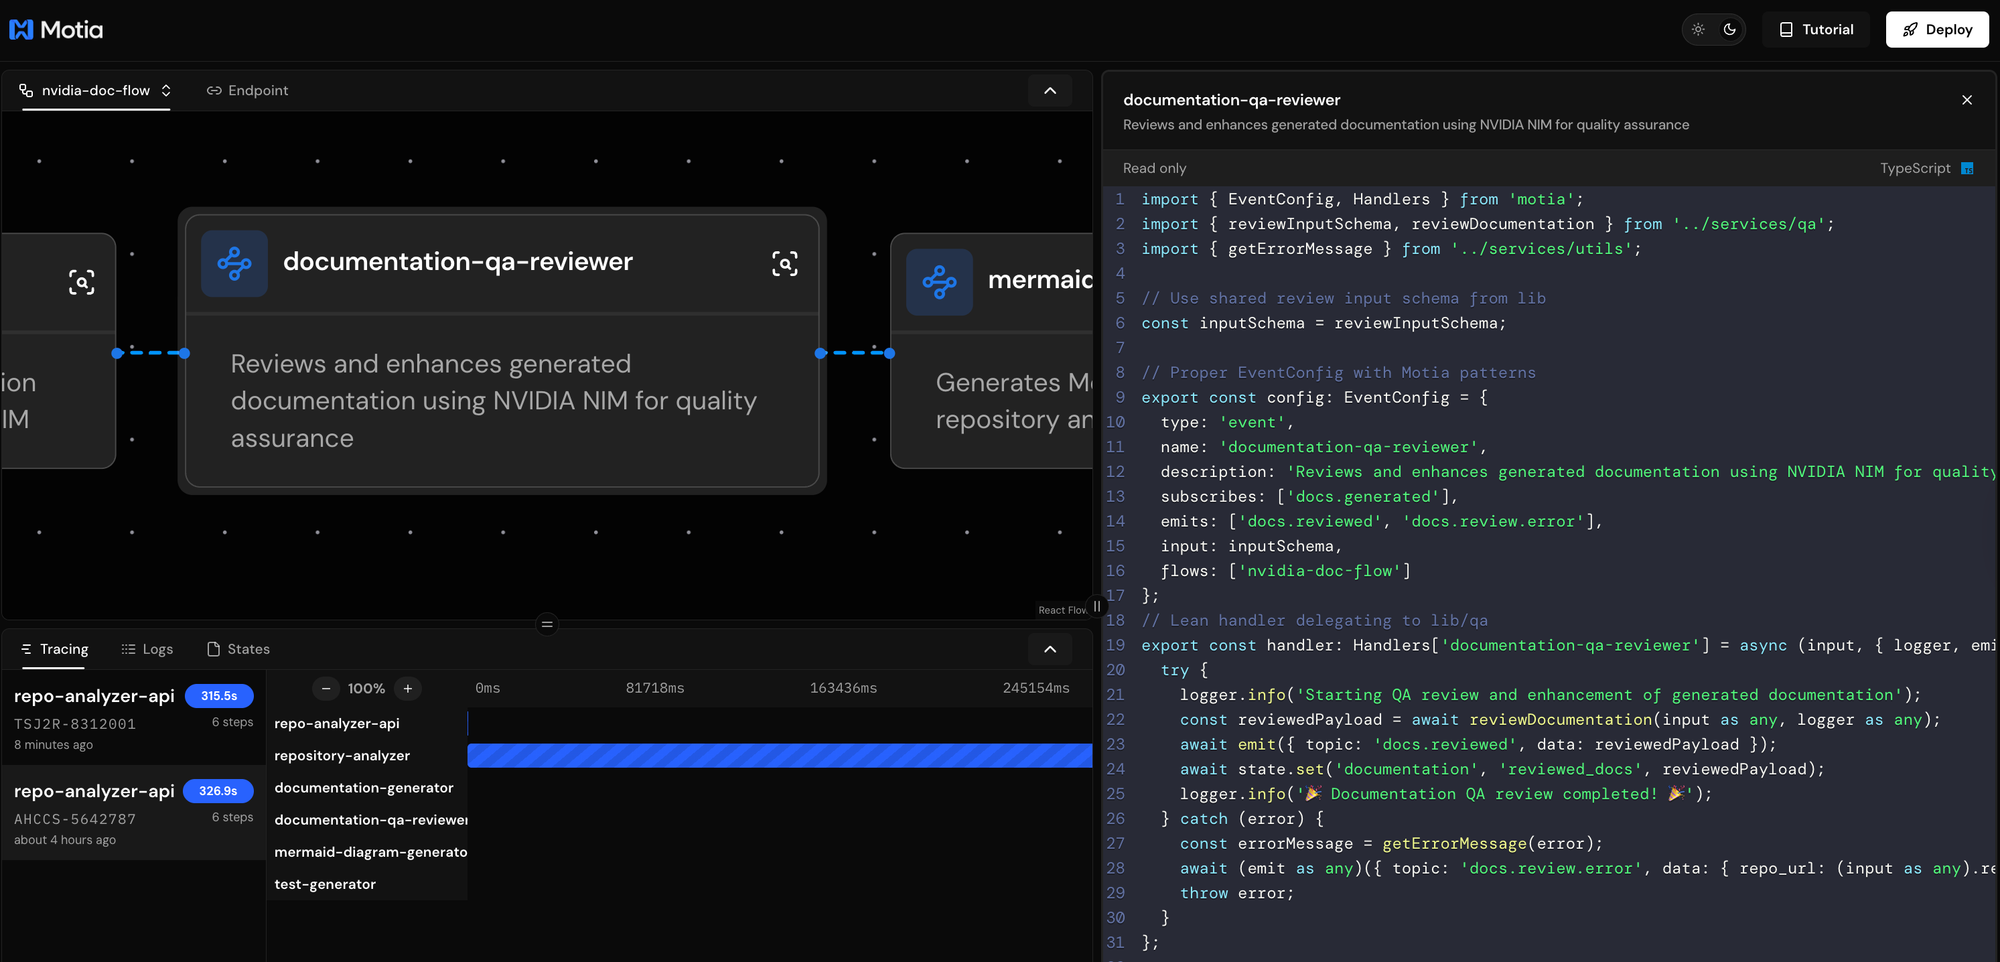
The Fourth Step: Quality Review and Enhancement
The fourth step analyzes generated documentation for quality metrics and automatically enhances content to ensure completeness, clarity, and accuracy.
What This Step Does
The QA reviewer subscribes to docs.generated events and performs comprehensive quality analysis including completeness scoring (0-100%), clarity assessment for readability and structure, accuracy validation against repository data, and automatic content enhancement for incomplete sections.
This step uses AI to analyze documentation quality and applies targeted improvements. The quality scoring helps identify areas needing enhancement.
Quality Metrics Analysis
The handler performs systematic quality evaluation:
async function analyzeDocumentationQuality(documentation: string, repoUrl: string): Promise<QualityMetrics> {
  const template = await fs.promises.readFile('prompts/qa_review/quality_analysis.mustache', 'utf-8');
  const prompt = Mustache.render(template, { repoUrl, documentationPreview: documentation.substring(0, 2000) });
  const response = await nim.chat(prompt, 'meta/llama-3.1-8b-instruct');
  return JSON.parse(response);
}
The system evaluates documentation completeness by checking for truncated sections and missing content, clarity through structure analysis and readability assessment, and accuracy by validating content against repository data and detecting inconsistencies.
Intelligent Content Enhancement
The step automatically improves incomplete documentation sections:
async function enhanceSection(sectionName: keyof EnhancedSections, originalContent: string, input: ReviewInput): Promise<string> {
  const MIN_SECTION_LENGTH = 300;
  if (originalContent.length >= MIN_SECTION_LENGTH) return originalContent;

  // Use specialized enhancement templates
  const template = await fs.promises.readFile(templates[sectionName], 'utf-8');
  const enhancedContent = await nim.chat(prompt, 'meta/llama-3.1-8b-instruct');
  return enhancedContent.trim();
}
The enhancement process targets specific improvement areas: expanding truncated overviews with comprehensive project descriptions, enriching architecture sections with detailed component explanations, completing getting started guides with comprehensive installation and setup instructions, and enhancing API references with usage examples and integration patterns.
Executive Summary Generation
The step creates executive summaries for professional presentation:
const executiveSummary = await generateExecutiveSummary(documentation, repoUrl);

// Combine enhanced content with quality metrics
const enhancedDocumentation = Mustache.render(enhancedDocTemplate, {
  repoName,
  executiveSummary,
  completenessScore: qualityMetrics.completeness_score,
  clarityScore: qualityMetrics.clarity_score,
  accuracyScore: qualityMetrics.accuracy_score,
  // ... enhanced sections
});
The final enhanced documentation includes professional executive summaries, quality scores and improvement tracking, enhanced sections with comprehensive content, and complete audit trails of improvements made.
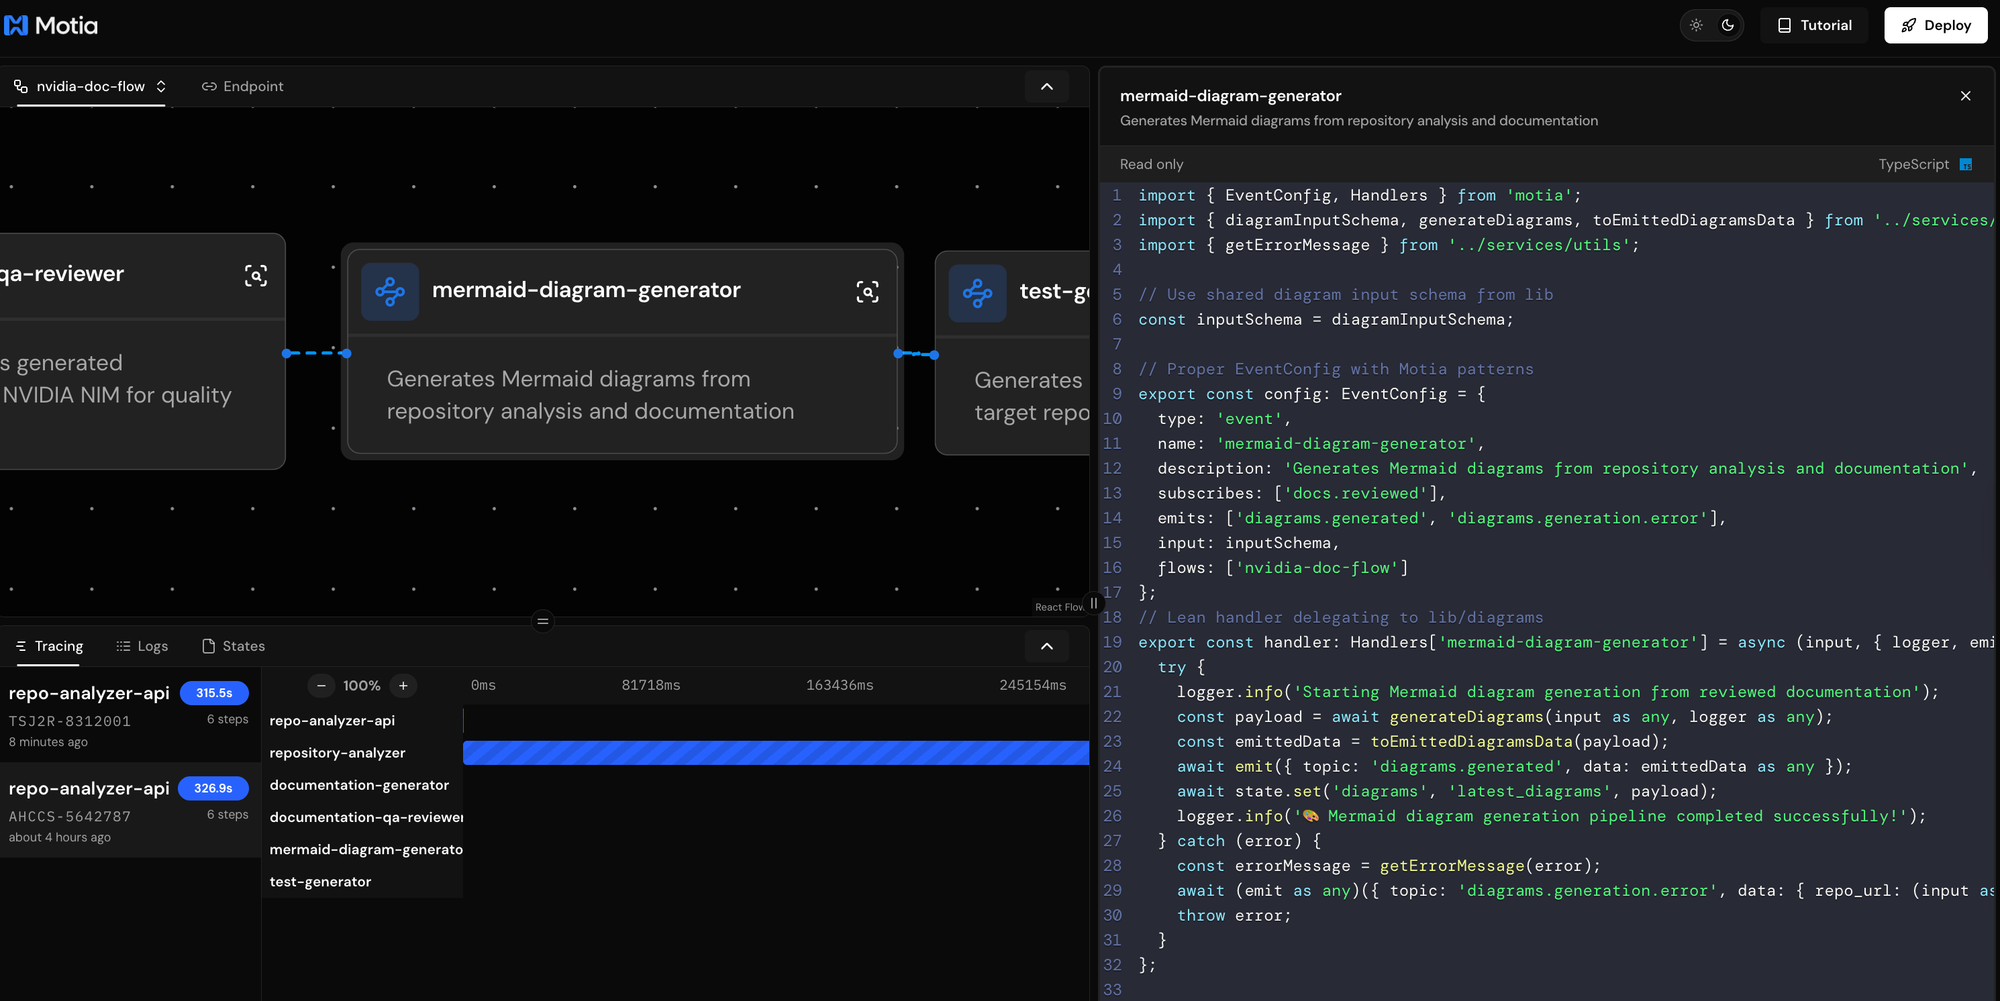
The Fifth Step: Visual Diagram Generation
The fifth step creates comprehensive Mermaid diagrams that visualize repository architecture, workflows, components, and data flow to enhance documentation understanding.
What This Step Does
The diagram generator subscribes to docs.reviewed events and creates five types of visual diagrams: architecture diagrams showing high-level system components, workflow diagrams displaying development and usage processes, component diagrams illustrating module relationships, data flow diagrams mapping information processing, and directory structure diagrams visualizing repository organization.
This step processes enhanced documentation and repository analysis to create visual representations. The diagrams are generated using AI and saved as Mermaid files for easy integration.
Multiple Diagram Types
The handler generates comprehensive visual documentation:
async function generateAllDiagrams(payload: DiagramInput): Promise<DiagramData[]> {
  const diagrams: DiagramData[] = [];

  // Generate architecture diagram
  const architectureDiagram = await generateArchitectureDiagram(analysis, repoUrl);
  diagrams.push({
    type: 'architecture',
    title: `${repoName} Architecture`,
    description: 'High-level system architecture showing main components and relationships'
  });

  // Generate workflow, component, dataflow, and directory diagrams
  // ... additional diagram generation

  return diagrams;
}
Each diagram type serves specific documentation purposes and uses specialized prompts for accurate visual representation.
AI-Powered Diagram Creation
The system uses NVIDIA NIM with specialized prompts for diagram generation:
async function generateArchitectureDiagram(analysis: DiagramInput['source_analysis'], repoUrl: string): Promise<string> {
  const template = await fs.promises.readFile('prompts/render_mermaid/architecture_diagram.mustache', 'utf-8');
  const templateData = {
    repoUrl,
    primaryLanguage: analysis.statistics?.primary_language,
    fileTypes: Object.keys(analysis.statistics?.language_breakdown || {}).join(', '),
    hasTests: analysis.repository_structure?.has_tests,
    // ... additional context
  };
  const prompt = Mustache.render(template, templateData);
  const response = await nim.chat(prompt, 'meta/llama-3.1-8b-instruct');
  return response.trim();
}
The AI generates context-aware architecture diagrams based on detected patterns, workflow diagrams reflecting actual development processes, component diagrams showing real module relationships, data flow diagrams mapping actual information processing, and directory structure diagrams representing repository organization.
Diagram Organization and Indexing
The step saves diagrams with comprehensive indexing:
// Save individual diagram files
const savedFiles = await saveDiagramsToFiles(diagrams);

// Generate comprehensive index
const diagramsIndex = await generateDiagramsIndexMarkdown(diagrams, repoUrl);
const indexPath = path.join('assets', 'diagrams', 'README.md');
await fs.promises.writeFile(indexPath, diagramsIndex);
The final diagram package includes individual Mermaid files for each diagram type, comprehensive README with usage instructions, online viewing links for Mermaid Live Editor, and integration guidance for documentation platforms.
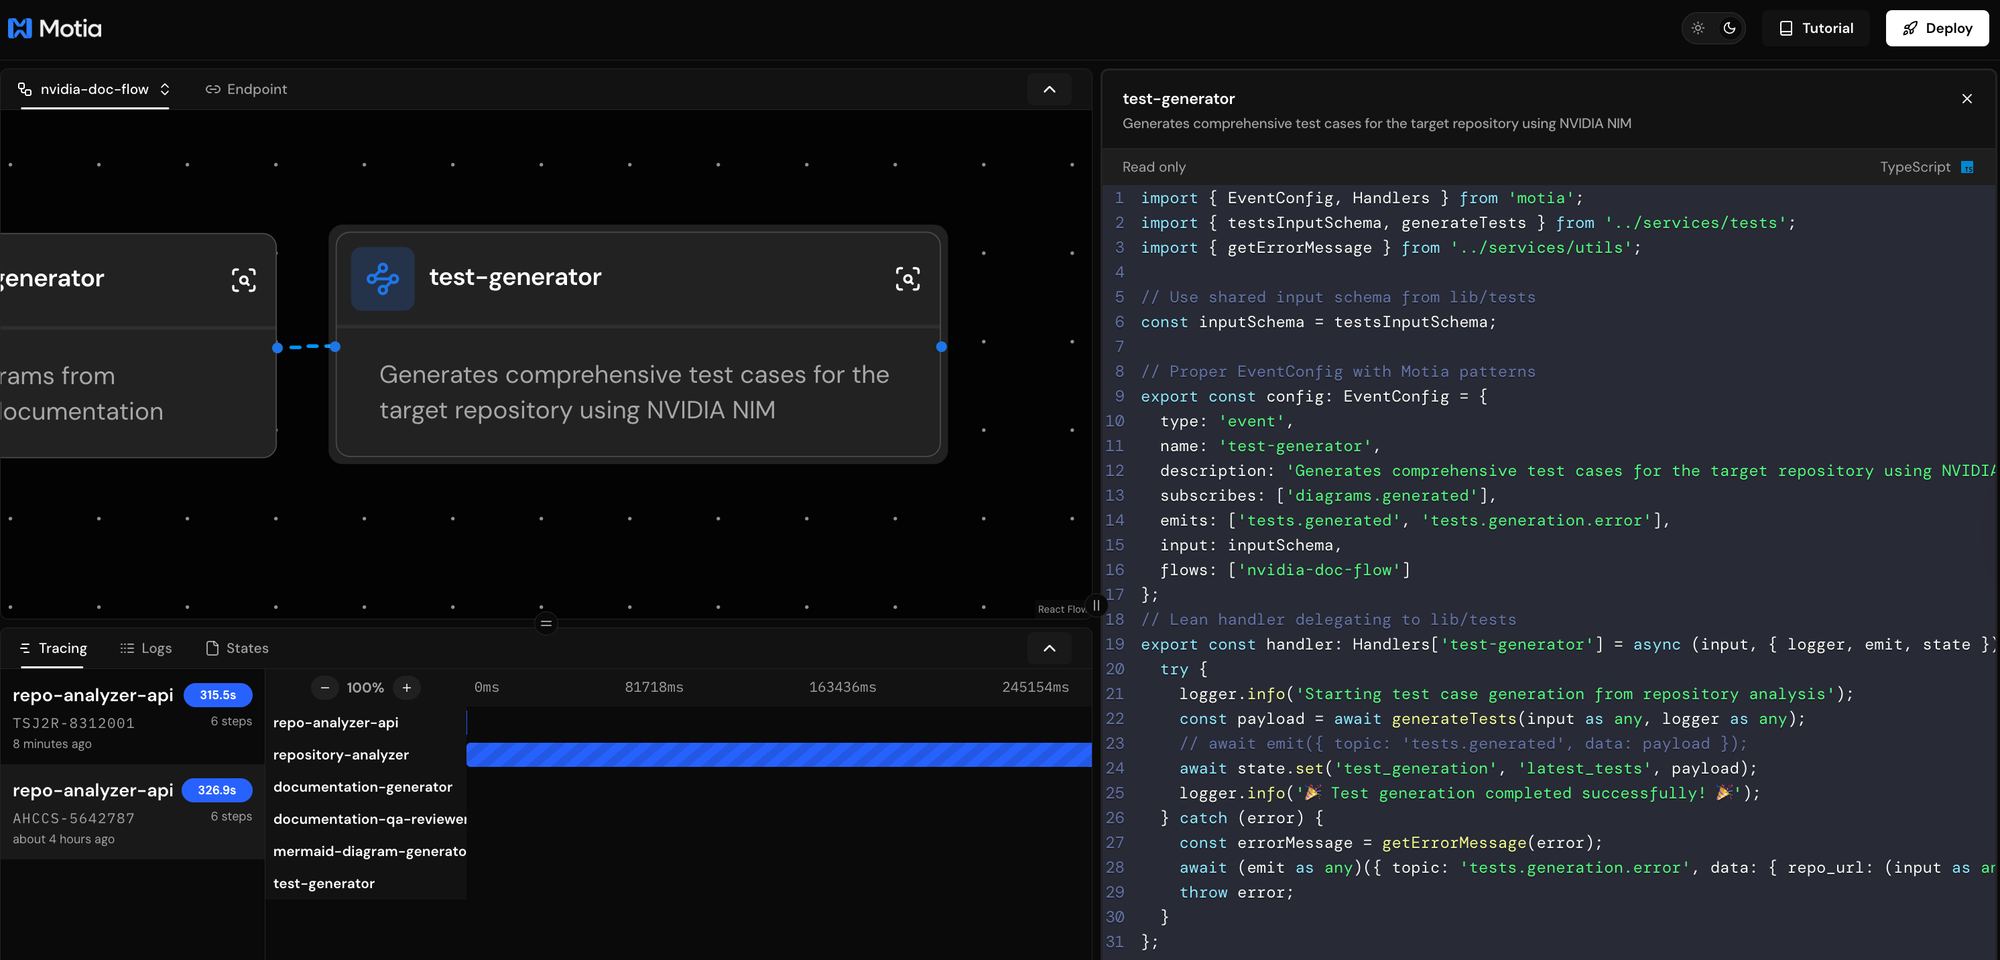
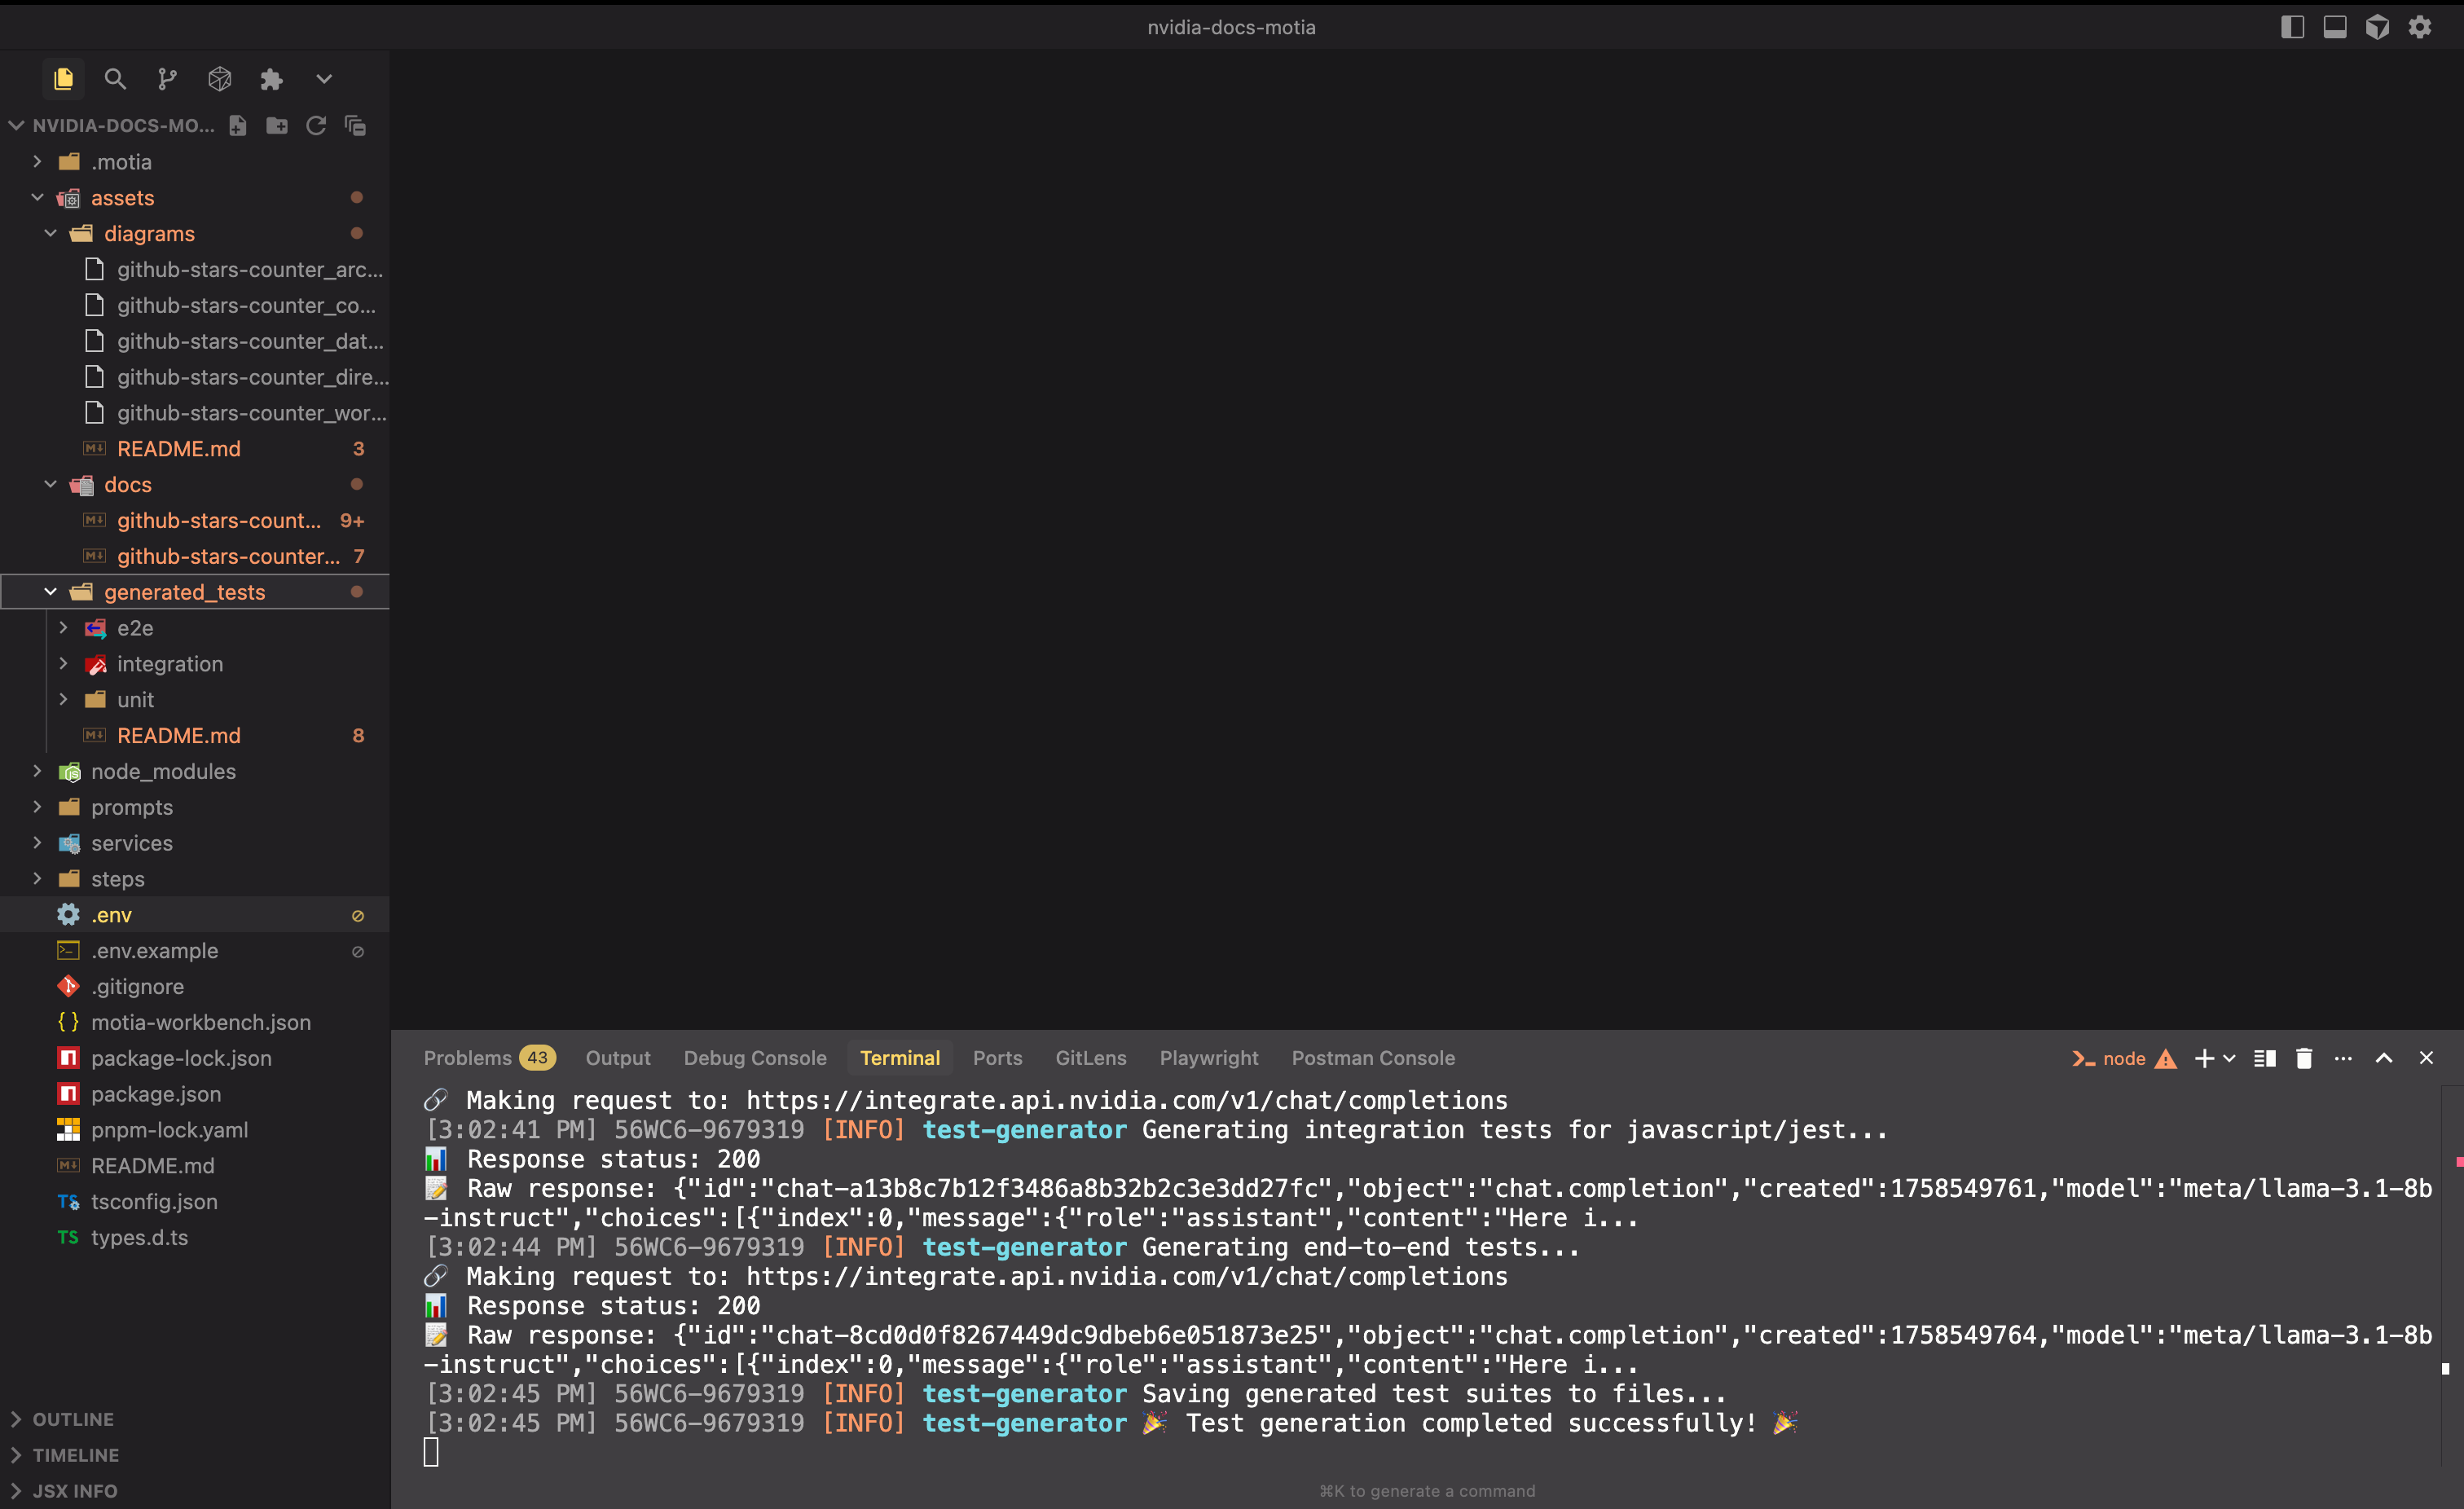
The Sixth Step: Comprehensive Test Generation
The final step creates comprehensive test suites including unit tests, integration tests, and end-to-end tests based on detected languages and frameworks.
What This Step Does
The test generator subscribes to diagrams.generated events and creates comprehensive test coverage including language-specific unit tests using appropriate frameworks, integration tests for module and API interactions, end-to-end tests for complete workflow validation, and organized test structure with proper documentation.
This step completes the documentation pipeline by providing executable test examples and comprehensive testing strategies for the analyzed repository.
Framework Detection and Test Strategy
The handler intelligently detects testing frameworks and creates appropriate test suites:
function detectTestingFrameworks(analysis: TestsInput['source_analysis']): { [language: string]: string } {
  const frameworks: { [language: string]: string } = {};

  if (primaryLang === 'python') frameworks.python = 'pytest';
  if (primaryLang === 'typescript' || hasPackageJson) frameworks.typescript = 'jest';
  if (languageBreakdown?.java > 0) frameworks.java = 'junit';
  // ... additional framework detection

  return frameworks;
}
The system creates framework-appropriate test structures, language-specific test patterns and conventions, comprehensive test coverage strategies, and realistic test scenarios based on repository analysis.
Multi-Level Test Generation
The step generates tests at multiple levels:
// Generate unit tests for each detected language
const unitTests = await generateUnitTests(analysis, repoUrl, language, framework);

// Generate integration tests for system interactions
const integrationTests = await generateIntegrationTests(analysis, repoUrl, language, framework);

// Generate end-to-end tests for complete workflows
const e2eTests = await generateE2ETests(analysis, repoUrl);
Each test level provides specific value: unit tests validate individual functions and methods with comprehensive edge case coverage, integration tests verify module interactions and API integrations, and end-to-end tests ensure complete system functionality with user workflow validation.
Test Organization and Documentation
The step creates organized test structure with comprehensive documentation:
// Save tests in organized directory structure
const savedFiles = saveTestSuites(testSuites, repoUrl);

// Generate comprehensive test documentation
const testsReadme = await generateTestsReadme(testSuites, repoUrl);
const readmePath = path.join('assets', 'generated_tests', 'README.md');
The final test package includes organized folder structure (unit/, integration/, e2e/), comprehensive README with running instructions, test statistics and coverage information, and framework-specific setup and configuration guidance.
Testing the Complete System
Test the AI documentation generator using real repository examples to see the complete workflow in action.
Manual API Testing
Test the system by submitting a repository URL through the Workbench Endpoints section:
{
  "repo_url": "<https://github.com/MotiaDev/github-stars-counter>"
}
Submit the payload and watch the complete documentation generation pipeline process your repositories through analysis, documentation, quality review, diagram creation, and test generation.
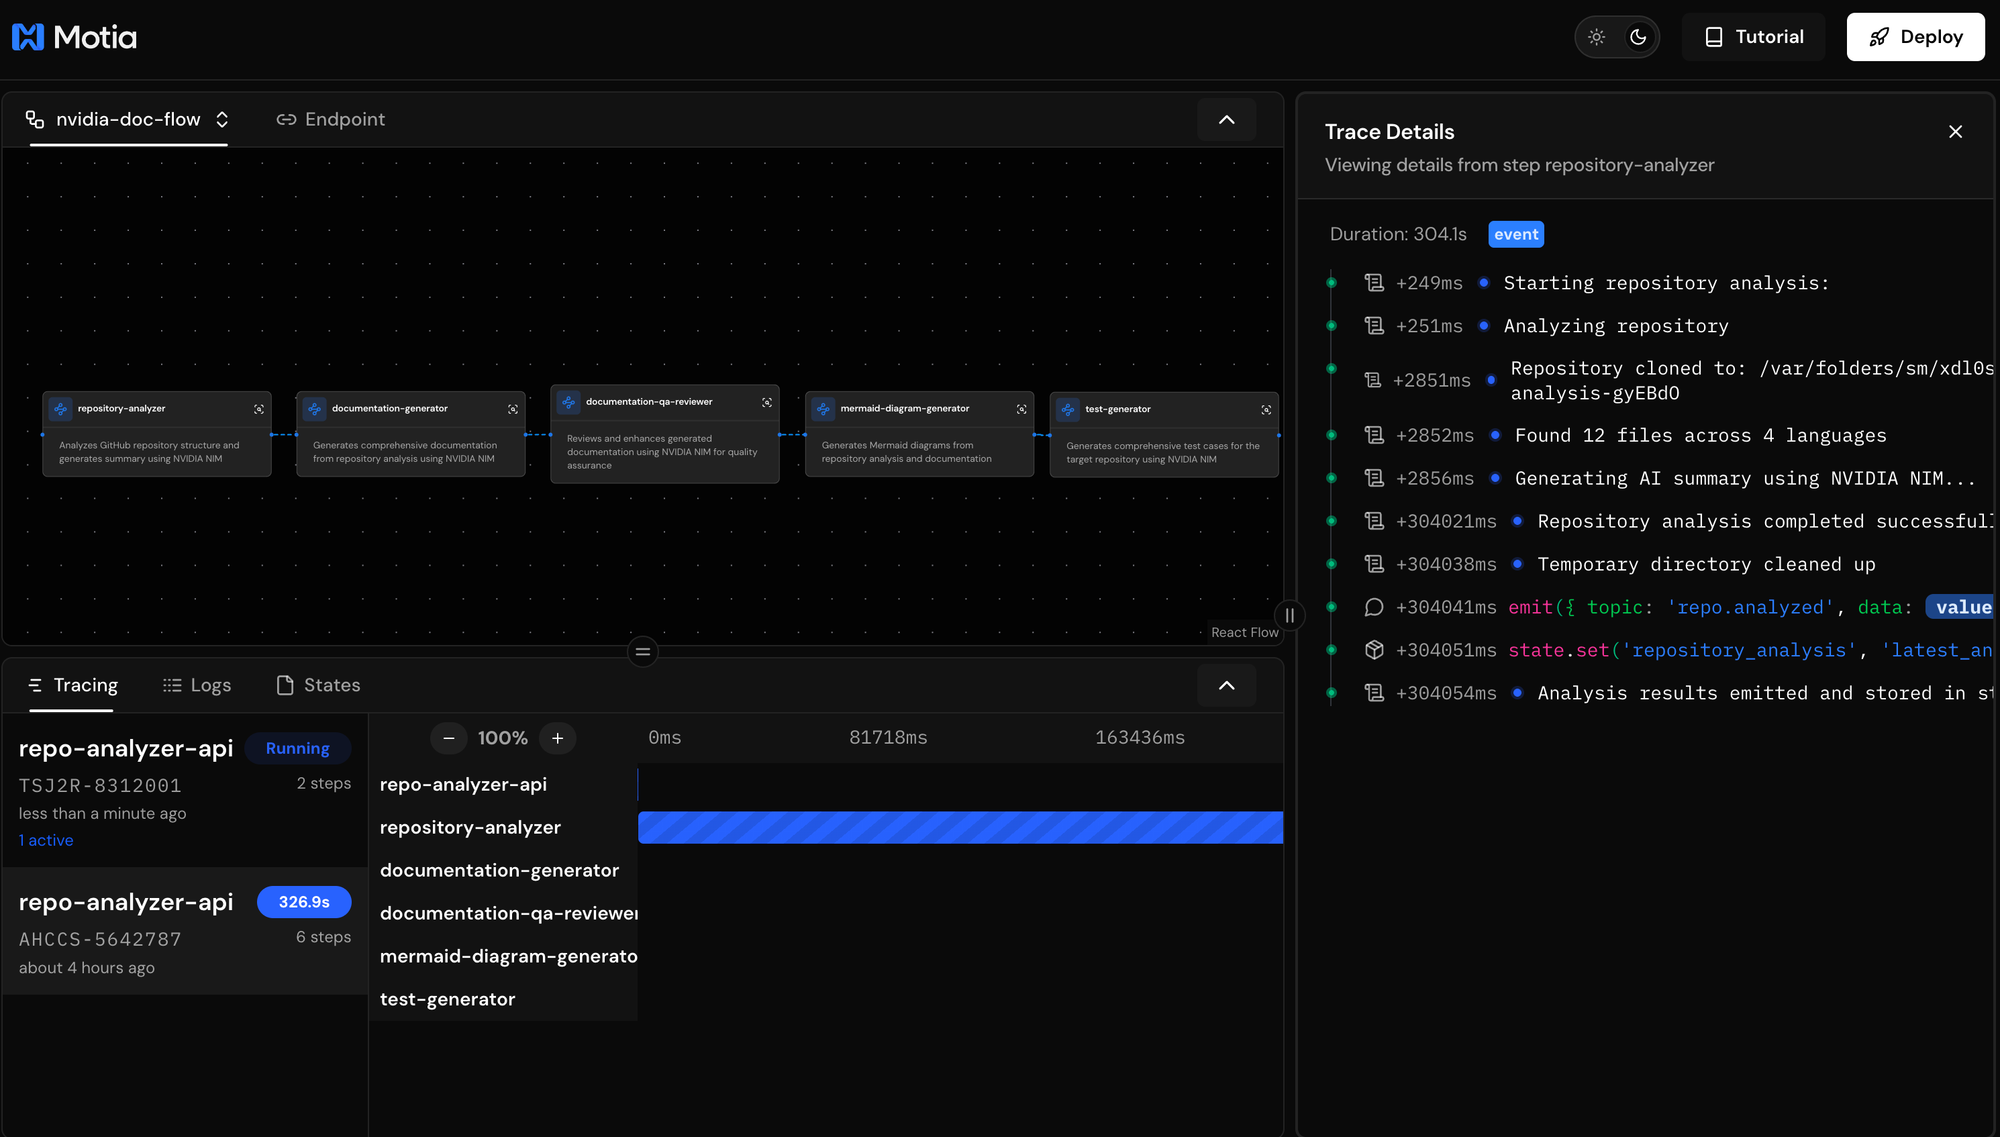
Workflow Monitoring
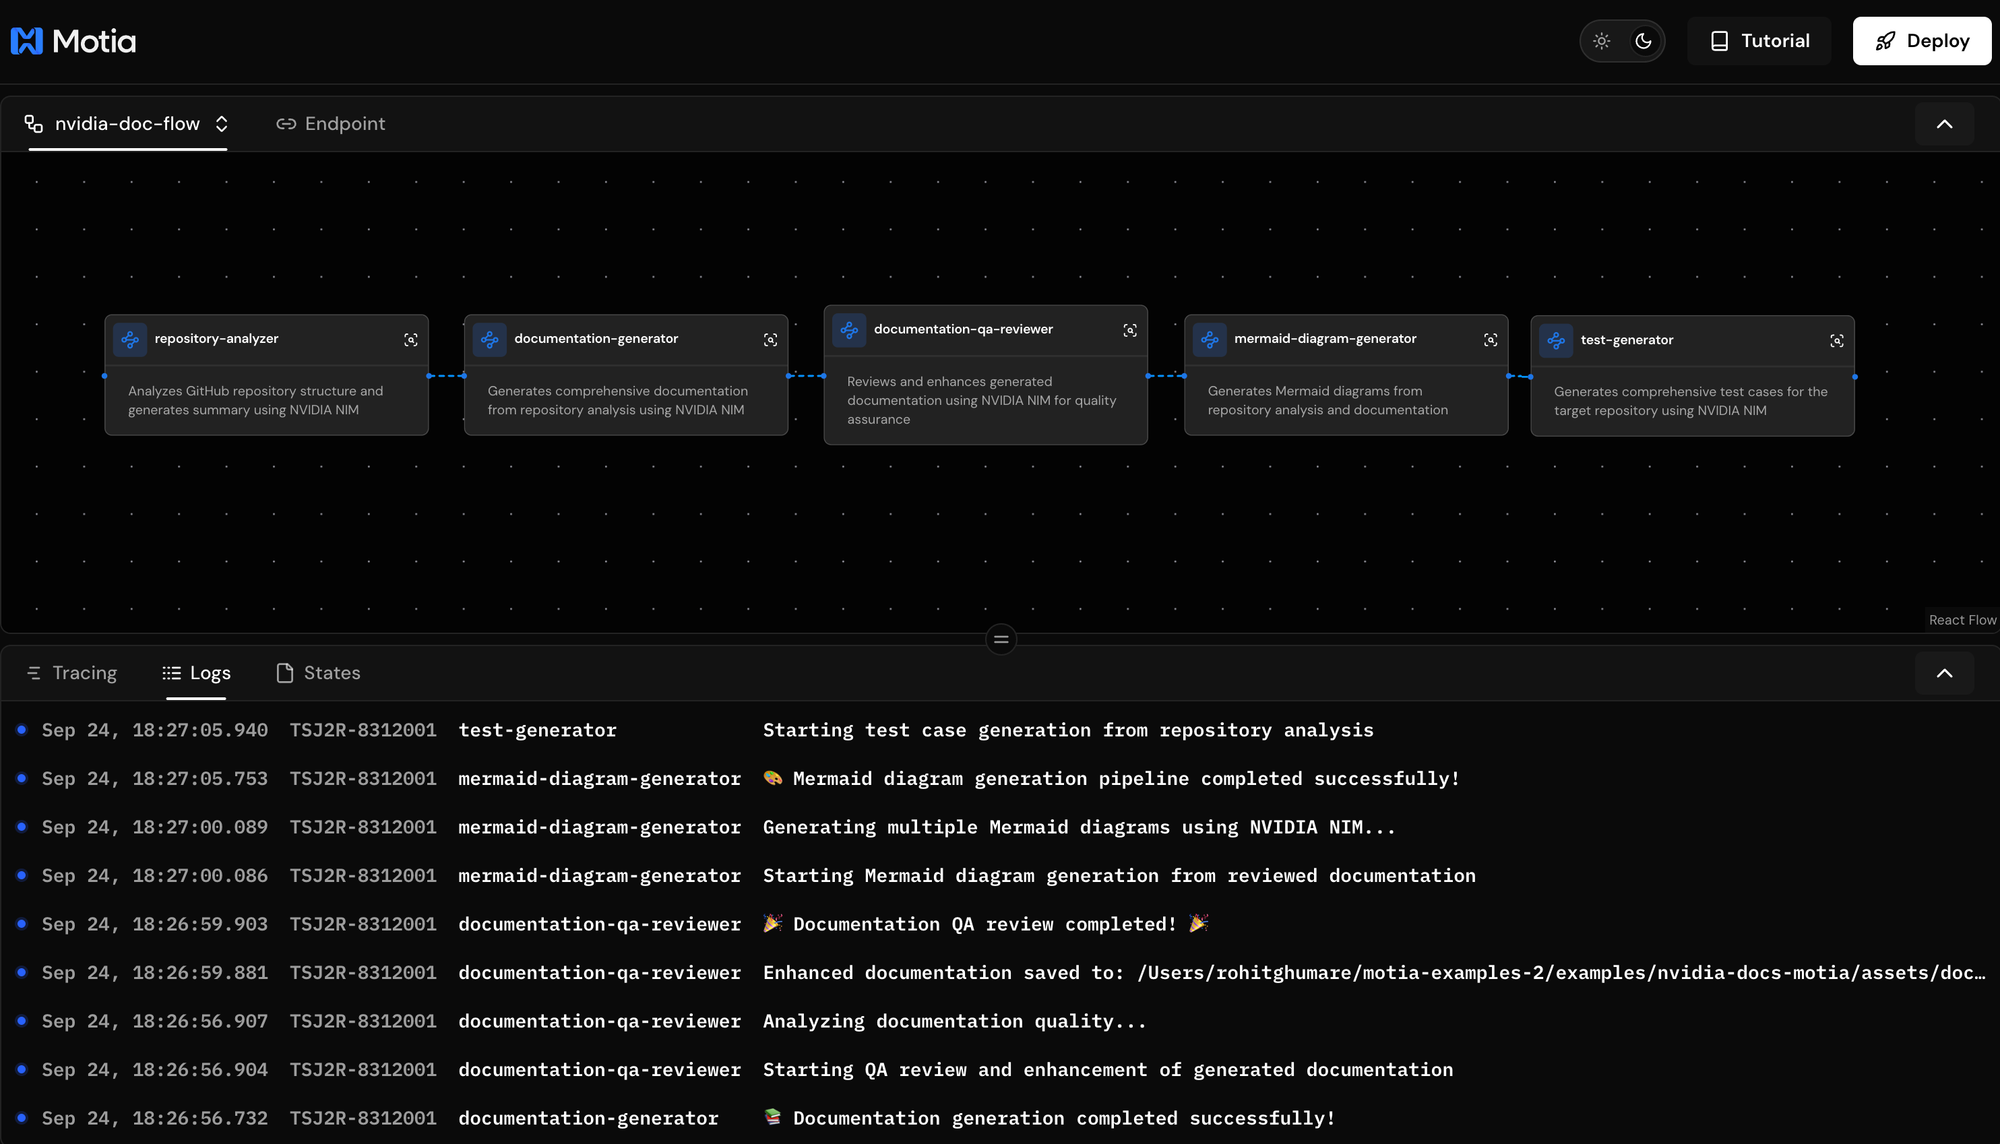
Monitor the complete workflow through Motia's built-in observability tools:
Tracing: See step-by-step execution timing, success/failure status for each phase, resource usage and performance metrics, and complete workflow execution paths.
Logs: Debug issues with detailed error information, monitor AI model performance and responses, track repository analysis progress, and review quality enhancement decisions.
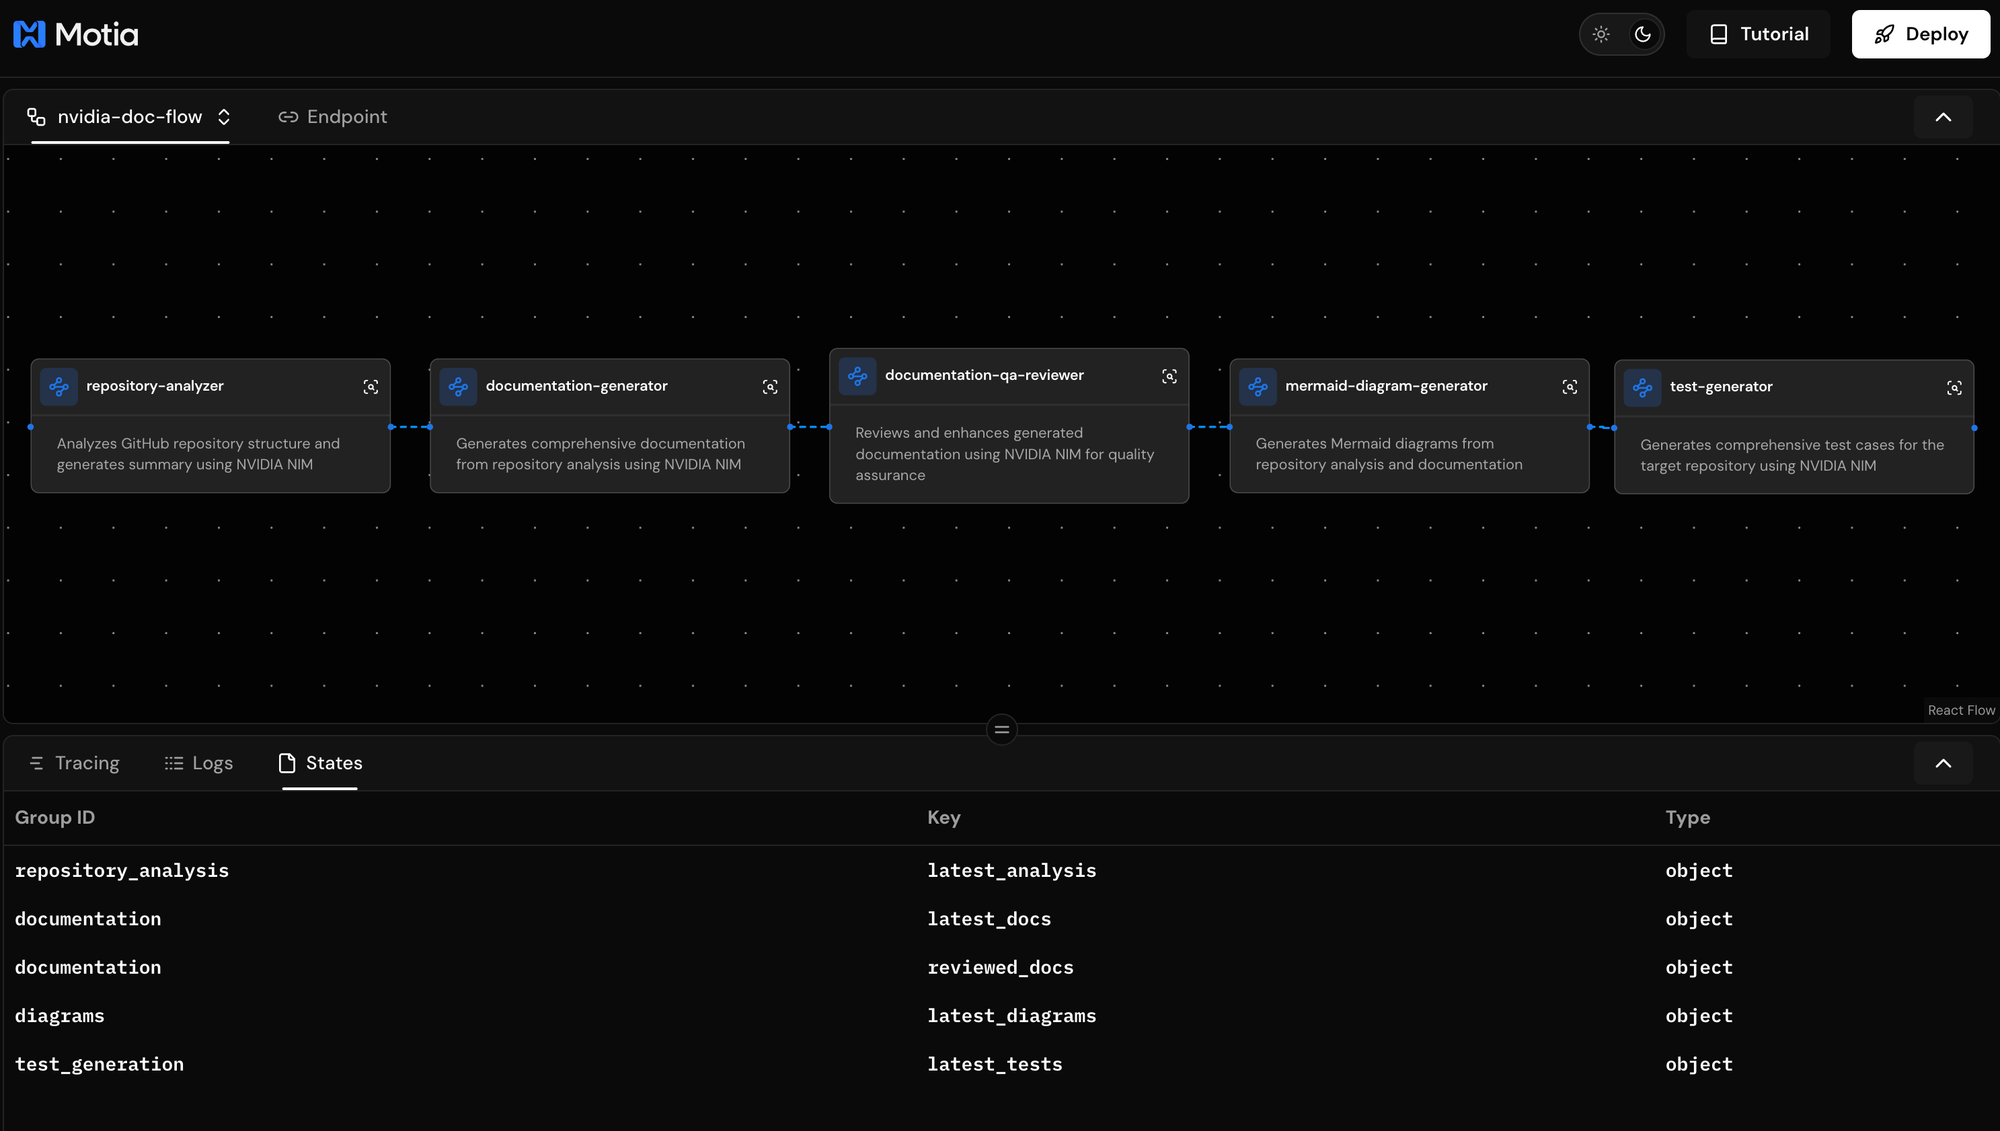
State: View complete repository analysis data, access generated documentation at each stage, examine quality metrics and improvement history, and review comprehensive test generation results.
Generated Assets Exploration
After successful processing, explore the comprehensive generated assets:
Documentation (assets/docs/):
- Complete markdown documentation with multiple sections
- Enhanced content with quality scores and executive summaries
- Professional formatting with language breakdowns and file structures
Diagrams (assets/diagrams/):
- Architecture diagrams showing system components and relationships
- Workflow diagrams displaying development and usage processes
- Component diagrams illustrating module dependencies
- Data flow diagrams mapping information processing
- Directory structure diagrams visualizing repository organization
Tests (assets/generated_tests/):
- Comprehensive unit test suites for detected languages
- Integration tests for module and API interactions
- End-to-end tests for complete system workflows
- Organized folder structure with framework-specific configurations
Conclusion
You've built a complete AI documentation generator using 6 connected workflow steps in Motia. The system receives repository URLs via API, analyzes codebases with NVIDIA NIM's powerful language models, generates comprehensive multi-section documentation, reviews and enhances content for quality and completeness, creates visual Mermaid diagrams for architecture understanding, and produces comprehensive test suites for quality assurance.
The event-driven architecture means each step only runs when needed and connects to the next through simple event emissions. Adding features like custom documentation templates, additional diagram types, or specialized test patterns just requires inserting new steps into the workflow chain. The system demonstrates how AI-powered analysis can help reduce documentation maintenance workload while maintaining professional quality through AI improvement and comprehensive visual documentation.
The complete source code is available in our GitHub repository. Thanks for reading till the end. Please Star (⭐️) our repo, while you're here.