
TL;DR
We'll be walking through building an automated content pipeline that turns your DevTo blog posts into viral tweets using Motia (an open-source unified backend framework).
- The workflow automatically monitors your published articles,
- processes them through AI to generate engaging social media content, and
- provides an API to review and retrieve the generated teets.
No more promotional headaches, just write your blog and let Motia handle everything else.
The why? 🤔
Over the years, as I've written more and more blogs, one of the most annoying and time-consuming parts hasn’t been the writing itself...it’s been the promotion.
Every time I hit publish, I’d open Twitter and stare at the screen, trying to squeeze my 1000-word blog into a punchy, viral-worthy tweet.
It felt repetitive. Forced. And honestly, it sucked the joy out of writing.
And like devs do, I also set out to automate the boring stuff!
I set out to build a simple solution.
- One that means I never have to write promotional tweets
- One that means I don't have to care for the usual engagement tactics
- One that is so seamless that I have to write and forget and have everything else done for me.
If this is you, I'm happy to say I may have something for you.
In the last couple of days, this is exactly what I've been working on and in this post I’ll show you how to go from long-form blog posts to viral tweet! 🔥
The idea was simple: I'll write blog posts and have some LLM service go through it and draft me a bunch of tweets (all tailored for virality) and I'll never have to be concerned with promoting it at all.
And to automate this, I needed to stitch together a few moving parts:
- A service to fetch the latest article (which if needed, can be done periodically by say a CRON job).
- Another service to parse that article, i.e., to extract the content so I could feed structured data into an LLM.
- An LLM service itself that could take the article body and give me a bunch of tweets.
- And finally, an API to retrieve those tweets, ready to publish or schedule, or just store somewhere.
And while this seemed simple, when I set out to do it, I had to context switch across tools, write the glue code, and battle brittle integrations.
This made it seem 'too much work' for such a little app.
That is until, I encountered a tool built precisely for solving this exact problem: the friction of stitching together siloed tools.
Enter Motia

Motia solved the biggest problem I had with my workflow: having to write glue code to stitch together a bunch of moving parts and hoping and praying that everything works as it should, so that I don't have to jump on the "joyride" of debugging what broke where.
With Motia, I had the entirety of the NPM universe at my disposal, and with built-in observability and logging, I didn't have to 'guess' where to begin debugging if something did break.
Armed with Motia's power, what earlier seemed like 'too much work' for such a little app, turned into just chain of steps.
That was because of how Motia approaches backends. In a Motia app, backends are just a series of interconnected Steps: composable, language-agnostic units of logic that seamlessly connect APIs, background jobs, events, and AI agents into unified workflows.
Motia is an open-source unified backend framework for APIs, Workflows, and Agents. It solves the complexity that typically fragments backend development with its unified system.
I'll be super happy if you check us out on GitHub and give us a star! ❤️

Let's begin with our application.
Basic set-up:
Motia apps are really simple. They're stitched together as steps in an event-based system, and each step can emit or subscribe to any other step.
That's all!
Oh, and there's the language agnostic nature of steps (meaning steps can be written in any supported language, even when they're part of the same workflow), the availability of basically the entirety of the NPM (or pip for Python and so on) universe, state of the art observability built-in, one-click deployments with instant rollbacks and many many more features that you can check out.
For our use case, we'll just start off by scaffolding a new Motia project by executing the following command:
npx motia@latest create -i
This command will ask you a few questions like the language (currently TS/JS and Python are supported with support for more languages coming out soon), the project name and whether to add Cursor rules or not, and install all the dependencies.
Once you've answered those, it'll create a project with a basic workflow with a few step files. You can fire up the Workbench and play around by running the following command:
npx motia dev
Now, go ahead and create an .env file for storing all the sensitive API keys.
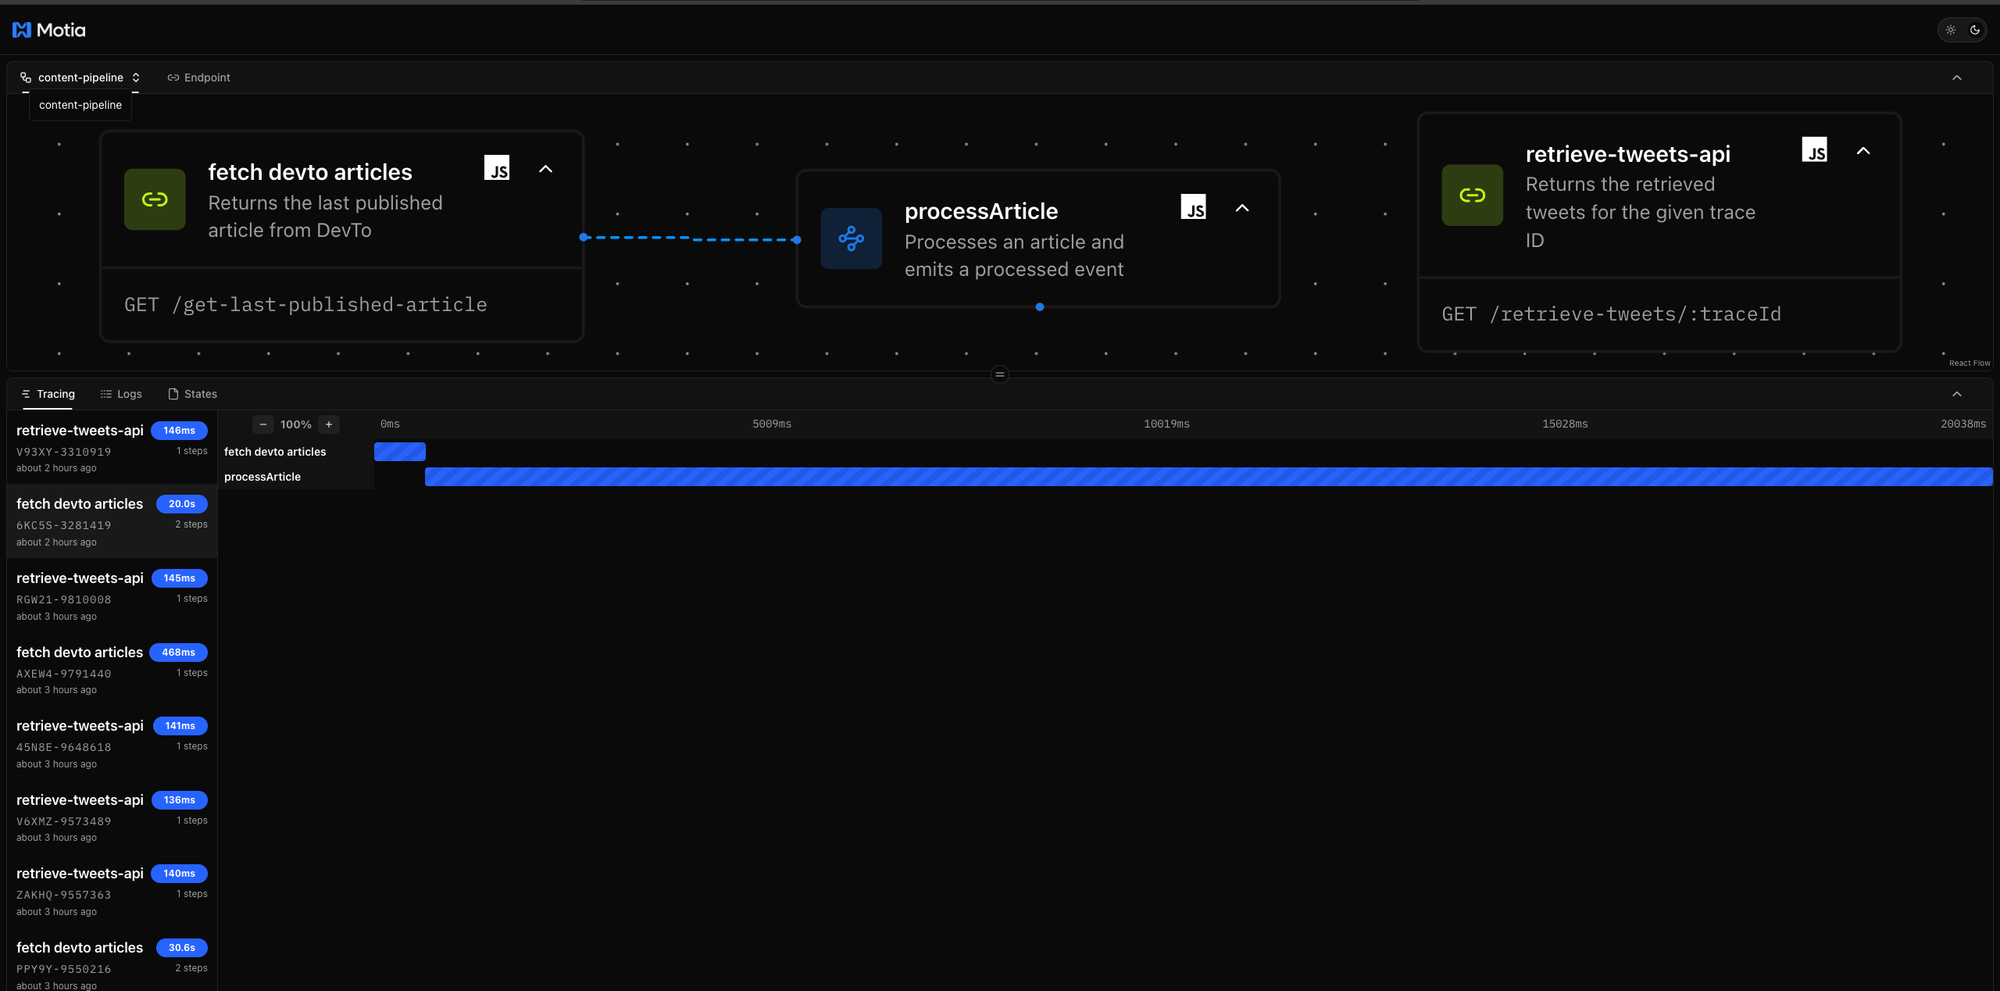
Our app is relatively simple and will be composed of three steps:
- One to fetch the last published article on the user's DevTo account.
- One to send the contents of that article and create tweets based on the article content, and
- And one to fetch the tweets
Before we begin with our app, we just need to keep in mind the following:
- Each Motia app is composed of steps chained together to form a workflow.
- Each step is made up of two things: A configuration object and a handler:
- The configuration object defines what that step is, its type (
API,event,CRONetc), itsname, theworkflowto which it belongs, what event does itemitandsubscribeto, and so on. - The handler function defines what happens when that step is triggered, the actions it performs, and how it interacts with other services or external APIs.
The first step
Let's take a look at the first step. This will serve as the entry point of our app:
import { z } from 'zod'
const { DevToService } = require('../services/dev-to-api-service.js')
const trace_id = process.env.TRACE_ID

exports.config = {
  type: 'api',
  name: 'fetch devto articles',
  emits: ['article.submitted'],
  flows: ['content-pipeline'],
  path: '/get-last-published-article',
  method: 'GET',
  description: 'Returns the last published article from DevTo',
  responseSchema: {
    200: z.object({
      message: z.string(),
    }),
  },
}

exports.handler = async (req, { emit, logger, state, traceId }) => {
  logger.info('Get last published article endpoint was called')

  const list = await axios.get('https://dev.to/api/articles/me/published?page=1&per_page=1', {
    headers: {
      "api-key": devToApiKey,
    }
  });

  const lastId = await state.get(trace_id, 'lastPublishedArticle')

  if (lastId === list.data[0].id) {
    logger.info('No new articles found, skipping emit')
    return {
      status: 200,
      body: { message: 'No new articles found' },
    }
  } else {
    logger.info('New article found, proceeding with emit')
    await state.clear(trace_id, 'lastPublishedArticle')
    await state.set(trace_id, 'lastPublishedArticle', list.data[0].id)

    await emit({
      topic: 'article.submitted',
      data: {
        body: list.data[0].body_markdown
      }
    })
  }

  return {
    status: 200,
    body: { message: 'API step ran successfully', traceId },
  }
}
As you see, this step defines a REST API endpoint at /get-last-published-article that serves as a webhook. The configuration object specifies that this is a GET endpoint designed to integrate with a larger content pipeline workflow, emitting events when new articles are detected.
So, once this API is hit, the step handler function fetches the most recently published article from DevTo using a custom DevToService class.
I've also added a duplicate detection mechanism which compares the current article's ID against a previously stored ID using a persistent state system provided out of the box by Motia.
If a new article is detected (meaning the latest article ID differs from the stored one), the system updates its state with the new article ID and emits an article.submitted event containing the article's markdown content.
This event-driven architecture allows other parts of the application to react to new content automatically.
Now, since we have the article data, it is time to forward the response from this API step to some LLM service to turn it into tweets.
Forwarding the article to an LLM service
The next step in our app should subscribe to the event emitted by this event, which, from the step configuration, is:
const z = require('zod');
const OpenAI = require('openai');

exports.config = {
  type: 'event',
  name: 'processArticle',
  description: 'Processes an article and emits a processed event',
  subscribes: ['article.submitted'],
  emits: ['processedArticle'],
  input: z.object({ body: z.string() }),
  flows: ['content-pipeline'],
};

exports.handler = async ({ body }, { emit, logger, state, traceId }) => {
  const openai = new OpenAI({
    apiKey: process.env.OPENAI_API_KEY,
  });

  const prompt = `
You are a viral content strategist for developer communities on X (formerly Twitter).

Your job is to:
1. Extract key themes, hooks, and keywords from the Markdown article below
2. Use them to craft 3–5 viral tech tweets that developers will engage with
3. Use formats like:
   - "classic": Hook + Insight + Callback
   - "listicle": Numbered or emoji-style list
   - "quote": Standalone punchy insight

Output a JSON array like:
[
  {
    "type": "classic" | "listicle" | "quote",
    "tweet": "actual tweet (≤280 chars)",
    "reason": "why this tweet would go viral"
  },
  ...
]

Audience: Developers, engineers, tech influencers. Optimize for shareability, clarity, and specificity. Don’t copy paste the article. Distill and remix.

Only return the JSON. Here’s the article:

\`\`\`md
${body}
\`\`\`
`;

  try {
    const response = await openai.chat.completions.create({
      model: 'gpt-4',
      messages: [{ role: 'user', content: prompt }],
      max_tokens: 2000,
      temperature: 0.7,
    });

    const raw = response.choices[0]?.message?.content?.trim() || '[]';

    logger.info('🧵 Tweets generated from article');

    await state.set(traceId, 'tweets', raw);


    return {
      status: 200,
      body: { message: 'Tweets generated.' },
    };
  } catch (error) {
    logger.error('❌ Failed to generate tweets:', error.message);
    return {
      status: 500,
      body: { message: 'LLM failed to generate tweets.' },
    };
  }
};
Unlike the previous step which was an API endpoint, this is configured as an event step that subscribes to the article.submitted event.
When the first step detects a new DevTo article and emits that event, this step automatically springs into action without requiring manual triggering or external API calls.
This step leverages an LLM service to transform long-form article content into bite-sized social media posts. It takes the markdown content from the original article and uses AI to extract key points, insights, or summaries that work well as tweets.
The step handler receives the article's markdown body from the event payload and passes it to the tweet generator. This demonstrates a common pattern in content automation where lengthy blog posts are automatically repurposed into multiple social media formats, saving content creators significant time and effort.
After generating the tweets, the system stores them in the persistent state using the trace ID. This will allow us to retrieve the generated tweets for publishing, scheduling, or further processing.
The trace ID ensures that all related data for a single article remains connected throughout the entire workflow. It uses Motia's built-in state management functionality to store and retrieve tweets.
The response of this step gives us the tweets that can be stored and retrieved later.
Let's write another API step that retrieves all the tweets we've stored in the State:
const { z } = require('zod')
exports.config = {
type: 'api',
name: 'retrieve-tweets-api',
path: '/retrieve-tweets/:traceId',
emits: [],
flows: ['content-pipeline'],
method: 'GET',
description: 'Returns the retrieved tweets for the given trace ID',
responseSchema: {
200: z.object({
message: z.array(z.object({
type: z.enum(['classic', 'listicle', 'quote']),
tweet: z.string().max(280),
reason: z.string(),
}))
}),
},
}
exports.handler = async (req, { logger, state }) => {
logger.info('Retrieve endpoint was called')
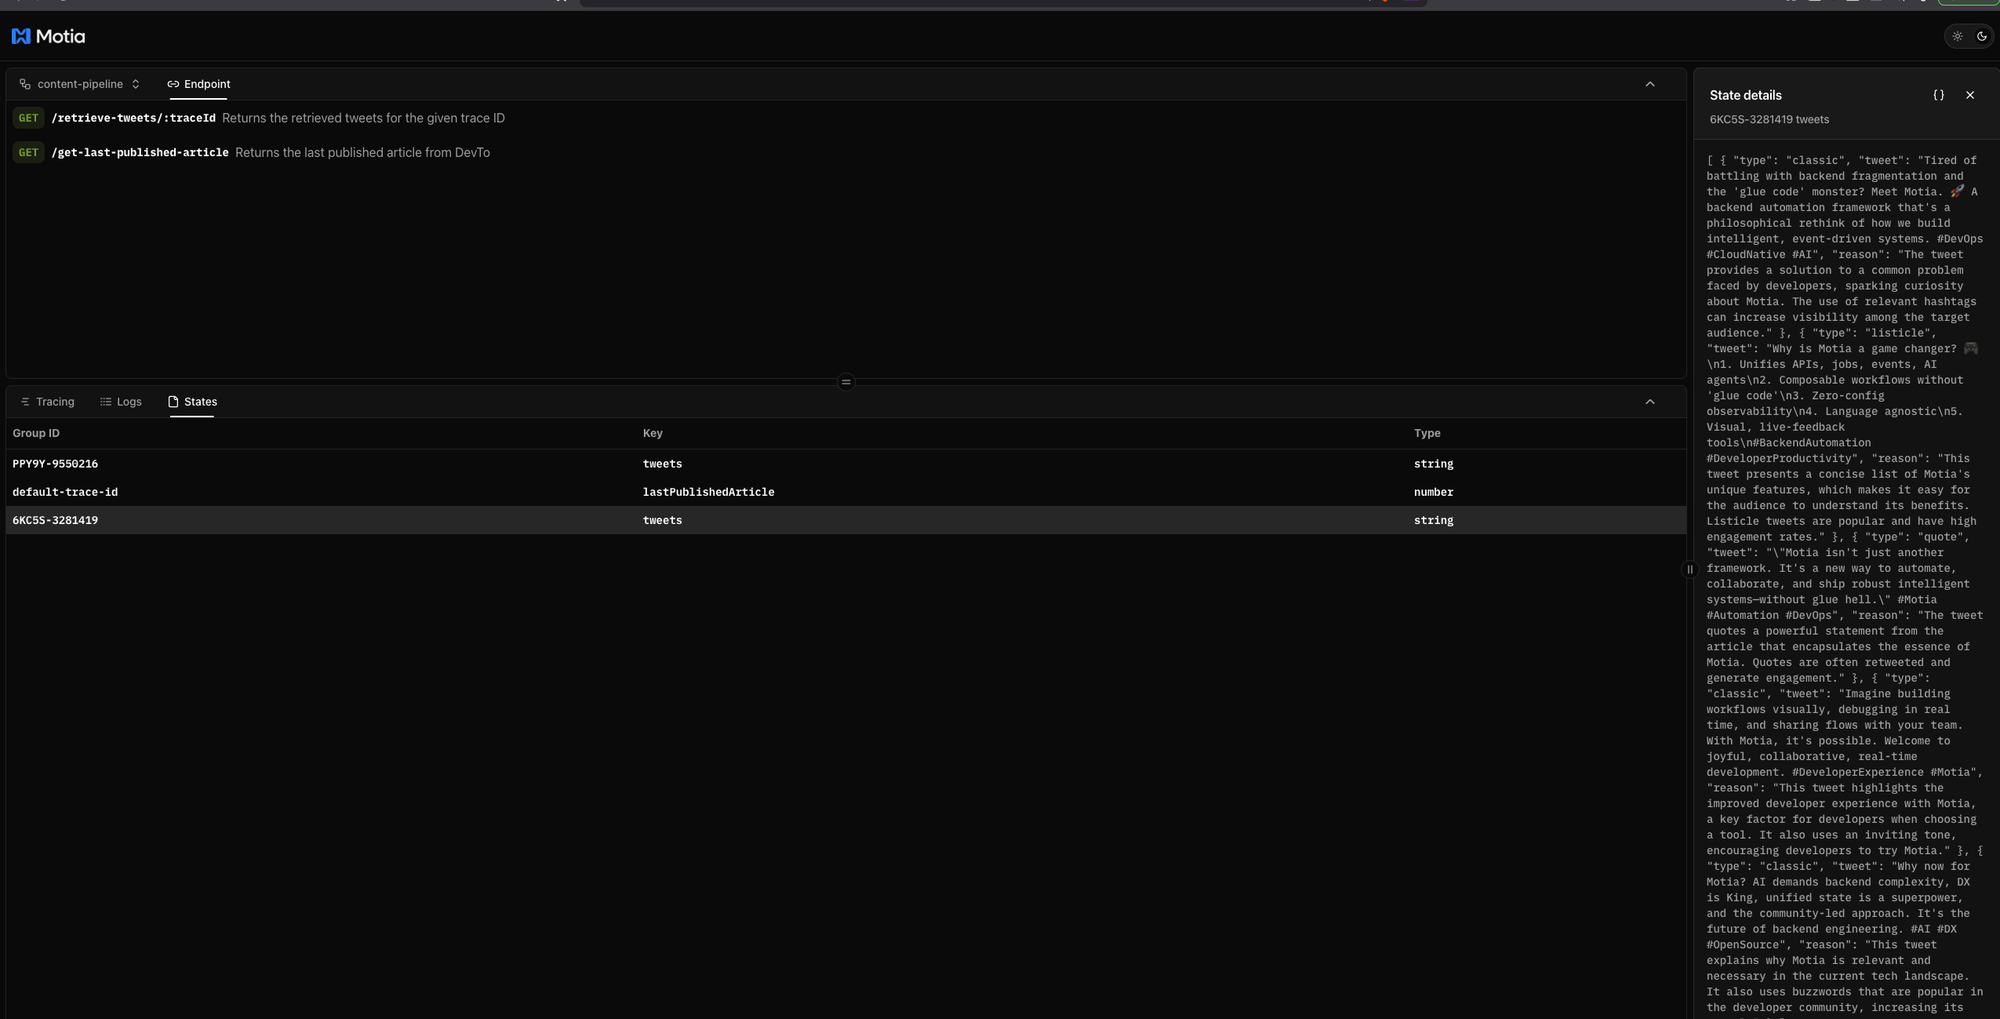
const tweets = await state.get(req.pathParams.traceId, 'tweets')
return {
status: 200,
body: { message: tweets },
}
}
This step is again an API endpoint (defined by the property type: 'api' in the step.config object) that uses a parameterized URL pattern (/retrieve-tweets/:traceId) that allows clients to fetch specific tweet sets by providing the trace ID.
This design makes it easy to be consumed for external applications, dashboards, or manual review processes to access the generated content.
The handler connects back to the persistent state system, using the trace ID to retrieve the tweets that were stored by the previous processing step, thereby demonstrating how the trace ID serves as a key that links all related data throughout the entire pipeline workflow.
This endpoint essentially provides a "review before publish" mechanism. Frontend apps can call this API to see what tweets were generated from their article, review the AI's selections and reasoning, and then decide which ones to actually post to social media.
Going forward from here, you can deploy this app to Motia Cloud or even have this app run on a schedule using a CRON step.
That's it!
If you've followed this guide, you'll have a complete automated content pipeline that transforms your DevTo articles into ready-to-publish social media content.
Your system now:
- Automatically monitors your DevTo publications, detecting new articles the moment they're published without any manual intervention.
- Intelligently processes each article through AI-powered content generation, extracting the most engaging points and reformatting them into Twitter-optimized posts with different styles and approaches.
- Provides easy access to review and retrieve your generated tweets through a clean API, giving you full control over what gets published while saving hours of manual content creation.
The beauty of this event-driven architecture is that it scales effortlessly. Moreover, with built-in observability and tracing, when something goes wrong (and it inevitably will), you won't be left guessing. The structured logging and tracing system lets you pinpoint exactly where in the pipeline an issue occurred, what data was being processed at the time, and how the system responded.
You can extend this foundation by adding scheduling capabilities, direct social media posting, or even support for other platforms like LinkedIn or Mastodon.
You can access the code for this as well as several other Motia examples in our community repo.
Lastly, if you're stuck anywhere and need me, I'm always available here
This project was made possible by Motia and it takes a lot of time and effort to come up with tutorials like this, so if you'd spare a moment and star its GitHub repo, it would mean a lot to me. Thanks for your support! ⭐⭐⭐⭐⭐
https://github.com/MotiaDev/motia

Don't forget to comment below if you liked the post.
Have a great one, bye! 👋